Knitty: little purls of wisdom
Fat Cat Knits
Title
beauty shot

Tangy

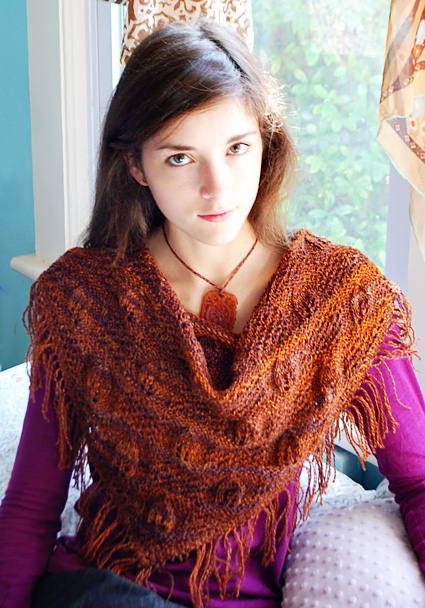
Throw this leafy triangle around your neck or wrap it with a pin, add fringe or leave it plain. Any way you chose, you’ll find this easy lace pattern addictive. Since it looks great in any yarn weight you’ll definitely be knitting more than one. The secret is to use larger needles than recommended for the yarn, maybe 2 sizes, maybe 4, depending on the body of your chosen yarn.

Spinners will love the scrumptiousness of Three Waters Farm Blue Face Leicester/Tussah Silk fiber, shown here in Canyonlands. The body and luster of this fiber make it perfect for lace yarns, and the colorway is, dare we say, indigenous, natural, chameleonesque. The Three Waters Farm Organic Merino Sport would also work very nicely.

The pattern is built on tiers of alternating bee stitch and leaf stitch squares. Easily memorized, this pattern can be repeated to form any size triangle. Suggested yardage is included for two versions.


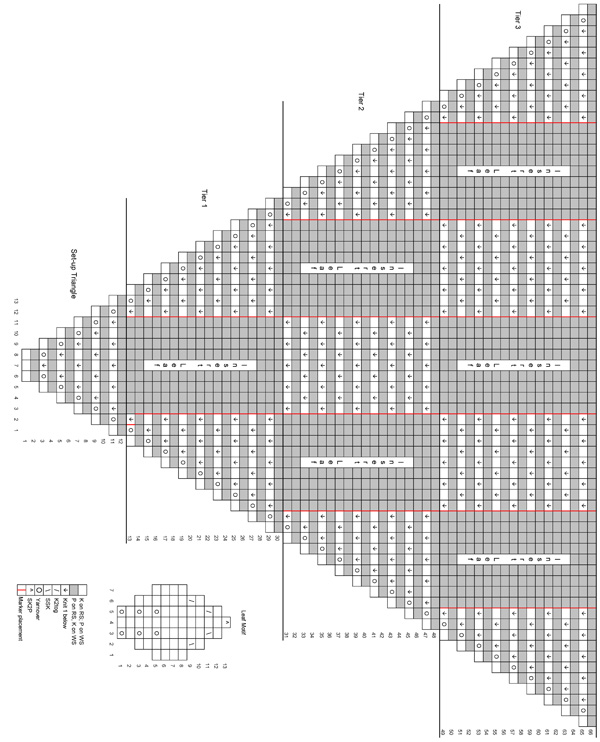
After the setup triangle, each tier begins the same way, with a right hand bee triangle and a leaf square. The first tier finishes with a left hand bee triangle. The second tier inserts a pair of bee/leaf squares. Each successive tier inserts one more pair of squares. Separate each square with stitch markers and it’s a cinch to keep your place in the pattern.

spacer model: Lauren Cabe spacer photos: Lynne Vogel

SIZE
One
(final size determined by yarn, gauge and number of tiers knitted)

spacer

FINISHED MEASUREMENTS
Handspun version:
Width: 44 inches
Length: 17 inches without fringe

Commercial version:
Width: 72 inches
Length: 25 inches, without fringe

spacer

MATERIALS
Fiber

spacer Three Waters Farm [75% BFL/25% tussah silk; handpainted top, approximately 375 yds without fringe, 425 with fringe]; color: Canyonlands (rust/lilac); 4 ounces

Finished Yarn
spacer Wraps per inch: 18
spacer Yardage used: 425 yards

Drafting Method
spacer Short forward draw

Commercial Yarn Alternative

spacer Plymouth Yarn Dye for Me “baby llama glow”] [95% baby llama, 5% Stellina; 273 yd/m per 125g skein]; color: natural (undyed); 2 skeins


Recommended needle size
[always use a needle size that gives you the gauge listed below -- every knitter's gauge is unique]
spacer Handspun version: 1 24 inch US #8/5 mm circular needle
spacer Commercial version:1 24 inch US #10/6 mm circular needle

gearbox

Spinning Tool: Timbertops Leicester; [double drive]
Niddy Noddy: Fricke skein winder with counter
Lazy Kate: Katie-A-Go-Go

Tools

crochet hook
, 1-2 sizes smaller than knitting needles used:
spacer Handspun version: US G/6 crochet hook
spacer Commercial version: US I/9 crochet hook

spacer stitch markers

spacer

GAUGE

Handspun:
16 sts/28 rows = 4 inches in stockinette stitch
9 sts/18 rows = 3 inches in leaf pattern stitch

Commercial:
14 sts/24 rows = 4 inches in stockinette stitch
12 sts/24 rows = 4 inches in leaf pattern stitch
 

PATTERN NOTES
[Knitty's list of standard abbreviations and techniques can be found here.]

Bee Stitch
Bee stitch is almost as easy as garter stitch. On the right side of the work, you alternate k1, k1b. On the wrong side you knit. Every odd row, you alternate the stitches you knit below (k1b, k1).

K1b [Knit 1 below]: Knit into the stitch below the stitch on the needle. When you slide the stitch off, the old stitch will lay as a float on top of the knitted stitch.

Ripping out
This stitch is really easy to knit, but can be a little challenging to rip out. Let’s talk about the stitch anatomy first. Work two rows of bee. Now you are at the beginning of a right side row. Pull down on your fabric a little and you can see that the stitches that you knit below two rows previous will have a double strand (DS). Stitches you knit normally only have one single strand (SS). The easiest way to keep your place when knitting bee stitch is to look for the DS stitch. Knit the stitch above the DS stitch as a normal knit stitch, then knit below on the stitch above the SS stitch.

If you make a mistake and catch it early enough, just unknit and reform your stitches as you go.

If you have to rip out a lot, then make sure you rip so that you put the ws row back on the needles. Since this row is a simple knit row, you won’t have to worry about any double strands from knitting below and it will be easy to find each stitch. You might want to practice by ripping out your sample swatch to get the hang of it.

Single Crochet/K2tog Bind Off
Knit two stitches, place both stitches back on left hand needle, k2tog through the back of the loops, [k1 (2 stitches on right hand needle), place both stitches back on left hand needle, k2tog through the back of the loops]. Repeat between [ ] until all stitches are bound off. Leave last loop live to use as first loop of crochet edging.

Ch: Chain
SC: Single crochet

"Knitchet": Working Crochet With Two Knitting Needles
Don’t crochet? You can get the same look with two knitting needles.
To start working the crochet edging, begin with the last loop of your bound off edge.
For each Ch, return stitch to left hand needle. Knit one.
For each SC, with one stitch already on your right hand needle, pick up and knit one stitch into edge as described in pattern (2 stitches on right hand needle). Return both stitches to left hand needle, k2tog through the back of the loop (1 stitch remaining).

If you’ve got a hook, more traditional crochet instructions can be found here.

spacerCharts
The charts for this pattern are very large and fit on a letter-sized page.
Click here and print the resulting page.

DIRECTIONS
SHAWL
Work from either the chart or the written instructions, whichever you prefer.

Set-up Bee Triangle:
Cast on 3 stitches.

Row 1 [RS]: Knit.

Row 2 [WS] and all even rows to row 12: Knit.

Row 3 [RS]: K1, yo, k1b, yo, k1. (5 sts)

Row 5 [RS]: K1, yo, k1b, k1, k1b, yo, k1. (7 sts)

Row 7 [RS]: K1, yo, [k1b, k1] twice, k1b, yo, k1. (9 sts)

Row 9 [RS]: K1, yo, [k1b, k1] three times, k1b, yo, k1. (11 sts)

Row 11 [RS]: K1, yo, [k1b, k1] four times, k1b, yo, k1. (13 sts)

Tier One (Right Side bee triangle, marker, Leaf Square, marker, Left Side Bee Triangle)

Row 13 [RS]: K1, yo, k1b, place marker, p9, place marker, k1b, yo, k1.

Row 14 [WS]: Knit.

Row 15 [RS]: K1, yo, k1b, k1, slip marker, p4, yo, k1, yo, p4, slip marker, k1, k1b, yo, k1.

Row 16 [WS]: Knit to marker (4 sts), slip marker, k4, p3, k4, slip marker, knit to end.

Row 17 [RS]: K1, yo, k1b, k1, k1b, slip marker, p4, [k1, yo] twice, k1, p4, slip marker, k1b, k1, k1b, yo, k1.

Row 18 [WS]: Knit to marker (5 sts), slip marker, k4, p5, k4, slip marker, knit to end.

Row 19 [RS]: K1, yo, [k1b, k1] twice, slip marker, p4, k2, yo, k1, yo, k2, p4, slip marker, [k1, k1b] twice, yo, k1.

Row 20 [WS]: Knit to marker (6 sts), slip marker, k4, p7, k4, slip marker, knit to end.

Row 21 [RS]: K1, yo, [k1b, k1] twice, k1b, slip marker, p4, k7, p4, slip marker, [k1b, k1] twice, k1b, yo, k1.

Row 22 [WS]: Knit to marker (7sts), slip marker, k4, p7, k4, slip marker, knit to end.

Row 23 [RS]: K1, yo, [k1b, k1] three times, slip marker, p4, ssk, k3, k2tog, p4, slip marker, [k1, k1b] three times, yo, k1.

Row 24 [WS]: Knit to marker (8 sts), slip marker, k4, p5, k4, slip marker, knit to end.

Row 25 [RS]: K1, yo, [k1b, k1] three times, k1b, slip marker, p4, ssk, k1, k2tog, p4, slip marker, [k1b, k1] three times, k1b, yo, k1.

Row 26 [WS]: Knit to marker (9 sts), slip marker, k4, p3, k4, slip marker, knit to end.

Row 27 [RS]: K1, yo, [k1b, k1] four times, slip marker, p4, SK2P, p4, slip marker, [k1, k1b] four times, yo, k1.

Row 28 [WS]: Knit.

Row 29 [RS]: K1, yo, [k1b, k1] four times, k1b, slip marker, p9, slip marker, [k1b, k1] four times, k1b, yo, k1.

Row 30 [WS]: Knit.

Tier Two: (Right Side Bee Triangle, marker, Leaf Square, marker, Bee Square, marker, Leaf Square, marker, Left Side Bee Triangle)

Row 31 [RS]: K1, yo, k1b, place marker, **p9, slip marker, [k1b, k1] four times, k1b**, slip marker, p9, place marker, k1b, yo, k1.

Row 32 [WS]: Knit.

Row 33 [RS]: K1, yo, k1b, k1, slip marker, **p4, yo, k1, yo, p4, slip marker, [k1, k1b] four times, k1**, slip marker, p4, yo, k1, yo, p4, slip marker, k1, k1b, yo, k1.

Row 34 [WS]: Knit to first marker (4 sts), slip marker,** k4, p3, k4, slip marker, knit to next marker**, slip marker, k4, p3, k4, slip marker, knit to end.

Row 35 [RS]: K1, yo, k1b, k1, k1b, slip marker, **p4, [k1, yo] twice, k1, p4, slip marker, [k1b, k1] four times, k1b**, slip marker, p4, [k1, yo] twice, k1, p4, slip marker, k1b, k1, k1b, yo, k1.

Row 36 [WS]: Knit to first marker (5 sts), slip marker, **k4, p5, k4, slip marker, knit to next marker**, slip marker, k4, p5, k4, slip marker, knit to end.

Row 37 [RS]: K1, yo, [k1b, k1] twice, slip marker, **p4, k2, yo, k1, yo, k2, p4, slip marker, [k1, k1b] four times, k1**, slip marker, p4, k2, yo, k1, yo, k2, p4, slip marker, [k1, k1b] twice, yo, k1.

Row 38 [WS]: Knit to first marker (6 sts), slip marker, **k4, p7, k4, slip marker, knit to next marker (9 sts)**, slip marker, k4, p7, k4, slip marker, knit to end.

Row 39 [RS]: K1, yo, [k1b, k1] twice, k1b, slip marker, **p4, k7, p4, slip marker, [k1b, k1] four times, k1b**, slip marker, p4, k7, p4, slip marker, [k1b, k1] twice, k1b, yo, k1.

Row 40 [WS]: Knit to first marker (7 sts), slip marker, **k4, p7, k4, slip marker, knit to next marker (9 sts)**, slip marker, k4, p7, k4, slip marker, knit to end.

Row 41 [RS]: K1, yo, [k1b, k1] three times, slip marker, **p4, ssk, k3, k2tog, p4, slip marker, [k1, k1b] four times, k1**, slip marker, p4, ssk, k3, k2tog, p4, slip marker, [k1, k1b] three times, yo, k1.

Row 42 [WS]: Knit to marker (8 sts), slip marker, **k4, p5, k4, slip marker, knit to next marker (9 sts)**, slip marker, k4, p5, k4, slip marker, knit to end.

Row 43 [RS]: K1, yo, [k1b, k1] three times, k1b, slip marker, **p4, ssk, k1, k2tog, p4, slip marker, [k1b, k1] four times, k1b**, slip marker, p4, ssk, k1, k2tog, p4, slip marker, [k1b, k1] three times, k1b, yo, k1.

Row 44 [WS]: Knit to marker (9 sts), slip marker, **k4, p3, k4, slip marker, knit to next marker**, slip marker, k4, p3, k4, slip marker, knit to end.

Row 45 [RS]: K1, yo, [k1b, k1] four times, slip marker, **p4, SK2P, p4, slip marker, [k1, k1b, four times, k1**, slip marker, p4, SK2P, p4, slip marker, [k1, k1b] four times, yo, k1.

Row 46 [WS]: Knit.

Row 47 [RS]: K1, yo, [k1b, k1] four times, k1b, slip marker, **p9, slip marker, [k1b, k1] four times, k1b**, slip marker, p9, slip marker, [k1b, k1] four times, k1b, yo, k1.

Row 48 [WS]: Knit.

Tier Three: (Right Side Bee Triangle, Leaf Square, Bee Square, Leaf Square, Bee Square, Leaf Square, Left Side Bee Triangle)
Follow instructions for Tier Two, repeating directions between pairs of ** twice.

Tier Four: Follow instructions for Tier Two, repeating directions between pairs of ** 3 times.

Tier Five: Follow instructions for Tier Two, repeating directions between pairs of ** 4 times.
And so forth.

Knit until you have completed desired number of Tiers.
Handspun version has 7 Tiers, commercial version has 8.

Bind off using Single Crochet/K2tog Bind-off (see notes).

spacer

FINISHING
Crochet around edge as follows:
With RS facing, starting in the upper right hand corner of the triangle, work one single crochet into each bound off stitch across to the left hand corner.
In the last stitch of the bind off row, work [1sc, 2ch, 1sc] into that stitch.

Head down the side, working [ch1, sc1 into the hole formed from the yarn over] until you reach the bottom point of the triangle.

In the bottom point work [ch1, sc1 ch2, sc1, ch1] to turn in the point.

Work [sc1, ch1] up the other side until you get to the starting point. Join round with a slip stitch. Turn.
Ch2, sc1 into hole formed by ch in previous row, [ch1, sc1] to bottom pointWork [ch1, sc1, ch2, sc1, ch1] to turn in the bottom point.

Work [sc1, ch1] to upper left hand corner. In the corner stitch, work [sc1, ch2, sc1] to turn in the corner.

Work sc1 in each stitch from previous round to right hand corner. Turn corner in last stitch by working [sc1, ch2, sc1, ch1]. Join rnd with slip stitch and finish off.

Fringe (optional):
For a 7-tier shawl, cut 148 10-inch lengths of yarn (one for each chain stitch in side of triangle, 4 for point of triangle). For each additional tier worked, add another 24 lengths.

Pull one 10-inch length of yarn through each single crochet stitch on side edges of triangle and fasten with a lark’s head knot so that you have a double strand of fringe.

At both top side corners of the triangle, tie three strands of fringe (two from the first pair and one from the next working towards the point of the triangle) with an overhand knot. Working towards the point, take one strand from each neighboring pair and tie them together with an overhand knot.

spacer
ABOUT THE DESIGNER

Eat, sleep, spin, knit, (dye, crochet, weave, felt) usually with dog attached and hubby looking on.

You’ll find more of her patterns in her Etsy store. She keeps a blog, and on Ravelry, she's lizzydoone. Find her on Facebook as "Lynne Vogel Limited Editions".

spacer