Knitty: little purls of wisdom
Ruby Lane
Title
beauty shot Sharon Rose

Tangy

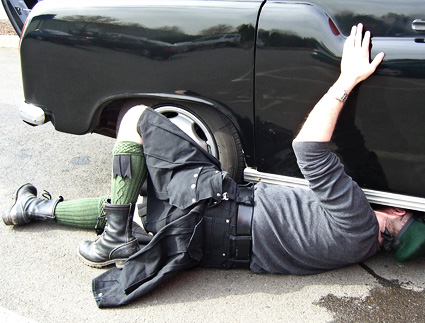
This pair of kilt hose was designed for my then-husband, who was never quite satisfied with the tall socks available at the local Scottish shop. His clan, Rose of Kilravock (pronounced “Kill-rock”), has their ancestral castle near Inverness in Scotland. He grew up wearing the traditional tartan but has since discovered the oh-so-practical Utilikilt. I knit these as a means of encouraging him to wear the kilt as frequently as possible. It was those legs, after all, that caught my eye the first time I saw him.

Kilravock starts with a heavily cabled cuff that folds over to hide garters, although they will stay up on their own. A ribbed leg ensures a perfect fit to show off the lad’s calves, and a simple cable adds interest down the side of the leg. When worn, change in the leg diameter creates a shift in the cable: It’s rounder near the top and gradually elongates as it approaches the ankle. Knit from the top down with DPNs or circulars, Kilravock is easily adjusted for different sizes.

spacer model: Matt Rose spacer photos: Sharon Rose


SIZE

One accommodating size. The ribbed leg and instep will stretch to fit most adult men. Adjust the length of the foot to suit your wearer. See Pattern Notes to modify for a custom fit. Shown in shoe size 11.5, calf 15 inch circumference.

spacer

FINISHED MEASUREMENTS
Leg length as shown: 21 inches from bottom of heel to edge of cuff (with cuff unfolded). Adjustable to fit. Cuff circumference: 14 inches, unstretched. Ankle circumference: 7 inches, unstretched.
Foot length as shown: 10 inches. Adjustable to fit.

spacer

MATERIALS
Yarn

spacer Schoeller & Stahl Fortissima Socka [75% superwash wool, 25% polyamide; 420m per 100g skein]; color 2090; 2 skeins.
Note: The sample socks required just short of two skeins.


Recommended needle size
[always use a needle size that gives you the gauge listed below -- every knitter's gauge is unique]
spacer 1 set US #1.5/2.5mm double-point needles
OR
spacer 1 32 inch long US #1.5/2.5mm circular needle for magic loop method
OR
spacer 2 shorter US #1.5/2.5mm circular needles for two-circulars method

spacer Crochet hook for edging, size US3/3.25mm

Notions
spacer Yarn needle
spacer 3 stitch markers – 1 should be a different color or style
spacer Cable needle

GAUGE
30 sts/40 rounds = 4 inches in stockinette stitch in the round
Cable panels: Cuff Chart = 2 inches wide. Leg chart = 1.1 inches wide relaxed.


PATTERN NOTES
[Knitty's list of standard abbreviations and techniques can be found here.]

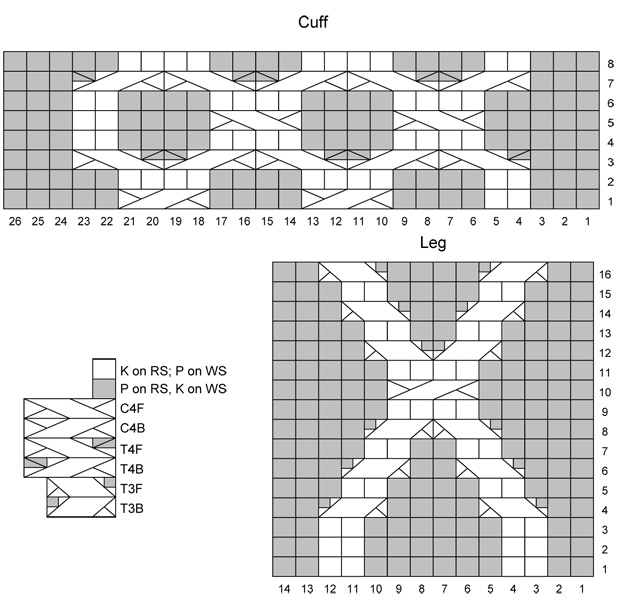
Pattern as written will accommodate calves 10-16.5 inches in circumference. If your intended leg is slimmer or wider, modify the stitch count in multiples of 4. The ribbing will automatically adjust from the calf muscle to the ankle, but additional shaping will be required for those with dramatic calf-to-ankle ratios. There are options for adapting the ankle to different instep heights in the Gusset Decrease section.

C4F: Slip 2 sts to cable needle and hold to front of work; k2 then k2 from cable needle.

C4B: Slip 2 sts to cable needle and hold to back of work; k2 then k2 from cable needle.

T4F: Slip 2 sts to cable needle and hold to front of work; p2 then k2 from cable needle.

T4B: Slip 2 sts to cable needle and hold to back of work; k2 then p2 from cable needle.

T3F: Slip 2 sts to cable needle and hold to front of work; p1 then k2 from cable needle.

T3B: Slip 1 st to cable needle and hold to back of work; k2 then p1 from cable needle.

Working these without a cable needle (great instructions can be found on Grumperina’s blog) will speed up the process considerably for most knitters.

Directions for provisional cast ons may be found here.

Directions for grafting may be found here.

Directions for a crochet chain border may be found here.

Note: For perfect symmetry, on your second sock, replace the cable on Row 10 of the leg chart with a 4 stitch left cable.

spacerCharts
The charts for this pattern are very large and fit on a letter-sized page.
Click here and print the resulting page.


DIRECTIONS
CUFF
Provisionally cast on 26 sts.

Work Cuff Chart in a long strip until the cuff fits comfortably around the calf, about two inches below the knee. Slip the first stitch of each row purlwise. Remember that there will be a layer of sock and probably a garter between the leg and the cuff. The fit should be snug, but not constricting. End on row 7 of chart. Graft the ends together.

Graft the ends together as follows:
Remove provisional yarn and slide live stitches onto another needle. Start with wrong side (first three stitches are knit side up). Follow grafting instructions for the first three stitches from each needle. Finish the sequence completely, as if they are the only six on the project. Flip work so knit side of next stitches are showing. Kitchener all knit stitches. Again, complete the sequence as if remaining stitches didn’t exist. Continue process until all stitches are worked. This will give you a seamless join in the pattern. Don’t worry if the join isn’t quite perfect: Nobody will see it on the inside of a striding leg.

Crochet a chain border on one long side to straighten the curl.

LEG
With WS facing, pick up and knit 84 stitches evenly distributed around the other long side, starting at the join. The wrong side of the cable is now the right side of the work. (When the cuff is turned down, the right side of this cable will show on the outside.)

Join for working in the round and note or mark beginning of round with the unique marker.
Knit two rounds.
Ribbing round: [K2, p2] to end.
Work Ribbing round for 2 inches.
This will create a flat area so that if the wearer is using a sock garter it won’t press the cable into the leg.

Next round: Work 34 sts in ribbing pattern; place new marker; work Row 1 of Leg Chart on 14 sts; place second new marker; continue rib pattern as established to end of round.

Continue in pattern as established until leg measures 14 inches (or the actual measurement of the leg in question, from just under the knee to the ankle), ending after Row 15 of chart. Cable panel markers may be discarded now.

HEEL
Left Foot Heel Flap:
Work partway across one more round, ending after stitch 48.
Left heel row 1 [RS]: [Sl1, k1] 20 times, turn.
Left heel row 2 [WS]: Sl 1, p39, turn.
Repeat Left heel rows 1 & 2 until heel flap measures 2.5 inches long, ending after a Left heel row 2.
                 
Right Foot Heel Flap:
Work one more full round (Chart round 16), and then continue partway across a second round, stopping after stitch 34. Turn so that WS is facing.
Right heel row 1 [WS]: Sl 1, p39, turn.
Right heel row 2 [RS]: [Sl1, k1] 20 times, turn.

Repeat Right heel rows 1 & 2 until heel flap measures 2.5 inches long, ending after a Right heel row 1.
                 

Turn Heel:
Row 1 [RS]: Sl 1, k21, ssk, k1, turn.
Row 2 [WS]: Sl 1, p6, p2tog, p1, turn.
Row 3 [RS]: Sl1, k7, ssk, k1, turn.
Row 4 [WS]: sl1, p8, p2tog, p1, turn.
Row 5 [RS]: Sl1, k9, ssk, k1, turn.
Row 6 [WS]: sl1, p10, p2tog, p1, turn.
Row 7 [RS]: Sl1, k11, ssk, k1, turn.
Row 8 [WS]: sl1, p12, p2tog, p1, turn.
Row 9 [RS]: Sl1, k13, ssk, k1, turn.
Row 10 [WS]: sl1, p14, p2tog, p1, turn.
Row 11 [RS]: Sl1, k15, ssk, k1, turn.
Row 12 [WS]: sl1, p16, p2tog, p1, turn.
Row 13 [RS]: Sl1, k17, ssk, k1, turn.
Row 14 [WS]: sl1, p18, p2tog, p1, turn.
Row 15 [RS]: Sl1, k19, ssk, k1, turn.
Row 16 [WS]: sl1, p20, p2tog, p1, turn.
Row 17 [RS]: Sl1, k21, ssk.  23 heel sts.

67 sts total - 23 on the heel, and 44 instep stitches.

GUSSET
Pick up and knit 16 sts along the left side of the heel flap, using slipped sts as a guide.
Place marker for start of instep. Work 44 stitches in 2x2 ribbing, as established for the instep.
Place marker for end of instep. Pick up and knit 16 sts along the second side of heel flap, using slipped stitches as a guide.  Knit 12 stitches. The start of the round is now at the center of the heel.
Place a unique marker or rearrange stitches on your needles as you wish. 99 sts total.

Gusset decrease:
Gusset decrease round 1: Knit to 2 before start of instep marker, k2tog, slip marker; work in rib pattern to end of instep; slip marker, SSK, knit to end of round. 2 sts decreased.
Gusset decrease round 2: As per round 1. 2 sts decreased.
Gusset decrease round 3: Work in pattern as established.

Repeat the last three rounds until there are 85 sts total – 44 on instep and 41 on sole. This will give you a slightly flat instep. If the wearer has a high instep, skip Round 2. If he has a seriously flat instep, skip Round 3.

Final gusset decrease round:
K2tog, work in pattern to end of round.  84 sts total – 44 on instep, 40 on sole.

FOOT
Work even in pattern as established until foot of sock measures 2 inches less than full foot length from back of heel.

TOE

Instep decrease round 1: Knit to first marker; ssk, work in pattern to 2 sts before second marker, k2tog; knit to end of round. 2 sts decreased.
Repeat Instep decrease round 1 once more. 40 sts between the markers on the instep.
Toe decrease round 1: K to 2 sts before first marker, k2tog; slip marker, ssk, knit to 2 sts before second marker, k2tog, slip marker, ssk; knit to end.
Toe decrease round 2: Knit.
Repeat the last two rounds until 20 stitches remain. Graft toe closed.
spacer

FINISHING
Weave in ends.

spacer
ABOUT THE DESIGNER

Sharon Rose knits, spins, and works other types of needle-oriented magic in Portland, OR.

Her other patterns can be found on her blog, and on Ravelry, where her handle is Needlegrrl.

spacer