Knitty: little purls of wisdom
Knit Kit Jewelry
Title
beauty shot

Tangy

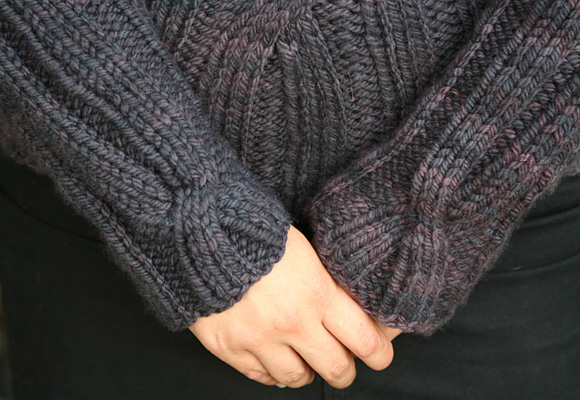
Every year I wait until I’m already cold to think about knitting a sweater, and then it usually takes too long before I have a wearable item. I wanted to design a sweater that would be super warm and cozy and quick to knit, but would still be fitted, stylish and sexy. 

The center design does a wonderful job of creating an hourglass shape while allowing a looser fit in places that might need it. A single cable cross at the wrist gives a touch of interest.

The cables make me think of Celtic knotwork. Chunky Malabrigo is just the thing when you want quick and cozy. The subtly variegated gray doesn’t compete with the cables, and the whole sweater is thick and warm. I was able to knit the entire thing in about a week.
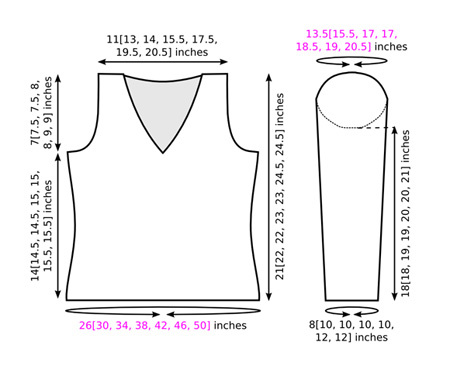
spacer model: Ashley Conatser spacer photos: Mandie Harrington

SIZE
XS[S, M, L, 1X, 2X, 3X] (shown in size M)
To fit bust circumference of 28[32, 36, 40, 44, 48, 52] inches.

spacer

FINISHED MEASUREMENTS
Chest: 26[30, 34, 38, 42, 46, 50] inches
Length: 21[22, 22, 23, 23, 24.5, 24.5] inches

Note: Sweater is intended to be very close-fitting. Choose a size with 0-3 inches negative ease.
spacer

MATERIALS
Yarn

spacer Malabrigo Chunky [100% merino wool; 104yd/91m per 100g skein]; color: Tortuga; 5[6, 6, 7, 8, 8, 9] skeins

Recommended needle size
[always use a needle size that gives you the gauge listed below -- every knitter's gauge is unique]
spacer 1 set US #11/8 mm double-point needles
spacer 1 US #11/8 mm circular needle, recommended lengths as follows:
24 inches for sizes XS, S; 32 inches for sizes M, L, 1X; 40 inches for sizes 2X, 3X

Notions
spacer Stitch markers
spacer Cable needle
spacer Stitch holders
spacer Yarn needle

GAUGE
10.4 sts/16 rows = 4" in 3x2 Rib, lightly stretched, after blocking


PATTERN NOTES
[Knitty's list of standard abbreviations and techniques can be found here.]

spacer
C6B: Slip next 3 sts to cable needle and hold to back of work; k3 from left needle, k3 from cable needle

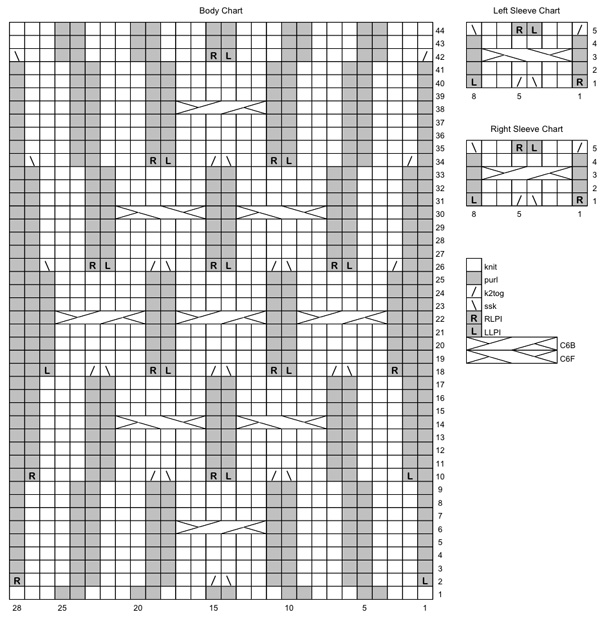
C6F: Slip next 3 sts to cable needle and hold to front of work; k3 from left needle, k3 from cable needle

RLI (Right Lifted Increase): Use the right needle to pick up the stitch below the next stitch on the left needle. Place it on the left needle, then knit into it. 1 stitch has been increased.

LLI (Left Lifted Increase): Use the left needle to pick up the stitch 2 rows below the last stitch on the right needle. Knit into this stitch. 1 stitch has been increased.

RLPI (Right Lifted Purl Increase): Use the right needle to pick up the stitch below the next stitch on the left needle. Place it on the left needle, then purl into it. 1 stitch has been increased.

LLPI (Left Lifted Increase): Use the left needle to pick up the stitch 2 rows below the last stitch on the right needle. Purl into this stitch. 1 stitch has been increased.

w2tog: If second st on left needle is a k st, work k2tog, if it is a p st, work p2tog.

Instructions for Jeny’s Stretchy Slip Knot Cast On can be found here.

Three-Needle Bind Off
Hold both pieces of knitting with right sides together.
Insert needle into first st on front needle and first st on back needle, and knit them together. *Repeat this for the next st on the front and back needles. Draw the first st worked over the second st.*
Repeat from * to * until all sts have been bound off. Break yarn and draw through remaining st.

spacerCharts
The chart for this pattern is very large and fits on a letter-sized page.
Click here and print the resulting page.


DIRECTIONS

LOWER BODY
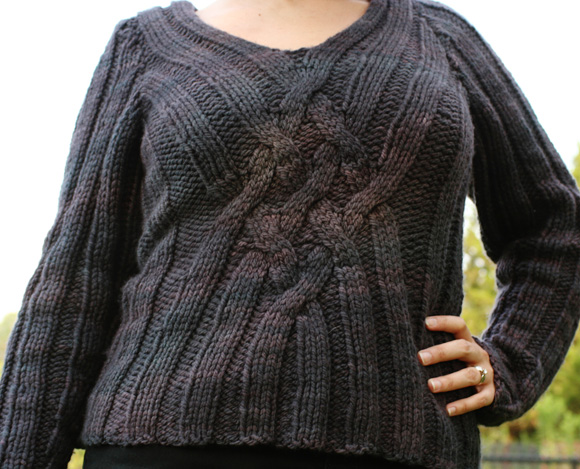
Using circular needle and Jeny’s Stretchy Slip Knot Cast On method, CO 70[80, 90, 100, 110, 120, 130] sts.

Sizes XS, M, 1X, 3X Only:
Row 1 [RS]: [P2, k3] to end of row.
This row sets 3x2 Rib pattern for lower body.

Sizes S, L, 2X Only:
Row 1 [RS]: [K3, p2] to end of row.
This row sets 3x2 Rib pattern for lower body.

All Sizes:
Place marker and join to begin working in the round, being careful not to twist. Work in 3x2 Rib as set until work measures 3[3.5, 3.5, 4, 4, 4.5, 4.5] inches or 11 inches less than desired length to underarm.

Note: If you do not have the correct row gauge, you will need to adjust the amount of length worked before beginning the chart. If you have too few rows over four inches, work less length before beginning chart; if you have too many rows, work more length.

Next Round: Work 2[5, 7, 10, 12, 15, 17] sts in pattern, place marker, work Round  1 of Body Chart over next 28 sts, place marker, work in pattern to end.

Continue in pattern, working chart pattern over sts between markers, until all rounds of Body Chart have been completed. Work measures 14[14.5, 14.5, 15, 15, 15.5, 15.5] inches.

Note: This is a good time to slip all sts to waste yarn and try on sweater. If you have a large bust, you may wish to work the following optional short row sequence before proceeding. The short rows will raise the V neckline, lengthening the front by approx. 2.5 inches, and will lengthen the rest of the sweater by approx. 0.5 inch.

Optional Short Row Sequence:
Round 1: Work 32[38, 42, 48, 52, 58, 62] sts in pattern, place marker, work in pattern to end of round.
Short Rows 1-2: Work in pattern to 1 st before marker, W&T.
(Note that odd-numbered short rows are worked with RS facing, and even-numbered short rows are worked with WS facing.)
Short Rows 3-4: Work in pattern to 3 sts before marker, W&T.
Short Rows 5-6: Work in pattern to 5 sts before marker, W&T.
Short Rows 7-8: Work in pattern to 7 sts before marker, W&T.
Short Row 9 [RS]: Work in pattern to end of round, working wraps together with wrapped sts.

When working next round, work remaining wraps together with wrapped sts. Remove the marker you placed for the short row sequence.

Divide for Neckline and Armholes:
Work 32[37, 42, 47, 52, 57, 61] sts in pattern, BO 5[5, 5, 6, 6, 6, 7] sts, work 29[34, 39, 43, 48, 53, 57] sts in pattern, BO 5[5, 5, 6, 6, 6, 7] sts, work 14[17, 19, 21, 23, 26, 28] sts in pattern, k1, turn. Begin working back and forth, leaving remaining stitches to be worked later.

Upper left front is worked back and forth over 15[18, 20, 22, 24, 27, 29] sts just worked; place 15[17, 20, 22, 25, 27, 29] sts of upper right front and 30[35, 40, 44, 49, 54, 58] sts of back on st holders.

spacer
UPPER LEFT FRONT
Row 1 [WS]: Work all sts in pattern. From this point on, work center st (at neckline edge) in stockinette st.

Row 2 [RS]: BO 1[2, 2, 2, 2, 3, 3] sts, work in pattern to end. 14[16, 18, 20, 22, 24, 26] sts.

Row 3 [WS]: Work in pattern to last 2 sts, w2tog. 13[15, 17, 19, 21, 23, 25] sts.

Next Row
[RS]: W2tog, work in pattern to end.

Work 1 row in pattern.

Repeat these 2 rows 2[3, 5, 6, 7, 9, 11] times more. 10[11, 11, 12, 13, 13, 13] sts.

Continue in pattern until work measures 7[7.5, 7.5, 8, 8, 9, 9] inches from underarm, ending with a WS row. Break yarn and place sts on st holder.

UPPER RIGHT FRONT
Place 15[17, 20, 22, 25, 27, 29] held sts of right front on needle and join yarn with RS facing (at neckline edge).

Row 1 [RS]: K1, work in pattern to end. From this point on, work center st (at neckline edge) in stockinette st.

Row 2 [WS]: BO 1[2, 2, 2, 2, 3, 3] sts, work in pattern to end. 14[15, 18, 20, 23, 24, 26] sts.

Row 3 [RS]: Work in pattern to last 2 sts, w2tog.

Row 4 [WS]: W2tog, work in pattern to end. 12[13, 16, 18, 21, 22, 24] sts.

Next Row [RS]: Work in pattern to last 2 sts, w2tog.
Work 1 row in pattern.
Repeat these 2 rows 1[1, 4, 5, 7, 8, 10] times more. 10[11, 11, 12, 13, 13, 13] sts.

Continue in pattern until work measures 7[7.5, 7.5, 8, 8, 9, 9] inches from underarm, ending with a WS row. Break yarn and place sts on st holder.

UPPER BACK
Place 30[35, 40, 44, 49, 54, 58] held sts of back on needle and join yarn with RS facing (at right underarm edge).

Sizes M, L, 1X, 2X, 3X Only:
BO 2 sts at beginning of next 2 rows. -[-, 36, 40, 45, 50, 54] sts.

All Sizes:
Next Row [RS]: W2tog, work in pattern to last 2 sts, w2tog.
Work 1 row in pattern.
Repeat these 2 rows 0[1, 1, 1, 2, 3, 4] times more. 28[31, 32, 36, 39, 42, 44] sts.

Continue in pattern until work measures 6[6.5, 6.5, 7, 7, 8, 8] inches from underarm, ending with a WS row.

Shape Neckline:
Row 1 [RS]: Work 12[13, 13, 14, 15, 15, 15] sts in pattern, join second ball of yarn and BO next 4[5, 6, 8, 9, 12, 14] sts, work in pattern to end. Two sets of 12[13, 13, 14, 15, 15, 15] sts, each with ball of yarn attached.

In directions that follow, semi-colon indicates division between two sets of sts.
Row 2 [WS]: Work all sts in pattern.
Row 3 [RS]: Work in pattern to last 2 sts of first set, w2tog; w2tog, work in pattern to end of second set. 11[12, 12, 13, 14, 14, 14] sts in each set.
Rows 4-5: Work as for Rows 2-3. 10[11, 11, 12, 13, 13, 13] sts in each set.

Using three-needle bind off, join sts of right back shoulder to held sts of upper right front, and sts of left back shoulder to held sts of upper left front.

LEFT SLEEVE
Using double-point needles and Jeny’s Stretchy Slip Knot Cast On method, CO 20[25, 25, 25, 25, 30, 30] sts.

Sizes XS, 2X, 3X Only:
Row 1 [RS]: P1, [k3, p2] to last 4 sts, k3, p1.
This row sets 3x2 Rib pattern for sleeve.

Sizes S, M, L, 1X Only:
Row 1 [RS]: K2, [p2, k3] to last 3 sts, p2, k1.
This row sets 3x2 Rib pattern for sleeve.

All Sizes:
Place marker and join to begin working in the round, being careful not to twist.
Work 7 rounds in pattern.

Next Round: Work 6[9, 9, 9, 9, 11, 11] sts in pattern, place marker, work Round 1 of Left Sleeve Chart over next 8 sts, place marker, work last 6[8, 8, 8, 8, 11, 11] sts in pattern.

Continue in pattern, working chart pattern over sts between markers, until all rounds of Left Sleeve Chart have been completed. At end of last round, do not slip end-of-round marker; work Increase Round as directed below.

Increase Round: LLI, slip end-of-round marker, RLI, work in pattern to end of round. 22[27, 27, 27, 27, 32, 32] sts.
Work 5 rounds in pattern, working increased sts into 3x2 Rib pattern.
Repeat these 6 rounds 6[6, 8, 8, 10, 8, 10] times more, then work Increase Round once more. 36[41, 45, 45, 49, 50, 54] sts.

Continue in pattern until work measures 18[18, 19, 19, 20, 20, 21] inches or desired length to underarm.

Shape Sleeve Cap:
Sizes M, L, 1X, 2X, 3X Only:
BO -[-, 3, 3, 3, 3, 4] sts at beginning of next 2 rows. -[-, 39, 39, 43, 44, 46] sts.

All Sizes:
BO 2 sts at beginning of next 2 rows. 32[37, 35, 35, 39, 40, 42] sts.

Next Row [RS]: W2tog, work in pattern to last 2 sts, w2tog.
Work 1 row in pattern.
Repeat these 2 rows 4[6, 5, 5, 6, 6, 6] times more. 22[23, 23, 23, 25, 26, 28] sts

BO 2 sts at beginning of next 4[4, 4, 4, 4, 4, 2] rows. 14[15, 15, 15, 17, 18, 24] sts.
BO 3 sts at beginning of next 2[2, 2, 2, 2, 2, 4] rows.
BO remaining 8[9, 9, 9, 11, 12, 12] sts.

RIGHT SLEEVE
Using double-point needles and Jeny’s Stretchy Slip Knot Cast On method, CO 20[25, 25, 25, 25, 30, 30] sts.

Sizes XS, 2X, 3X Only:
Row 1 [RS]: P1, [k3, p2] to last 4 sts, k3, p1.
This row sets 3x2 Rib pattern for right sleeve.

Sizes S, M, L, 1X Only:
Row 1 [RS]: K1, [p2, k3] to last 3 sts, p2, k2.
This row sets 3x2 Rib pattern for right sleeve.

All Sizes:
Place marker and join to begin working in the round, being careful not to twist.
Work 7 rounds in pattern.
Next Round: Work 6[8, 8, 8, 8, 11, 11] sts in pattern, place marker, work Round 1 of Right Sleeve Chart over next 8 sts, place marker, work in last 6[9, 9, 9, 9, 11, 11] sts in pattern.
Continue as for left sleeve, except work Right Sleeve Chart instead of Left Sleeve Chart.

spacer

FINISHING
Weave in ends and block sweater body and sleeves. Sew sleeves into armholes.

spacer
ABOUT THE DESIGNER

designernamespacer Mandie lives and works in a house that’s way too small in Indianapolis with her husband and 3 kids. She considers herself lucky to have found a way to work and play with fiber. 

She blogs (occasionally), but sometimes forgets.

spacer