
|
|
 |
|
|
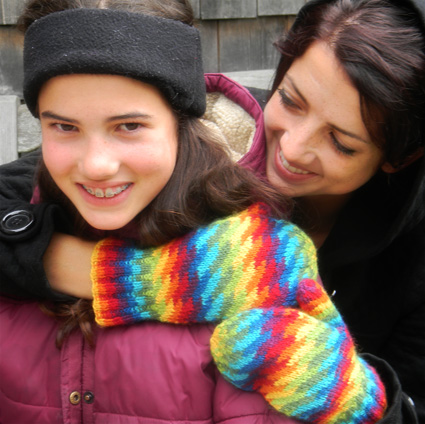
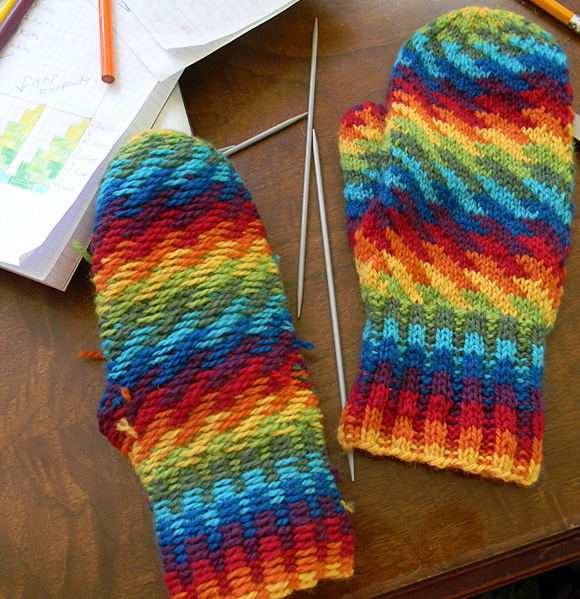
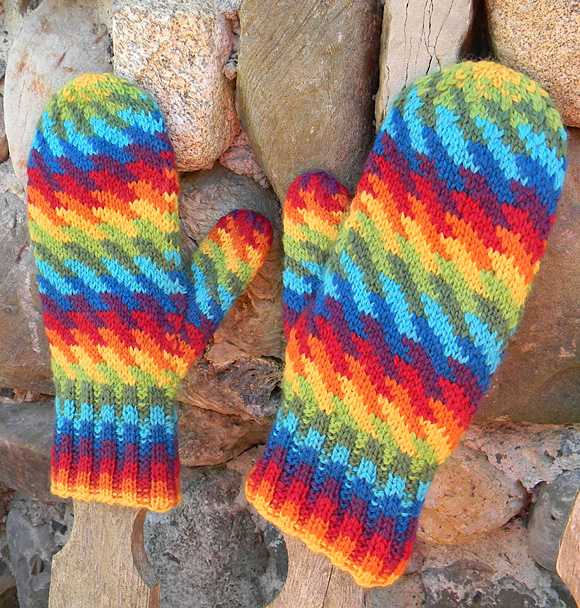
When I first learned to knit, it was all about me—sweaters for me, mittens for me, hats, scarves and gloves—for me. But time went on and I found myself living in Maine, in a nippy farmhouse with a crew of fun-in-the-snow kids, all needing wooly hats, socks, and most importantly, mittens. These latter items were constantly being lost, felted and worn out. My knitting interests shifted from sweaters for me to mittens for them—and I’ve been knitting mittens ever since. (Those kids are now young adults!) Back in those days, I leaned very heavily on Robin Hansen’s designs (Favorite Mittens) and used heavy worsted weight yarns like Bartlettyarns from Harmony, Maine, for many of the mittens I made my children. I’ve branched out now, and while I still favor wool for warmth, I lean more toward sport and DK weight yarns available in wide palettes of color. Inspiration for my designs is often based on the natural world, but is equally prompted by playing with yarns in a myriad of colors. I try hard to keep mitten designs to no more than 8 different colors, which I have decided is really enough for most people. When I first designed this mitten I had access to some closeout yarns from an out-of-business yarn mill. There were over 80 colors, and this mitten was the result of playing with those yarns (though in its original form, I used 15 shades!). After the Rain uses 8 colors, and is shown in Cascade 220 Sport. The cuff is knit in a corrugated ribbing, which then flows into the pattern on the hand. The stranded knitting helps make these warm, but the lighter weight yarn keeps them flexible. The thumb is my own cross between a gusseted one and a “sore” thumb. Because it is shaped, there is no need for extra stitches on the hand to accommodate the thumb, so the hand fits snugly and comfortably. While designing this mitten I had a phrase from an old Paul Simon song running through my head—though not quite accurately as it turns out, from a line in “My Little Town”—after it rains, there’s a rainbow are the actual words, but I still hear after the rain, there’s a rainbow, in my head! |
||
|
|

|
Tweet
 |
|
SIZE |
|
|
FINISHED MEASUREMENTS |
|
MATERIALS
Notions |
|
GAUGE |
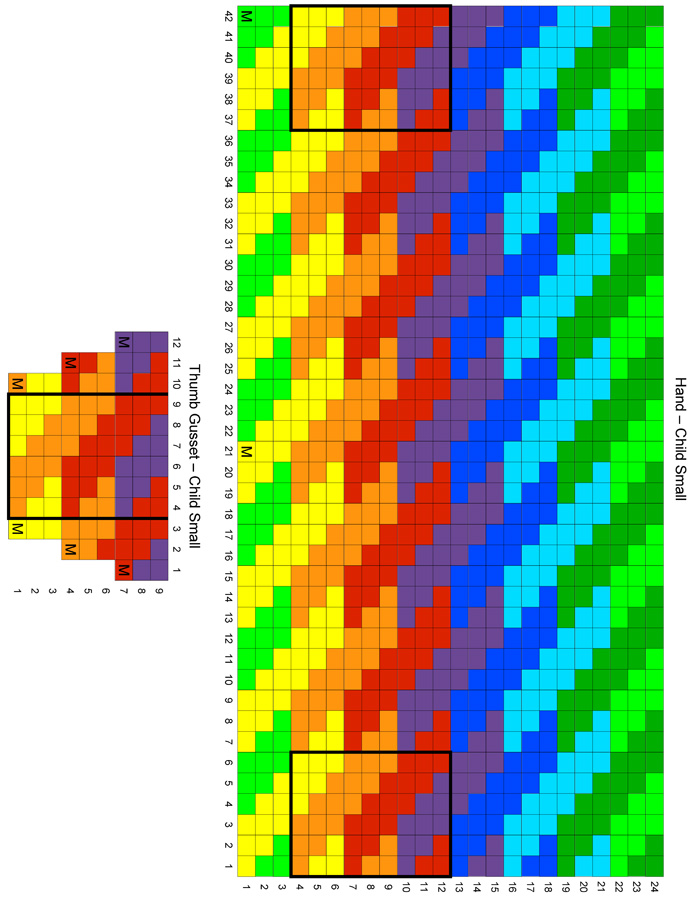
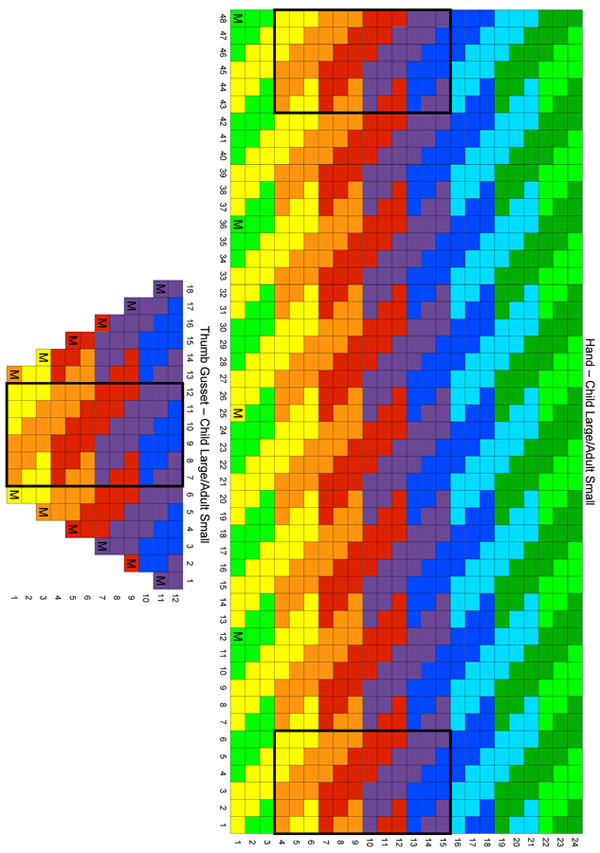
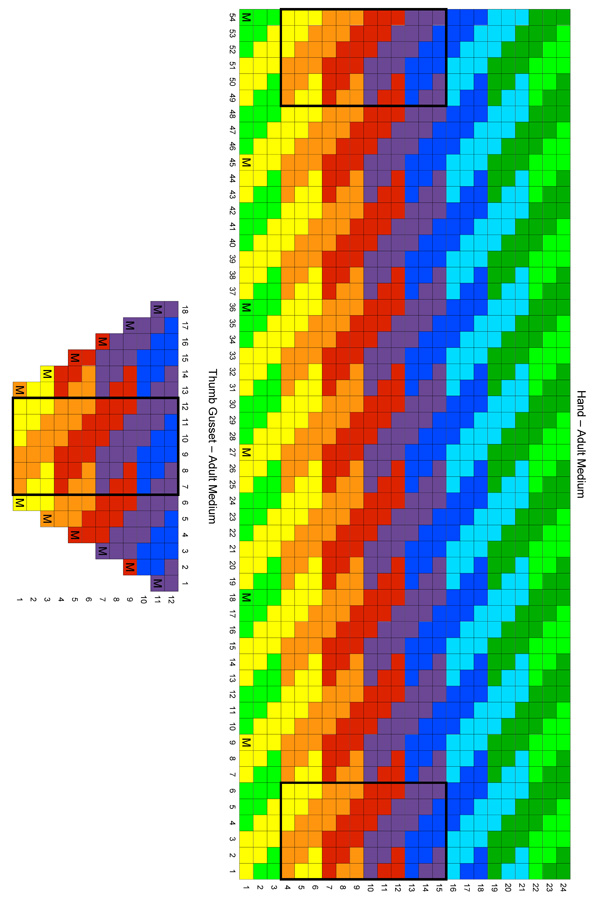
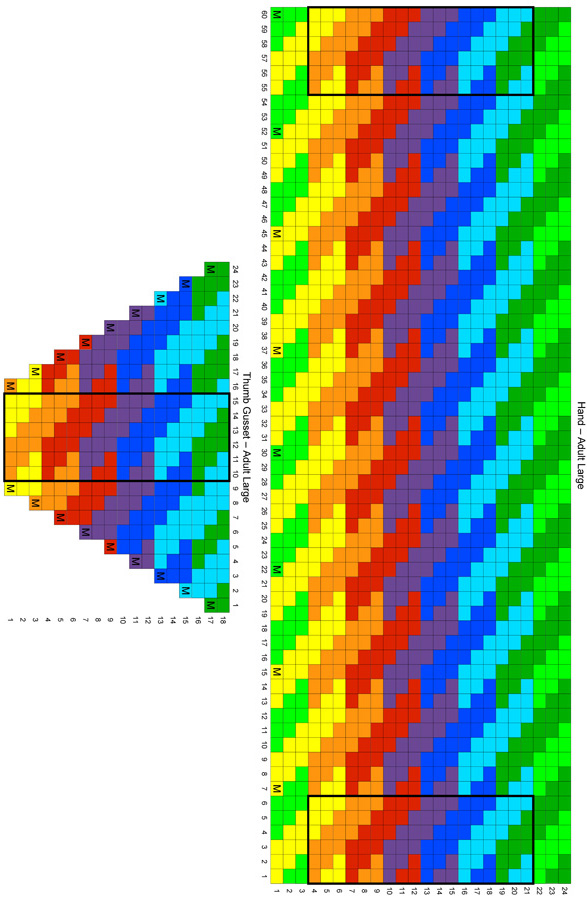
26 stitches and 29 rounds = 4 inches in stockinette stitch over stranded color knitting |
|
PATTERN NOTES |
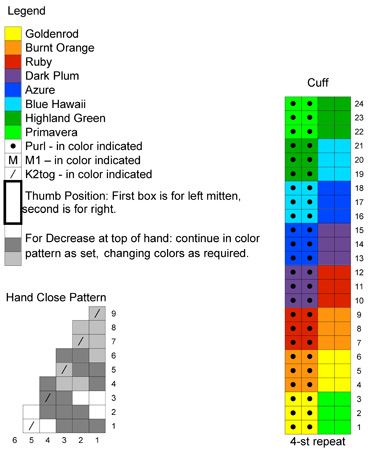 This pattern uses 2 colors per row, with only 3 stitches between most color
changes, so it is not usually necessary to wrap yarns to avoid long floats.
Occasional exceptions occur when you are increasing for the thumb. Some
rows require carries of up to 5 stitches. I wrap the yarns around each
other in these situations because this pattern makes a snug-fitting mitten.
It would be very irritating to get a finger caught under a long yarn float!
It is important to keep the stranding loose enough so it doesn’t
pucker. I find it easiest to carry 1 color in each hand, but any method
that suits you is fine. This pattern uses 2 colors per row, with only 3 stitches between most color
changes, so it is not usually necessary to wrap yarns to avoid long floats.
Occasional exceptions occur when you are increasing for the thumb. Some
rows require carries of up to 5 stitches. I wrap the yarns around each
other in these situations because this pattern makes a snug-fitting mitten.
It would be very irritating to get a finger caught under a long yarn float!
It is important to keep the stranding loose enough so it doesn’t
pucker. I find it easiest to carry 1 color in each hand, but any method
that suits you is fine. Because the colors change frequently, there is no “Main” or “Contrasting” color. I keep it even by always knitting each new color with my right hand, and then moving it to my left hand 3 rows later when another color becomes the “new” one. Because there are a lot of color changes, and hence a lot of ends, you might wish to weave in each new color for 8 or 10 stitches before you begin knitting with it. It does take more time during the knitting process, but makes the finishing process at the end much quicker. Corrugated Ribbing |
Child
small • Child
Large/Adult Small • Adult Medium •
Adult Large |
|
DIRECTIONS 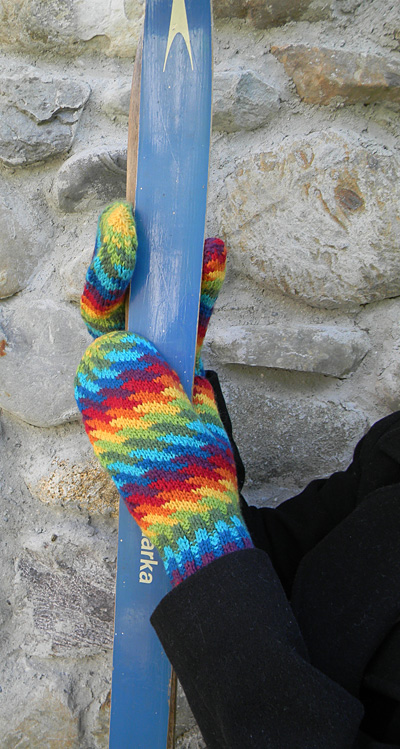
Cuff Work Corrugated Ribbing as per Cuff chart, starting with Row 7[4, 4, 1]. Hand On round 4, begin working appropriate size Thumb Gusset chart in thumb position as indicated. The Right thumb is worked at the end of the round, the Left thumb is worked at the start of the round. Place markers at start and end of thumb stitches as desired. On round 13[16, 16, 22], slip 12[18, 18, 24] thumb stitches to scrap yarn for holder, and cast on 6 stitches in colors indicated to close thumb gap. Continue working Hand chart, repeating from row 1 on as needed until mitten measures 5.75[7.75, 8.75, 9.75] inches, or 1.25 inches short of desired length of hand. Finish after Round 3, 6, 9, 12, 15, 18, 21 or 24 of the pattern. Work Hand Close Pattern chart, continuing color changes as set by hand patterning. 7 [8,9,10] sts rem. Cut yarn leaving an 8 inch tail and pull through rem sts to close. Note: At this point, I recommend weaving in the ends so they don’t confuse the issue while you work the thumb. Thumb Continue working in patt until length is to top of thumb. |
|
|
FINISHING |
| ABOUT THE DESIGNER |
|
|
|
Pattern & images © 2011 Mary O'Shea. Contact Mary |
