Knitty: little purls of wisdom
Title
beauty shot

Tangy

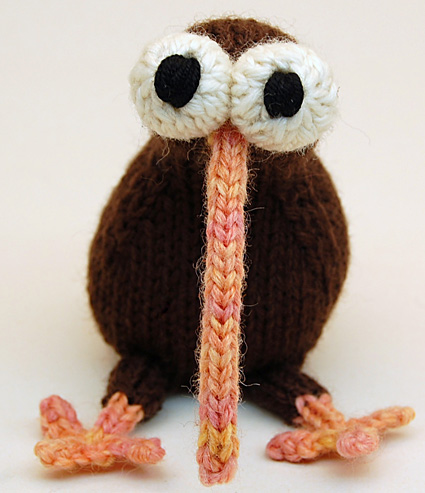
Your eyes would be bugging out too if you laid eggs one quarter of your own body weight! But despite the strain, Kiwis love each and every one of their little chicks.

Kiwi is knit from the base of the body up to the tip of the beak. The eyeballs & legs are knit on stitches picked up from the body, or knit separately & sewn on.


spacer photos: cheezombie


SIZE
One size is determined by size of yarn and needles used.

FINISHED MEASUREMENTS
Small Kiwis are approx. 5 inches tall, large kiwi is approx. 11 inches tall.
Measurements taken with toys seated as shown.

spacer

MATERIALS
Yarn

Many different yarns will work with this pattern. Small toys shown were knit using worsted weight yarns, large toy was knit using super bulky weight. Small toy requires approx. 35yd/32m MC, large toy requires approx. 50yd/46m MC. Small amounts of CC1 and CC2 are required, so this is a good project for using up odds and ends.

Small green toy:
spacer [MC] SWTC Vespera [100% wool, 164yd/150m per 50g skein]; color: #652
spacer [CC1] Aspen Moon Arts Handpainted Mini Skein [100% merino wool; 42yd/38m per 20g skein]
spacer [CC2] KnitPicks Bare Swish Worsted [100% superwash merino wool; 220yd/201m per 100g skein]; undyed
Needle size used: US #3/3.25mm

Small brown toy:
spacer [MC] KnitPicks Simply Cotton Worsted [100% cotton, 164yd per 100g]; color: Reindeer Heather
spacer [CC1] and [CC2] same as for small green toy above
Needle size used: US #3/3.25mm

Large toy:
spacer [MC] Cascade Magnum [100% wool, 123yd/112m per 250g skein]; color: #9408 Cordovan
spacer [CC1] Mystery stash yarn [bulky single ply wool/polyester blend]
spacer [CC2] Cascade Lana Grande [100% wool; 87yd/80m per 100g skein]; color: #6010 Natural
Needle size used: US #11/8mm

Recommended needle size
[always use a needle size that gives you the gauge listed below -- every knitter's gauge is unique]
spacer 1 set double-point needles in size needed for yarn chosen (see Gauge section below and sizes used above)

Notions
spacer Yarn needle
spacer Safety pin or split ring marker
spacer Small amount of black yarn or embroidery thread
spacer Stuffing

spacer

GAUGE

Exact gauge is not important for this project; however, it is important to knit tightly to obtain a firm fabric so that stuffing does not show through. Use needles that are several sizes smaller than size recommended on ball band.


PATTERN NOTES
[Knitty's list of standard abbreviations and techniques can be found here.]

LLI (Left Lifted Increase): Use the left needle to pick up the stitch 2 rows below the last stitch on the right needle. Knit this stitch through its back loop. 1 stitch has been increased.

Directions for the Knitted Cast On method (“knitting on”) can be found here.
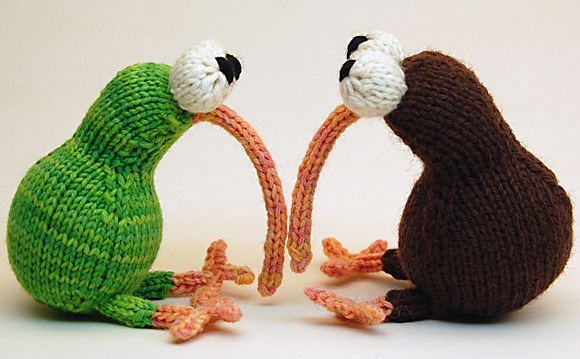
DIRECTIONS

spacer
BODY
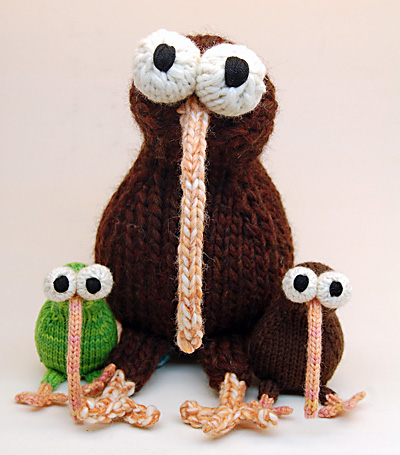
Using MC, CO 6 sts. Divide sts between needles and join to work in the round, being careful not to twist. After several rounds have been worked, place safety pin or split ring marker in work to indicate beginning of round.

Round 1: [Kfb] in each st. 12 sts.

Even-numbered Rounds 2-8: K all sts.

Round 3: [Kfb] in each st. 24 sts.

Round 5: [Kfb, k6, kfb] three times. 30 sts.

Round 7: [Kfb, k8, kfb] three times. 36 sts.

Round 9: [Kfb, k10, kfb] three times. 42 sts.

Rounds 10-19: K all sts.

Round 20: [Ssk, k10, k2tog] three times. 36 sts.

Odd-numbered Rounds 21-25: K all sts.

Round 22: [Ssk, k8, k2tog] three times. 30 sts.

Round 24: [Ssk, k6, k2tog] three times. 24 sts.

Round 26: [Ssk, k4, k2tog] three times. 18 sts.

Round 27: K all sts.

Head is shaped using short rows (see Abbreviations + Techniques).
Round 28: K6, W&T; p12, W&T; k24.
Round 29: Kfb, k5, W&T; p13, W&T; k5, kfb, k20. 20 sts.
Round 30: Kfb, k6, W&T; p15, W&T; k6, kfb, k22. 22 sts.
Rounds 31 and 32: K8, W&T; p16, W&T; k30.

Before proceeding, sew up small hole at base of work and draw yarn tail to inside of work. Stuff body.
Round 33: Ssk, k4, k2tog, W&T; p6, p2tog, p4, p2tog, W&T; k24. 18 sts.
Round 34: [Ssk, k2, k2tog] three times. 12 sts.

Break MC and stuff head. Using CC1, proceed as follows. If you wish to make a firm beak for your kiwi, switch to a smaller needle size.
Round 35: [Ssk, k2tog] three times. 6 sts.
Round 36: Ssk, k2, k2tog. 4 sts.

Transfer all sts to one needle. Work 25 rows I-cord, or until beak is desired length.
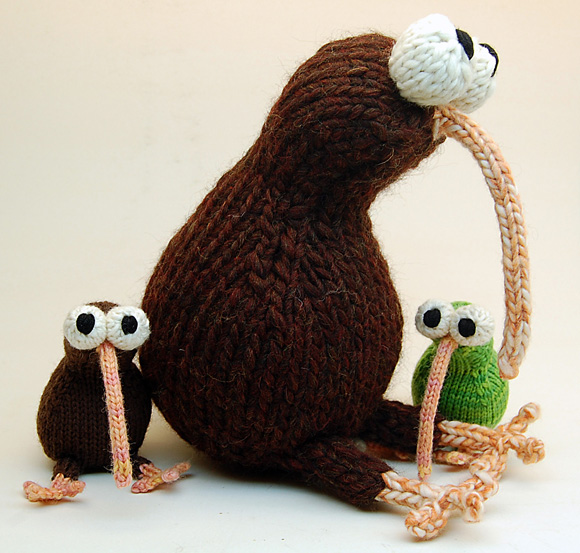
Last round: Ssk, k2tog. Break yarn and draw through remaining 2 sts. Use yarn needle to draw yarn tail down through center of beak to inside of head. Draw any remaining yarn tails to inside of piece.

EYES
Note: If desired, eyes and legs can be knit separately and then sewn on, instead of being worked from picked-up sts.

Using CC2, pick up and k 8 sts in top of toy, in two parallel rows as shown below. Eyes are worked in the round.

spacer
Round 1:K all sts.

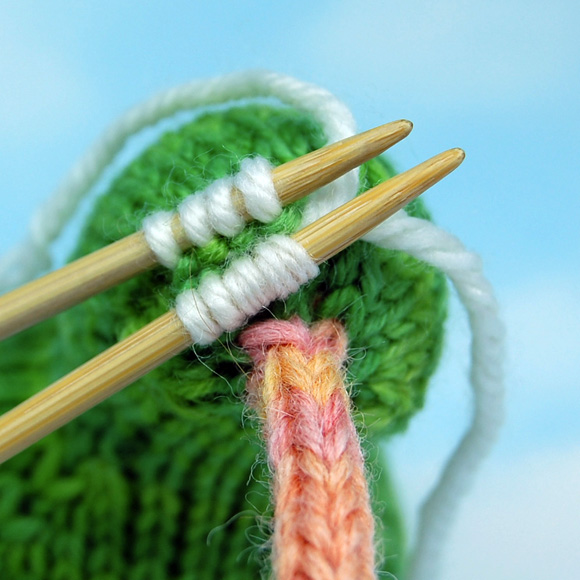
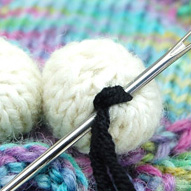
Round 2: [K1, LLI] eight times. 16 sts.

Rounds 3-6: K all sts.

Round 7: [Ssk] eight times. 8 sts.

Break yarn and draw loosely through remaining sts. Stuff eye, then pull yarn tail tight to close. Weave in ends and make a second eye in the same way.

Use black yarn or embroidery thread to embroider pupils as shown at right.

LEGS
Using MC, pick up and k 6 sts in base of body as shown below, to one side of front, approx. 7 rows above CO.

Work 5 rows I-cord. Pull yarn tightly to help close up back of I-cord. Break MC.

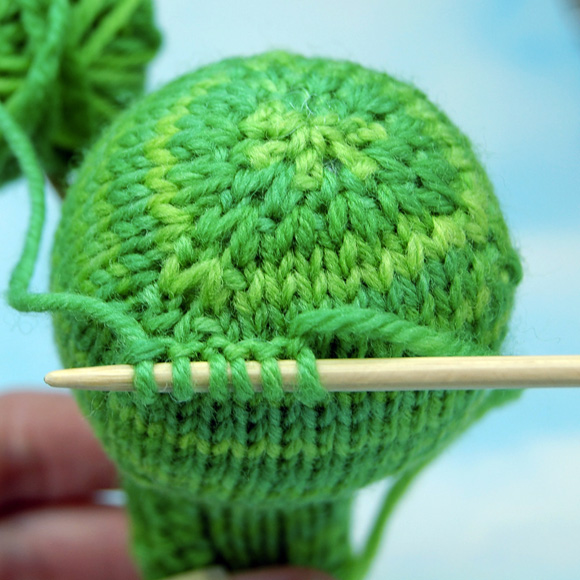
Using CC1, continue in I-cord as follows:
Next Row: [Ssk] three times. 3 sts.
Work 5 rows I-cord.

Form feet by working picot bind off as follows. Use knitted cast on method (see Pattern Notes).
[CO 4 sts, BO 5 sts] twice, CO 4 sts, BO 4 sts. Break yarn and draw through remaining st.  Use yarn needle to draw yarn tail down through center of leg. Draw any remaining yarn tails to inside of piece.

Work second leg in the same way.

spacer
ABOUT THE DESIGNER

Cheezombie often finds herself bleary eyed and finger sore, but still knitting and watching slasher movies and cartoons, at 2 a.m.  The byproducts of these late-night sessions fuel others, whereby creating a cycle of sleeplessness and creativity and funny critters.

Knitting Manifesto:
1. Projects should take no longer than a few hours from start to finish.
2. Projects should have few or no seams to sew up at the end.
3. Projects should be made in one piece, or the absolute minimum of pieces necessary.
4. Projects should use the simplest stitches to get the desired effects as possible.
5. And above all, they should be quick and fun enough to knit over and over until you have little herds of funny critters following you about the house.

spacer