
|
|
 |
|
|
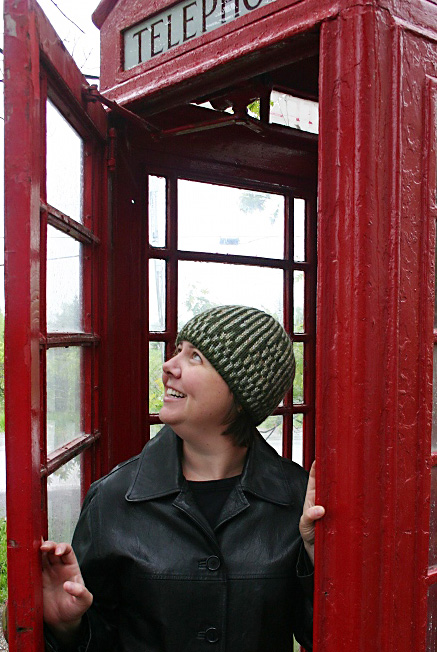
With vertical lines branching from the decreases at the crown, this double knit hat is reminiscent of the hanging branches and leaves of weeping willow trees. I designed the hat that I want to own: double knit for warmth,
a graphic design that speaks to my love of art deco and a shape
that hugs my head. Plus the paired decreases mean that it's totally
reversible and looks great inside out! |
||
|
|

|
Tweet
|
|
SIZE |
|
|
FINISHED MEASUREMENTS |
|
MATERIALS Adult's hat: Adult's hat: Note: For both hats, if you decide not to work the tubular
cast on, the circular needle in smaller size will not be
needed. Notions |
|
GAUGE |
Child: 19 sts/26 rows = 4" in
double knitting using larger needle |
|
PATTERN NOTES |
|
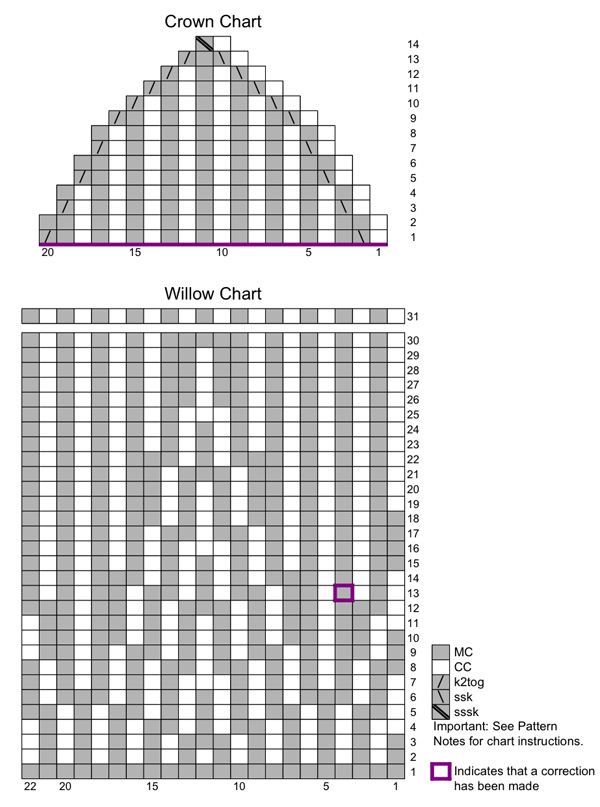
This hat is worked in double knitting. This is a technique which allows you to form two layers of fabric at once. It can be used in different ways, but in this case, it is used to make a reversible hat with a stockinette surface on each side. It is easy to end up with a loose fabric when working in double knitting; be sure to work with a firm tension. Chart Instructions: MC square: Bring both yarns between needles to inside (WS) of work, k1 using MC; bring both yarns between needles to outside (RS) of work, p1 using CC. CC square: Bring both yarns between needles to inside (WS) of work, k1 using CC; bring both yarns between needles to outside (RS) of work, p1 using MC. Stitches must be reordered before working k2tog or ssk decreases, as follows: slip next st (outer layer) from left needle to right needle; drop next st (inner layer) from left needle and hold behind work while slipping following st (outer layer) to right needle; replace dropped inner layer st on left needle, slip both outer layer sts to left needle. Sts are reordered so that 2 outer layer sts are adjacent, and 2 inner layer sts are adjacent.k2tog (shown in MC): Bring both yarns between needles to inside (WS) of work, k2tog using MC; bring both yarns between needles to outside (RS) of work, p2tog tbl using CC. ssk (shown in MC): Bring both yarns between needles to inside (WS) of work, ssk using MC; bring both yarns between needles to outside (RS) of work, p2tog using CC. Before working the double decrease below, reorder sts (as for single decreases) so that 3 outer layer sts are adjacent, and 3 inner layer sts are adjacent. sssk (shown in MC): Bring both yarns between needles to inside (WS) of work, sssk using MC; bring both yarns between needles to outside (RS) of work, p3tog using CC. Instructions for Duplicate Stitch can be found here. The cast on technique used for this project is a variation on
the Tubular Cast On technique shown here.
Instructions for the
Backward Loop Cast On can also be found here. If
you do not wish to work the tubular
cast on, work as follows: |
The chart for this pattern is very large and fits on a letter-sized page. Click here and print the resulting page. Note: Charts were updated Oct 3, 2011 |
|
DIRECTIONS Tubular Cast On: K 3 rounds. If you have not worked sts from a provisional cast on before, see linked article in Pattern Notes before proceeding. Next Round: *K1 from left needle, p1 in back loop of CO st below
st just worked; repeat from * until all sts have been worked.
176 sts. Crown: Thread yarn needle with CC end. Leaving MC end hanging at outside of work, *sl next st with CC held to inside of work, draw CC end through next st and remove from needle; repeat from * to end of round. 8 sts remain. Pull CC end to inside of hat. Draw MC end through remaining sts and pull both ends tight. |
|
FINISHING |
| ABOUT THE DESIGNER |
|
Natalie is the busy mother of 2 young children, works as a software tester, and is an avid knitter, especially of lace patterns. She's a recent convert to spinning and finds spindling to be even more relaxing than knitting. She blogs here. |
|
Pattern & images © 2011 Natalie Servant. Contact Natalie |