Knitty: little purls of wisdom
Zen Yarn Garden
Title


spacer

My interest in knitting has been kept alive over the years by the almost infinite variety of color, pattern, and texture that is found in collections of knitters and museums around the world. Although I love the smooth, quiet repetition of knitting a rectangular scarf in garter stitch using a luxurious yarn, it is the endless diversity of technique and style that keeps me interested in knitting as more than a way to keep my hands busy while watching TV.

"It's a dangerous business, Frodo, going out your door. You step onto the road, and if you don't keep your feet, there's no knowing where you might be swept off to."
--from The Lord of The Rings by J.R.R. Tolkien


Zen Yarn Garden

spacer title
beauty shot

by Donna Druchunas

Tangy

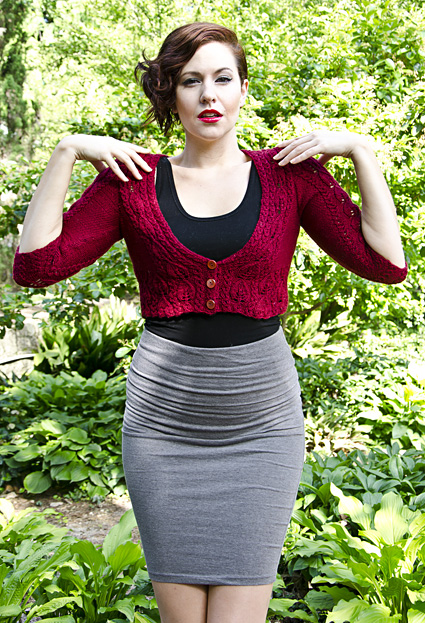
This pattern is my idea of what makes Japanese patterns special, on a simplified level (believe it or not!). I've taken two pattern stitches from my Japanese stitch libraries, and worked them into a sweater design in a very detailed and specific way to create a vintage-looking, classicly-styled cropped cardigan with three-quarter length sleeves. A Japanese designer would probably have added additional detail such as bobbles, textural elements or more elaborate finishing to this design.

The hard part came when I had to grade the pattern to create 7 different sizes. Japanese patterns come in one size, small or extra-small, and that's how I designed my original cardigan. To change this design to one larger size, say L or 1X for myself, would have required some thought and patience. Creating seven different sizes that scale up to the standard Craft Yarn Council of America size range that Knitty uses was another matter all together! I originally tried to work out each size the way I would design a sweater in that size only. The results were much too complicated to write a pattern. Working with my tech editor as well as my friend, Susan Crawford, author of A Stitch In Time volumes 1 & 2, we've come up with a design that maintains the structure and style elements of my original idea, with sizing that could be written into a pattern.

spacer model: Cortney Rice
spacer photos: Harrison Stone

SIZE
XS[S, M, L, 1X, 2X, 3X]
shown in size XS

FINISHED MEASUREMENTS
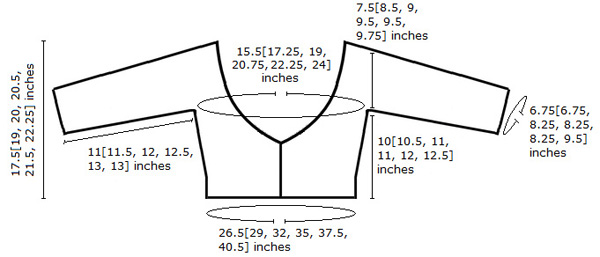
Chest: 32[34, 38, 42, 44, 48, 52] inches
Length: 18[19.5, 20.5, 21, 22, 22.7, 23] inches


MATERIALS
Yarn

spacer Zen Yarn Garden Serenity DK [90% superwash merino, 10% cashmere; 250yd per 100g skein]; color: Red Maple; 4[4, 5, 6, 7, 8, 8] skeins


Recommended needle size
[always use a needle size that gives you the gauge listed below -- every knitter's gauge is unique]
spacer 1 set US #3/3.25mm straight needles

Notions
spacer 3 buttons, approx 3/8 in diameter
spacer sewing needle and matching thread
spacer yarn needle

 
GAUGE

23 sts/32 rows = 4 inches in stockinette stitch
28 sts/32 rows = 4 inches over leaf and ribbing pattern
Exact gauge over leaf panel and ribbing is not important. This is a stretchy panel.

spacer

PATTERN NOTES
[Knitty's list of standard abbreviations and techniques can be found here.]

Please read all instructions before you begin, as stitch counts change over the Leaf panel, and the Leaf and Rib section is moving at the same time as the armhole shaping is worked.

M1p: make 1 purlwise: Insert tip of left needle from back to front under the bar that runs between the stitch you've just worked and the next st; purl this bar through the front. 1 st increased.

Reverse Stockinette Stitch (rev St st)
RS Rows: Purl.
WS Rows: Knit.

Leaf Panel (shown at right, top)
(Over 1 st, increases to 9)
Note: stitch counts change on every row. Count sts on first row of chart only. Chart revised Sep 15/13 -->

Faux Cable Eyelet Rib (shown at right, bottom)
(Worked over a multiple of 5+2)
Eyelet cable cross: Pass the 3rd st on the left needle over the first 2 sts and drop it off; k1, yo, k1.


DIRECTIONS

BACK
CO 92[102, 112, 122, 132, 142, 152] sts.
Row 1 [WS]: K2, [p3, k2] across.
Work 3 rows of Faux Cable Eyelet Rib.

Set up Leaf Panels
Setup row 1 [WS]: Work 7[12, 17, 22, 27, 32, 37] sts in est rib, [p3tog, Rib 7, p4, m1p, p4, Rib 7] 3 times, p3tog, Rib 7[12, 17, 22, 27, 32, 37]. 87[97, 107, 117, 137, 147] sts.

Setup row 2 [RS]: Work Rib as est for 7[12, 17, 22, 27, 32, 37] sts, [work Leaf panel Row 1, Rib 7, work Leaf panel Row 9, Rib 7] 3 times, work Leaf panel Row 1, Rib 7[12, 17, 22, 27, 32, 37].

Work as set until a total of 28 Leaf panel rows are complete, ending when center leaf has 1 st rem. 95[105, 115, 125, 135, 145, 155] sts.

Mark the central pattern elements as follows: Count out 2 sts on either side of the central leaf stitch and place markers outside those sts. There should be 5 sts between these markers. Count out another 19 sts from each of these markers: 5 rib stitches, the 9-stitch leaf motif and another 5 rib stitches. Place a marker outside those sts. You should have a total of 43 sts in the center between the outer markers, with 5 sts between the central markers, with 26[31, 36, 41, 46, 51, 56] sts outside the markers on each side.

Divide Panels
Next row [RS]: [Purl to marker, work in pattern as set to next marker] twice, purl to end of row.

Following row [WS]: [Knit to marker, work in pattern as set to next marker] twice, knit to end of row.

Continue working sections outside markers and center section in rev St st and marked panels as est for remainder of back.

Move Leaf and Rib panels out toward shoulders as foll:
Panel-shift row [RS]: Purl to 2 sts before first marker, p2tog, sm, work patt as est to next marker, sm, p1, m1p, purl to 1 st before next marker, m1p, p1, sm, work patt as est to last marker, sm, p2tog, purl to end of row.
Work 3 rows even.

Note: st counts will vary because of the shaping of the Leaf motif, so absolute stitch counts are not given. Read ahead carefully as armhole shaping and pattern are worked concurrently.

Rep last 4 rows 13[15, 16, 18, 18, 20, 21] more times.

Once this is complete, work as follows:
Next row [RS]: [P to marker, work in pattern as set to next marker] twice, p to end of row.
Following row [WS]: [K to marker, work in pattern as set to next marker] twice, k to end of row.

AT THE SAME TIME
, when piece measures 10[10.5, 11, 11, 12, 12.5, 12.5] inches, shape armholes as foll:

Shape Armholes:
BO 4[5, 6, 6, 6, 7, 7] sts at beg of next 2 rows.
BO 2[2, 4, 4, 4, 4, 4] sts at beg of next 2 rows.
Dec 1 st at each end of every RS row 4[5, 6, 7, 8, 9, 11] times.

After armhole shaping and panel-shift rows are complete, 2[3, 3, 5, 9, 10, 12] sts rem outside the markers at the armhole edges.

Work even in patts as est until armhole measures 7.5[8.5, 9, 9.5, 9.5, 9.75, 10] inches.

Shape Neck and Shoulders
Because the stitch count in the Leaf motif is changing, the number of sts in the shoulders varies depending on where you are in the Leaf pattern.

Place markers around the central 31[37, 39, 43, 43, 47, 49] sts. Count the rem sts on each side and divide as evenly as possible by 3. Note number of sts used for each BO.

Next row [RS]: BO one third of right shoulder sts, work to end of row.
Next row [WS]: BO one third of left shoulder sts, work to marker; join new ball of yarn and BO marked center sts to next marker, work to end of row.
Working both sides at once, BO one third of shoulder sts at beg of next 4 rows.

Right Front
CO 47[52, 57, 62, 67, 72, 77] sts.
Row 1 [WS]: K2, [p3, k2] to end.
Work 3 rows of Faux Cable Eyelet Rib.

Set up Leaf Panels
Note: There are two columns of rib at the center front, at the beg of RS rows. The edge-most 7 sts form the front band.

Setup row 1 [WS]: Work 7[12, 17, 22, 27, 32, 37] sts in est rib, p3tog, Rib 7, p4, m1p, p4, Rib 7, p3tog, Rib 12. 44 [49, 54, 59, 64, 69, 74] sts.

Setup row 2 [RS]: Rib 12, work Leaf panel,Row 1, Rib 7, work Leaf panel Row 9, Rib 7, work Leaf panel Row 1, Rib 7[12, 17, 22, 27, 32, 37].

Work as set until a total of 28 Leaf panel rows are complete, ending when center leaf has 1 st rem,

Next row [RS]: Rib 7 for band, place marker (pm), Rib 5, work Leaf panel as set, Rib 5, pm, purl to end of row. 52[57, 62, 67, 72, 77, 82] sts.
Work 1 row even.

Neck Shaping
Move panel out toward shoulders as foll:
Dec row [RS]: Work in patts to second marker, slip marker, p2tog, purl to end of row.
Work 3 rows even.

Note: st counts will vary because of the shaping of the Leaf motif, so absolute stitch counts are not given. Read ahead carefully as armhole shaping and pattern are worked concurrently.

Rep last 4 rows 13[15, 16, 18, 18, 20, 21] more times.

AT THE SAME TIME, when piece measures 10[10.5, 11, 11, 12, 12.5, 12.5] inches, ending with a RS row, shape armholes as for back.

Shape Armholes
BO 4[5, 6, 6, 6, 7, 7] sts at beg of next WS row,
BO 2[2, 4, 4, 4, 4, 4] sts at beg of next WS row.
Dec 1 st at end of every RS row 4[5, 6, 7, 8, 9, 11] times.
After armhole shaping and neck dec rows are complete, 2[3, 3, 5, 9, 10, 12] sts rem at armhole side of marker.

Work even in patts as est until armhole measures 7.5[8.5, 9, 9.5, 9.5, 9.75, 10] inches, ending with a RS row.

Shape Neck and Shoulders:
At beg of next 3 RS rows, BO same number of sts as for back shoulders. 7 band sts rem.

Back Neckband Extension
Work in patt as est on rem 7 sts until extension measures approx 3[3.25, 3.5, 3.75, 3.75, 4, 4.25] inches. Put sts on holder; cut yarn, leaving a very long tail– you many need to lengthen or shorten extension slightly at assembly.

Left Front
CO 47[52, 57, 62, 67, 72, 77] sts.
Row 1 [WS]: K2, [p3, k2] across.
Work 3 rows of Faux Cable Eyelet Rib.

Set up Leaf Panels
Note: There are two columns of rib at the center front at the end of RS rows. The edge-most column is the front band.

Setup row 1 [WS]: Work 12 sts in est Rib, p3tog, Rib 7, p4, m1p, p4, Rib 7, p3tog, Rib 7[12, 17, 22, 27, 32, 37]. 44 [49, 54, 59, 64, 69, 74] sts.

Setup row 2 [RS]: Rib 7[12, 17, 22, 27, 32, 37], work Leaf panel Row 1, Rib 7, work Leaf panel Row 9, Rib 7, work Leaf panel Row 1, Rib 12.

Work as set until a total of 28 Leaf panel rows are complete, ending when center leaf has 1 st rem,

Next row [RS]: P26[31, 36, 41, 46, 51, 56], pm, Rib 5, work Leaf panel as set, Rib 5, pm, Rib 7 (front band). 52[57, 62, 67, 72, 77, 82] sts.
Work 1 row even.

Neck Shaping
Move cables out toward shoulders as foll:
Dec row [RS]: Purl to 2 sts before first marker, p2tog, work in patts to end of row.
Work 3 rows even.

Note: st counts will vary because of the shaping of the Leaf motif, so absolute stitch counts are not given. Read ahead carefully as armhole shaping and pattern are worked concurrently.

Rep last 4 rows 13[15, 16, 18, 18, 20, 21] more times.

AT THE SAME TIME, when piece measures 10[10.5, 11, 11, 12, 12.5, 12.5] inches, ending with a WS row, shape armholes as foll:

Shape Armholes
BO 4[5, 6, 6, 6, 7, 7] sts at beg of next RS row.
BO 2[2, 4, 4, 4, 4, 4] sts at beg of next RS row,.
Dec 1 st at beg of every RS row 4[5, 6, 7, 8, 9, 11] times.
After armhole shaping and neck dec rows are complete, 2[3, 3, 5, 9, 10, 12] sts rem at armhole side of the marker.

Work even in patts as est until armhole measures 7.5[8.5, 9, 9.5, 9.5, 9.75, 10] inches, ending with a RS row.

Shape Neck and Shoulders:
At beg of next 3 WS rows, BO same number of sts as for back shoulders. 7 band sts rem.

Back Neckband Extension
Work in patt as est on rem 7 sts until extension measures approx 3[3.25, 3.5, 3.75, 3.75, 4, 4.25] inches. Put sts on hold; cut yarn, leaving a very long tail – you many need to lengthen or shorten extension slightly at assembly.

SLEEVES
CO 47[47, 57, 57, 57, 67, 67] sts.
Place markers around center 33 sts.
Row 1 [WS]: K2, [p3, k2] across.
Work 11 rows of Faux Cable Eyelet Rib.

Set up Leaf Panels
Setup row 1 [WS]: Work Rib as est to marker, p4, m1p, p4, Rib 7, p3tog, Rib 7, p4, m1, p4, rib to end of row.

Setup row 2 [RS]: Work Rib as est to marker, work Leaf panel Row 9, Rib 7, work Leaf panel Row 1, Rib 7, work Leaf panel Row 9, rib to end of row.

Continue in est patts, working Leaf panels as set and repeating the 18-row pattern.

Work 1 row even.

Inc row [RS]: P1, m1p, work in patt to last st, m1p, p1. 2 sts increased.

Repeat Inc row every RS row 1[4, 4, 6, 6, 0, 0] more times, then every 4th row 13[12, 14, 15, 15, 17, 19] times. 22[24, 31, 34, 34, 35, 37] sts on each side of center panel.

Work even until sleeve measures 11[11.5, 12, 12.5, 13, 13, 13.5] inches, ending with a WS row.

Shape Cap
BO 5[6, 6, 6, 7, 7, 8] sts at beg of next 2 rows.

BO 3[4, 4, 4, 4, 4, 5] sts at beg of next 2 rows. 16[17, 21, 24, 24, 24, 26] sts rem each side of center panel.

Dec 1 st both ends of every RS row 12[16, 18, 20, 20, 9, 22] times.

Dec 1 st both ends of every 4th row 0[0, 0, 0, 0 1, 0] times.

Dec 1 st both ends of every RS row 0[0, 0, 0, 0, 10, 0] times.

BO 2 sts at beg of next 6[4, 6, 6, 6, 6, 6] rows.

BO 3 sts at beg of next 2[4, 2, 2, 2, 2, 2] rows.

BO rem sts.

FINISHING

Block pieces to measurements.
Sew shoulder seams; ease sleeves into armholes and sew seam starting at shoulder and working out toward underarm, sew underarm and side seams starting at hem and working toward underarm.

With WS facing whip stitch back neck band to back neck, unravelling any unnecessary rows. Join ends of bands with Kitchener stitch or three-needle BO.

Lightly press seams with steam, being careful not to singe yarn or flatten the fabric.

Sew 3 buttons evenly spaced to lower left front band, positioning them so that they are opposite eyelets on right front band. Eyelets function as buttonholes.

Weave in ends.

ABOUT THE DESIGNER
Donna Druchunas escaped a corporate cubicle to honor her passions for knitting, world travel, research, and writing. She teaches in the United States in Europe, offers online sock-knitting classes at Craftsy.com, and holds retreats at her studio in Vermont. Her newest project, Stories In Stitches™ is a pattern line featuring stories about knitters and their lives, traditions, history, and travel, all tied together with gorgeous knitting patterns and projects.

Visit Donna's website at sheeptoshawl.com.


spacer