
|
|
 |
|
|
 |
Store-bought bread? Not for this household. I’ve been baking bread for the past year. White, wheat, challah, or brioche, no matter what the variety the process has been rewarding on multiple levels. You may be wondering what bread has to do with a sock pattern. Well, the inspiration for this design is wheat. Winnowing is the process of separating the desired from
the undesired using wind or air. In order to harvest wheat
grain, threshed wheat was tossed in the air and winds would
carry the chaff away, leaving the heavier wheat berries to
fall to the ground.
|
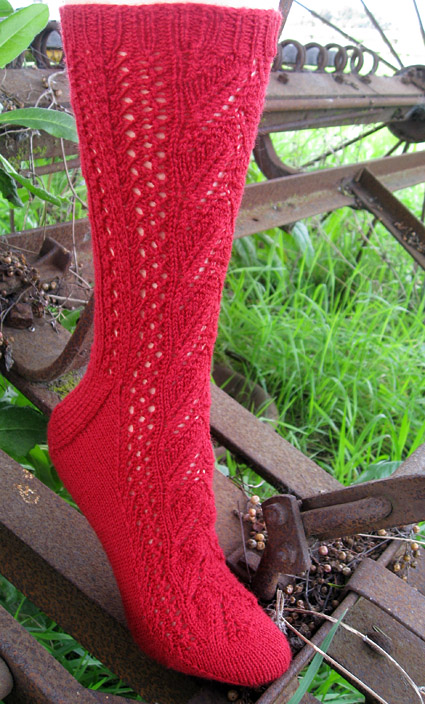
Winnow has panels of wheat heads traveling
up the front and back of the sock and airy lace fans along
the sides. I liked the fan stitch pattern as-is, so all of
the sizing is accomplished in the wheat panels. |
|
 |
|
|
SIZE |
|
FINISHED MEASUREMENTS |
|
MATERIALS Notions |
|
GAUGE |
| 34 sts/44 rounds = 4 inches in stockinette stitch 42 sts/44 rounds = 4 inches in pattern stitch |
|
PATTERN NOTES |
|
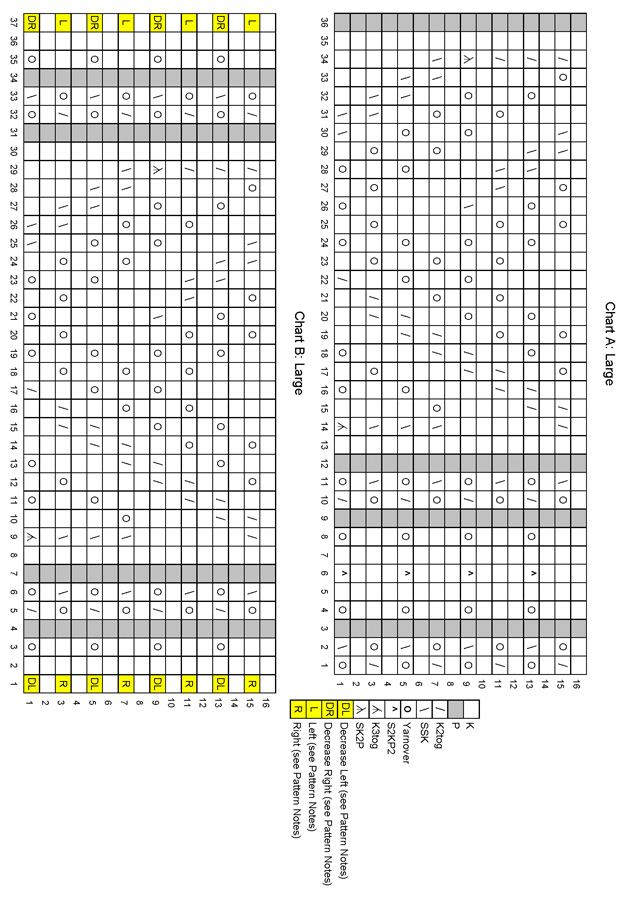
Slip sts as if to purl unless otherwise instructed. Work each row of Chart A twice per round. While working the gusset and foot, the first st of Chart B is marked with a split ring marker. As the project gets longer, move the marker closer to the needles while keeping the marker on the first st of Chart B. K3tog: Knit 3 together. Special symbols on chart:
Rib St (worked over
64[72] sts): |
Choose the appropriate versions of Charts A and B
for the size you are making. |
|
||||||||||
|
DIRECTIONS Leg Note: If you change the length of the leg, end the leg after completing a round that contains row 4, 8, 12, or 16 of Chart A. Make note of the last row worked. Heel Flap Note: The heel flap is worked flat across 31[35] sts which may be consolidated onto one needle. Rem 33[37] sts will be held for instep. Row 1 [WS]: Sl1, p30[34]. Turn work. Note: If you have a large instep, you may wish to work a longer heel flap to add height to the foot of the sock. If you do this, be sure to pick up more gusset sts and work more gusset decrease rounds accordingly. Heel Turn Large size only: Gusset
Note: The gusset decreases are integrated into the patterning worked across the instep. Rows 1, 5, 9 and 13 of the chart have decreases at each end. When a gusset decrease round falls on one of those chart rows, a double decrease is worked at the start and end of the instep sts rather than a standard single decrease. When a gusset decrease round falls on chart rows 3, 7, 11 and 15 a single decrease is worked in place of the knit stitch normally worked. See chart and pattern notes for details. Once the gusset decreases are complete, single decreases are worked at each end of chart rows 1, 5, 9 and 13; and on chart rows 3, 7, 11 and 15, a knit stitch is worked at both ends. Round 1: Sl1, k18[20], pick up and knit 19[21] sts along the side of the heel flap; slip the last picked-up stitch to the left needle, S2KP2, mark the resulting st with a removable stitch marker— (this is the first st of Chart B) continue with the second st of Chart B (refer to table above for which row to work) ending with stitch 32[36] of the chart; sl2, pick up 1 st at the top of heel flap and place it on the left needle, sl2 from the right needle back to the left needle, S2KP2—you just worked stitch 33[37] of Chart B; pick up and knit 18[20] sts along the side of the heel flap, k10[11], pm for beg of rnd if desired.Sole/gusset: 55[61] sts, instep: 33[37] sts. 88[98] sts total. Round 2: Knit up to but do not work marked st; work 33[37] sts in established pattern from Chart B; k to end of rnd. Round 3: Knit until there is 1 unworked st before the marked st; work 33[37] sts in established pattern from Chart B; k to end of rnd. 2 sts decreased. Repeat Rounds 2 and 3 until 33[37] sole sts remain. 66[74] sts total. Foot Foot round: Knit up to but do not work marked
st; continue instep in established pattern from Chart B,
k to end of rnd. Toe Round 1: K1, SSK, k27[31], k2tog, k1, pm for center of round, k1, SSK, k until 3 sts rem in rnd, k2tog, k1. 4 sts decreased. Round 2: K all sts. Round 3: K1, SSK, k to 3 sts before center marker, k2tog, k1, slip marker, k1, SSK, k until 3 sts before end, k2tog, k1. 4 sts decreased. Repeat Rounds 2 and 3 10[12] more times until 18 sts remain. Graft the toe closed. |
|
FINISHING |
| ABOUT THE DESIGNER |
|
Janice knits, spins, and bakes in her home in Northern California.
In her spare time she also sings
backup in a band—her fellow band members often see her
knitting during down time at rehearsal and soundcheck. |
|
Pattern & images © 2010 Janice Kang. Contact Janice |
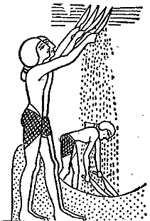 Winnowing illustration: Encyclopaedia Biblica, a 1903
publication which is now in the public domain.
Winnowing illustration: Encyclopaedia Biblica, a 1903
publication which is now in the public domain.