
|
|
 |
|
Tweet
|
|
|
|
|
C'mon Baby, Let's do the
(Bavarian) Twist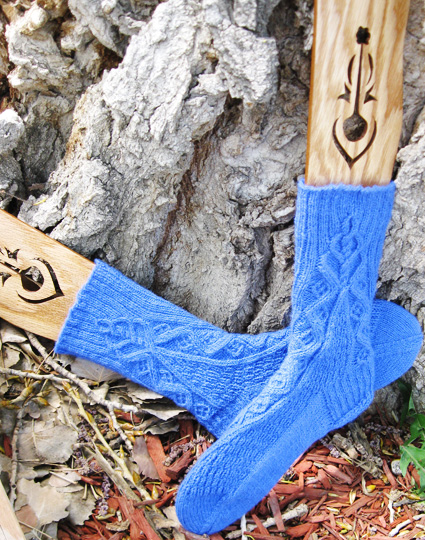 On both socks and sweaters, these designs are made up of twisted knit stitches forming vertical panels on a background of purls. Made from light-weight yarn, the fabric is densely packed with high-relief textured stitches that draw the material in like ribbing. This feature makes it easy to create a body-hugging sweater, but difficult to measure gauge. Because the fabric is quite stretchy, it is easy to distort when wet. Many sweaters from Austria and Bavaria were knitted back and forth in pieces, and sewn together in the style of jackets made from woven fabric. Snug at the waist, with a low scooped neckline, these form-fitting sweaters were often worn with dirndl skirts in the regional style. Men and women also wore fitted vests, or waistcoats, made with similar pattern stitches. Traditional designs featured twisted stitch panels on either side of the front opening of a vest or cardigan and a central panel on the back. The sides and sleeves were often decorated with simpler knit and purl patterns to make shaping easier. Today, sweaters with Bavarian twisted traveling stitches are made in many different styles, but the classic fitted cardigan — covered completely with ornate panels of lattices, zigzags, and diamonds, and braids — is most common. Bavarian socks were made in two styles. Knee socks were made with columns of pattern stitches encircling the entire leg, and a special increase section at the center back for calf shaping. The second popular style was knit in stockinette stitch or ribbing with triangular panel of pattern stitches on each side of the leg, with gusset increases, worked in a simple texture stitch, in the center. Here's How
Obviously, you can knit from
these charts using a legend, just as you knit
from English-language charts, but I think that
adding the step of looking up each symbol and
converting it into words before knitting it,
makes the process more difficult and error
prone. By internalizing the chart symbols and
thinking of them as a drawing of what you are
knitting, and by reading your knitting and
looking at what you have completed and thinking
about where each stitch needs to go in the
row you are knitting to draw the diagonal lines,
you can become very proficient at working the
twisted traveling stitches, as well as other
cables. Once you master this technique, you
may even find that it is easier to knit cables
from photographs of knitted fabric than from
charts! Learn More Überlieferte Strickmuster aus dem steirischen Ennstal, Volumnes 1, 2 and 3 (Paperback, in German) by Maria Erlbacher, Verein Schloss Trautenfels, 7th ed., 2004 |
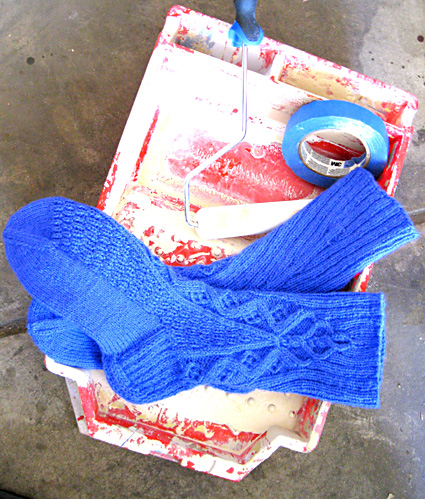 |
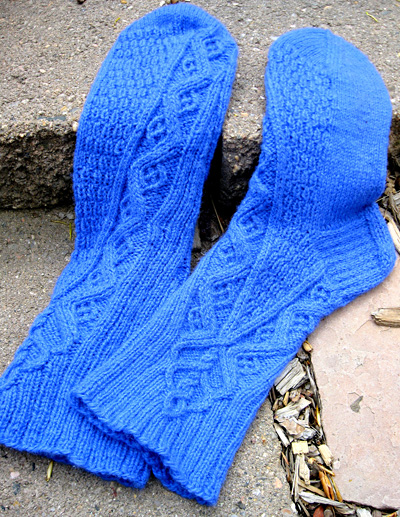
by Donna Druchunas Inspired by the traditional Bavarian socks photographed
in Bäuerliches Stricken, these socks are made with
a modern twist. 
|
|
SIZE |
|
|
|
MATERIALS Notions |
| GAUGE |
28 sts/36 rounds = 4 inches in stockinette stitch |
|
PATTERN NOTES |
SSP: Slip the next 2 sts
knitwise, one by one, insert the left needle into the front
of the 2 slipped sts from left to right, remove the right needle
then insert it into the back of the 2 stitches together from
left to right, then complete the stitch as you normally purl. Working the Twists with a cable needle Working the Twists without a cable needle 1/1 RT, 1/1 RPT | Right Traveling Stitch 2/1 LT, 2/1 LPT | Double
Left Traveling Stitch 2/1 RT, 2/1 RPT | Double Right Traveling
Stitch 2/2 RC | Double Right Cross 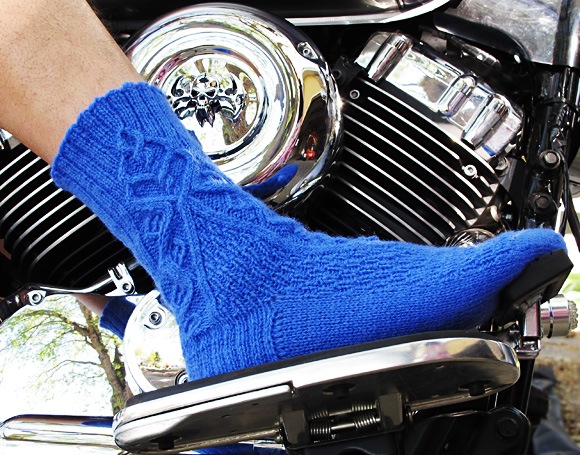
|
Chart
A | Chart B, D | Chart
C |
|
DIRECTIONS |
 Using long-tail method, CO 66[72, 78] sts. Distribute sts across needles as you prefer and join for working in the round being careful not to twist. Ribbing round: [K2, p1] around. Round 1, establish patterns: Work 15 [18, 21] sts in ribbing as set, pm, k2, pm, work 15 [18, 21] sts in ribbing, pm, work 5 sts in ribbing, pm, work Chart A over next 24 sts, pm, work rem 5 sts in ribbing as set to end of round. Work as set until round 15 of the chart is complete. When all rows of Chart A are complete change to charts B, C, and D in pattern area as follows: Maintaining ribbing as established, work Chart B over first 16 sts of Chart A area, m1 (this is the first stitch of the first row of Chart C), work chart D over last 16 sts of patterned area. 67[73, 79] sts. 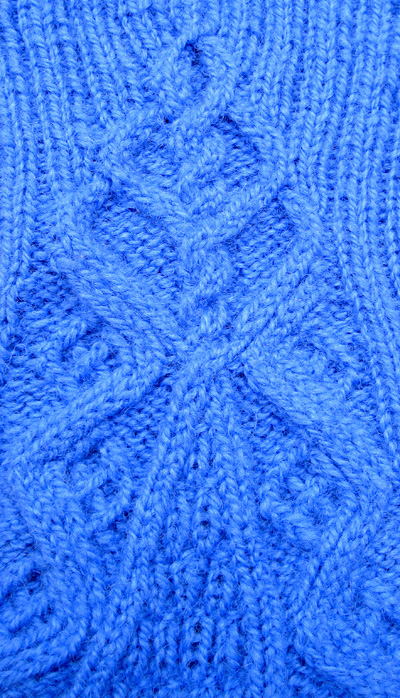 When Chart C complete, work even in patts as est until leg measures 8 inches from CO edge or desired length to heel. Heel Flap Next rnd, setup for heel: Work in patts as est to center stitch (stitch #7) of Chart C panel. Right sock: Work center stitch of gusset panel. The 32[36,
40] sts just worked are the heel sts. Repeat Rows 3 & 4 8[9,10] more times, until 12[14, 16]
sts rem in heel. Foot With RS facing, pick up and knit 11[11, 12] sts along first edge of heel flap, using slipped sts as a guide. Work across instep sts in patts as established. Pick up and knit 11[11, 12] sts along second edge of heel flap, using slipped sts as a guide. Work across heel sts as follows: K2tog, k8[10, 12], ssk. 32[36, 40] sts rem in heel, 67 [73, 79] sts total. Foot round: K to start of instep; work across instep in patts
as est; k to end of round. Right sock, shaping round: K to start of instep; work across instep in patt as set to end of Chart C gusset marker, m1, slip marker, work as set to 2 sts before end of instep, ssp; k to end of round. Left sock, shaping round: K to start of
instep; p2tog, work across instep in patt
as set to end of Chart C gusset marker,
m1, slip marker, work to end of instep
as set; k to end of round. Repeat the above four rounds, taking increased gusset sts into gusset pattern until only 1 st rems between chart panel and instep. At this point, patterns end and instep is worked in St st
until foot is desired length to toe: 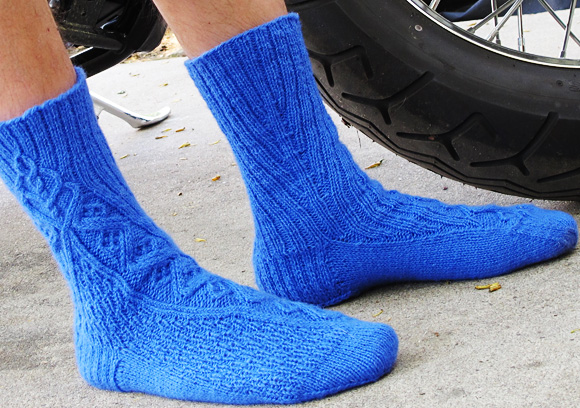
Setup round, size S only: [K2tog, k20] 3 times, k1. 64 sts. Setup round, size M, L: K2tog, k to end of round. -[72, 78] sts. Rearrange sts so that sts so half of the sts are in sole and half in the top of foot. Start of round is at center of sole. Rnd 1: Knit to last 3 sts on sole, k2tog, k2, ssk,
knit to last 3 sts of instep, k2tog, k2 ssk, knit to end of
rnd. 4 sts decreased. FINISHING Wash and dry on large sock blockers if desired. |
| ABOUT THE DESIGNER |
 Visit Donna's website at sheeptoshawl.com. |
| Pattern & images © 2012 Donna Druchunas. Contact Donna |
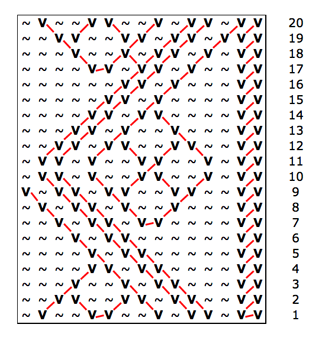 Take
a look at the sample chart at right, and see
if you can knit the pattern. Because we're
knitting in the round, all rows are read from
right to left. I've numbered them for your
convenience, but the rows are not numbered
in the German-language books.
Take
a look at the sample chart at right, and see
if you can knit the pattern. Because we're
knitting in the round, all rows are read from
right to left. I've numbered them for your
convenience, but the rows are not numbered
in the German-language books.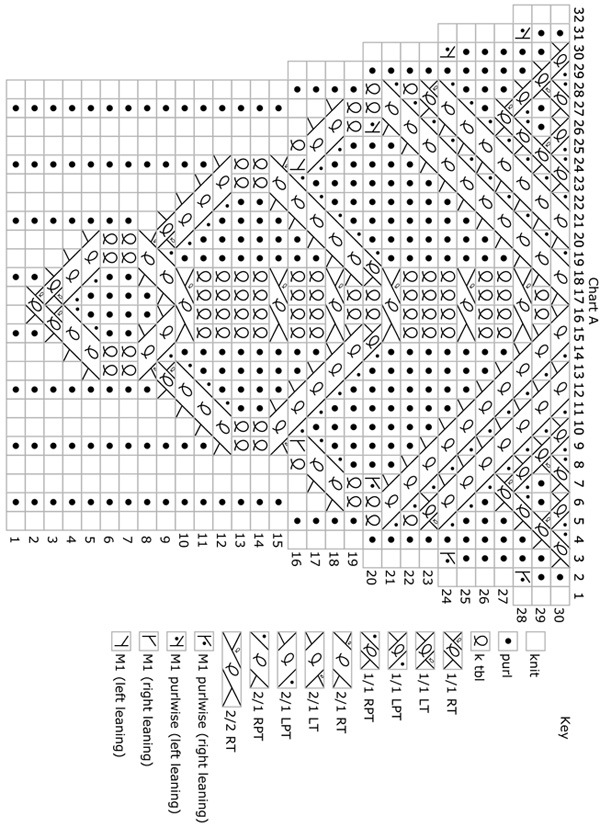