
|
|
 |
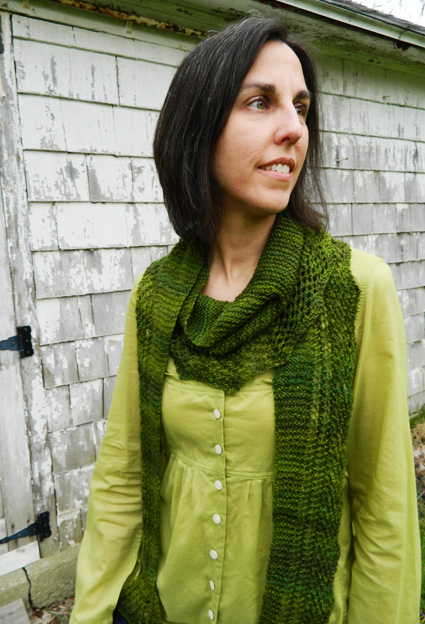 I have a thing for garter stitch—especially with handspun yarn. Garter stitch seems to bring out all the wonderful qualities of handspun. I find it gloriously rustic and sweet and cozy—a fabric without pretension. I love the way garter stitch blends and mellows the colors in the yarn I spin from the hand-dyed braids of fiber that seem to follow me home from fiber festivals. Instead of clearly delineated (and sometimes distracting) stockinette stripes, garter stitch often delivers a lovely, subtle shading of colors. Garter stitch helps to balance twist in handspun yarns, which makes it ideal for using singles. And garter stitch gives me yet another reason to be happy: I really like my scarves and shawls to look the same on both sides so I can wrap them any way I want without having to fuss. Unleaving is a simple scarf with an uncommon edging. Knit entirely in garter stitch from end to end—not a purl in sight—it’s a great stash buster for small amounts of finely spun handspun or single skeins of commercial sock yarn. Exact gauge is not critical, and you can weigh your skein before you begin and customize the length to use the yardage you have on hand. I began with 4 ounces of yak/silk/merino blend fiber dyed by Abstract Fiber. The top was somewhat compacted from the dyeing process, so I let it relax a bit after unbraiding it and then split it lengthwise. The colors in this particular batch were close, so I didn’t need to do anything special to preserve the color variation. I spun it with a short forward draw and was pleased that the yak, silk, and merino stayed nicely blended. The result was what I had hoped for: a semi-solid two-ply yarn with enough color variation to give the knitted fabric depth without creating obvious stripes. The scarf pictured used up only 2.3 ounces of yarn, which left me enough left over to make a second, slightly smaller version as a gift. |
||

|
Tweet
|
|
|
SIZE |
|
|
FINISHED MEASUREMENTS |
Depth at Center Point: 10 inches |
MATERIALS
Drafting Method: Tools |
|||||
| GAUGE |
| 20 sts/36 rows = 4 inches
in garter stitch using US #6/4 mm needles Gauge is not essential for this project, but your final yardage and measurements may vary. |
|
PATTERN NOTES |
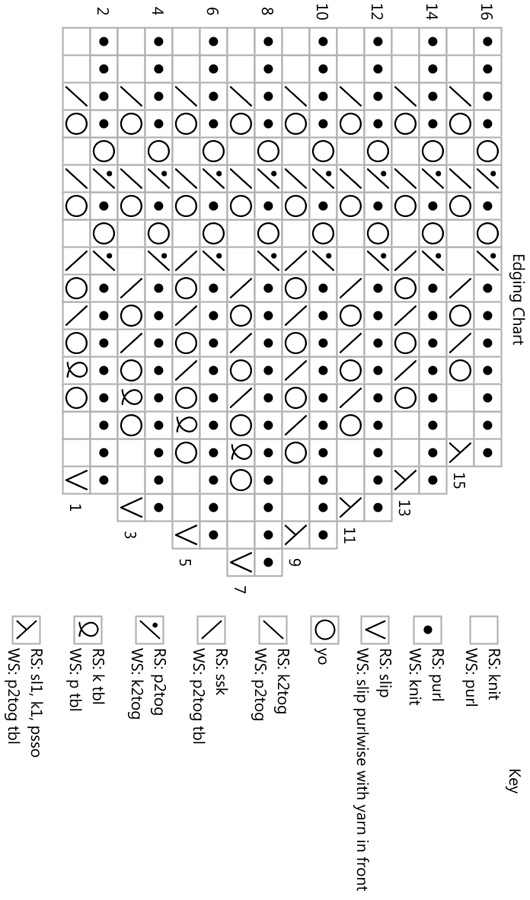
This pattern is a great stash buster because you can use a wide variety of yarns, handspun or commercial, and as long as you have roughly 2 to 3 ounces of a lace weight, 3.5 to 4 ounces of fingering, or about 5 to 6 ounces of sport weight, you’ll end up with a scarf that’s long enough to be useful. Your finished measurements will vary, depending on your gauge and your yardage. You can customize this pattern to use your chosen yarn by weighing the skein (or, in the case of heavier yarns, skeins) before you start and then weighing it periodically during the increase stage. When you have slightly more than half a skein left, begin the decreases. Your yardage and finished size may vary, but the scarf will look great in a variety of sizes. You can change the rate of increases/decreases as well to vary the center width. When I made a second sample from the 1.7 ounces of yarn I had left, I worked increases every 16th row three times; every 8th row eight times; and then every 4th row sixteen times before beginning the matching decreases. This enabled me to reach a center measurement of about 10 inches with a wingspan of about 66 inches. You could also create a wider shawl shape by working a few increases every 16th and 8th rows, and then increasing every 4th row until you reach the desired width. Just make sure you work within the 16-row repeat for the edging, with increases or decreases occurring every 16th, 8th, or 4th row. Slip the first stitch of each row knitwise. Lace Stitch for Edging (worked
over 16 to 20 sts and 16 rows) |
Charts |
DIRECTIONS Foundation Row [WS]: K2, pm, k16. Row 1 [RS]: Work Row 1 of Edging
Chart, slip marker, k2. Begin Increases: Work Inc Row. Dec Row [RS]: Work Edging Chart to
marker, slip marker, ssk, k to end. Work Dec Row. BO all sts loosely knitwise. |
|
FINISHING |
| ABOUT THE DESIGNER |
|
Lee lives with her family in western Connecticut, where she
teaches fiber arts at Westover School and tries
to teach the spiders in her house to sweep the floors so she can spend
more time spinning (so far, they are sympathetic but noncompliant).
|
|
Pattern & images © 2012 Lee Juvan. Contact Lee |