
|
|
 |
|
|

This design was inspired by a favorite piece of clothing owned by my mom, Teresa. It was a long tunic vest from a big chain store, in deepest shade of purple. Unfortunately, the whole thing was made with low-quality acrylic knitted fabric and was pilling very badly. My mom requested my own version of it, and voila, I dedicated this pattern in my mom's name. The general theme of this tunic vest is comfort. It is a very classic piece of clothing you can wear every day in the fall and not get bored. It features cable and simple lace patterns and a cozy shawl collar. The tunic has about 2 inches of positive ease and is worked flat, front and back separately from the bottom up. The armhole shaping is unusual; the armhole is a straight line, and only shaped at the shoulders, so that the armholes fall on the upperarms instead of top of the shoulders. The hem and the shawl collar are worked in 2x2 ribbing. The collar is picked up directly from the neckline and shaped with short rows to raise the back of the neck. |
||
|
|

|
Tweet
 |
|
SIZE |
|
|
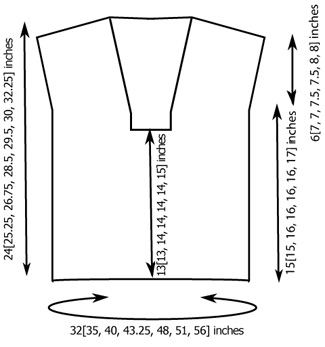
FINISHED MEASUREMENTS |
|
MATERIALS Notions |
| GAUGE |
| 17 sts x 26 rows = 4” in St st with larger needles, after blocking. |
|
PATTERN NOTES |
|
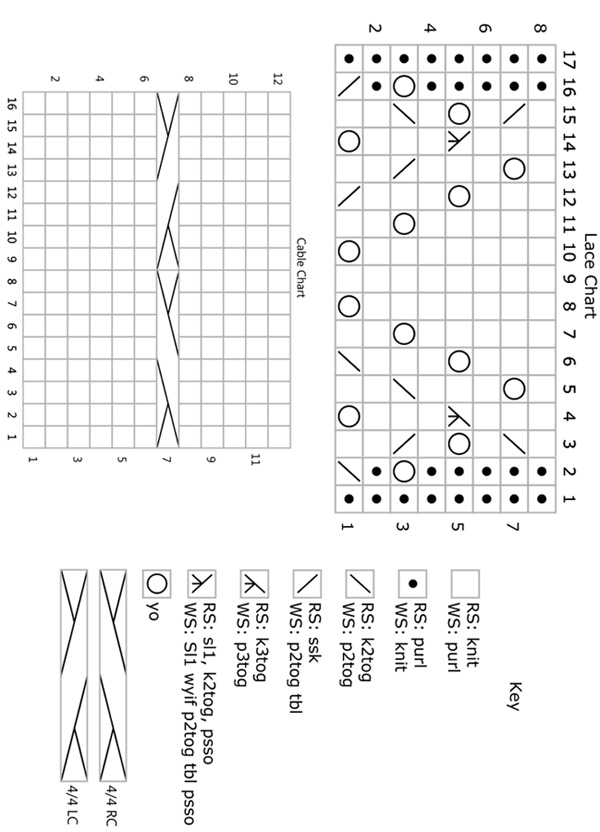
The Body begins with a crochet provisional cast on. 4/4 RC: Slip 4 sts to cn and hold to back, k4; k4 from cn.
|
|
DIRECTIONS Tubular Cast on: Change to working yarn and [k1, yo] to end. 76[84, 96, 104, 116, 124, 136] sts. Next Row: K1tbl, sl1 wyif, [k1, sl1 wyif] to end. Next Row: [K1, sl1 wyif] to end. Body: Next Row [RS]: K1, [p2, k2] to 3 sts before end, p2, k1. Continue in 2x2 ribbing as established until piece measures 3.5 inches from the cast-on edge, ending after a WS row. Switch to larger needles and begin charts as follows: Row 1 [RS]: K6, p3, work Row 1 of Lace Chart, p2[4,
6, 6, 8, 10, 12], k1[2, 4, 6, 8, 9, 11], p1[2, 4, 6, 8, 9, 11],
work Row 1 of Cable Chart, p1[2, 4, 6, 8, 9, 11], k1[2, 4, 6,
8, 9, 11], p2[4, 6, 6, 8, 10, 12], work Row 1 of Lace Chart,
p3, k6. Cont in established patt for 2 rows more. Inc Row [RS]: K1, m1R, patt to last st, m1L, k1. – 2 sts inc’d Work even in patt for 3 rows, then repeat Inc Row once more. 80[88, 100, 108, 120, 128, 140] sts.** Work even in patt until piece measures 15[15, 16, 16, 16, 16, 17] inches from cast-on edge, ending after a WS row. Armholes: Work without shaping until armhole measures 6[7, 7, 7.5, 7.5, 8, 8] inches from the safety pins, ending after a WS row. Shape shoulders: Next Row [WS]: Work 13[15, 17, 17, 20, 22, 24] sts in pattern, then BO next 34[36, 40, 40, 40, 44, 44] sts in pattern, work to end. 13[15, 17, 17, 20, 22, 24] sts remain for each shoulder. Place remaining stitches on holders or waste yarn. Dividing Row [RS]: Work 29[32, 37, 40, 45, 47, 53] sts in pattern, attach a new ball of yarn and bind off next 22[24, 26, 28, 30, 34, 34] sts in pattern (work Cable Chart in St st if your next row is a cable row), patt to end. 29[32, 37, 40, 45, 47, 53] sts rem on each side. From here, you will work left and right fronts separately. Place the first set of sts (the left front) on waste yarn or a holder (do not break yarn). Right Front Place safety pin in the first st of the last (WS) row to mark beginning of armhole. Neck Shaping Row [RS]: K1, ssk, patt to end. Shape shoulders: Place remaining sts on holder or waste yarn. Left Front Work in pattern without shaping until piece measures 2 inches from the Neck Shaping Row, ending after a WS row. Place safety pin in the last st of the last (WS) row to mark beginning of armhole. Neck Shaping Row [RS]: Patt to last 3 sts, k2tog,
k1. Work without shaping until armhole measures 6[7, 7, 7.5, 7.5, 8, 8] inches from the safety pin, ending after a WS row. Shape shoulders: Place remaining sts on holder or waste yarn. |
|
FINISHING Armhole edging: Round 1: [K2, p2] around. Next Row [WS]: P2, [k2, p2] to end. Cont in established rib pattern throughout, working short rows
as follows: Next Row: Patt to wrapped st, pick up wrap and work together with the wrapped st, patt 1 st, W&T. Repeat the last row until 1 st rem between last wrapped sts and markers 3 and 4, ending after a WS row. Next Row: Patt to wrapped st, pick up wrap and work
together with the wrapped stitch, patt to end. Cont even in rib patt until collar measures 5.25[5.75, 6, 6.5,
7, 8, 8] inches from the pick up row, not including the short
rows. Sew collar edge to neck bind off edge. Weave in all ends. Block gently to measurements. |
|
| ABOUT THE DESIGNER |
|
Jean lives in Irvine, California with her
husband and their dog, Bagel. |
|
Pattern & images © 2012 Jean Chung. Contact Jean |