
|
|
 |
|
|
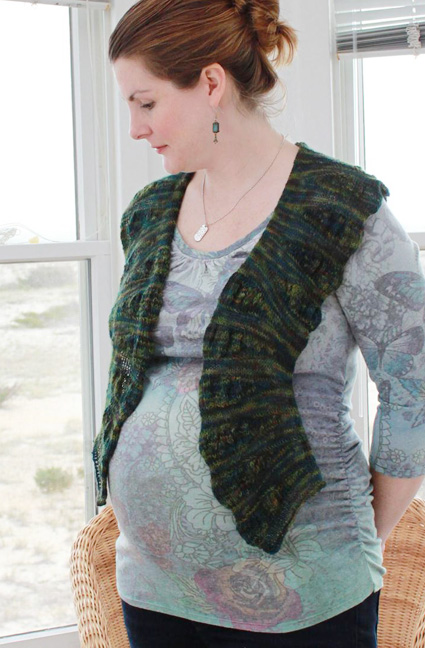
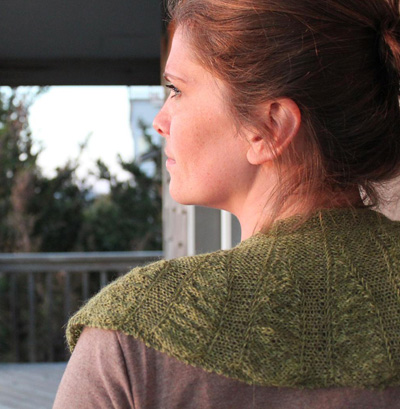
Named for the mathematical definition of the point at which a curved line changes from concave to convex, Inflection is a lovely curved scarf that can sometimes look like a shawlette. Worked with lace weight yarn, this light scarf has great versatility as an accessory that can be draped, wrapped, or pinned during any season. Ruched short rows create dense gussets that curve the scarf in one direction or another. Bi-directional gussets and wedges of these gussets can be varied to create different shapes and lengths. This pattern is written for the two scarves shown in the photographs, but a simple paper wedge technique gives almost infinite design possibilities. Perfect for gift giving, Inflection knits up very quickly requiring
only one skein of laceweight yarn, unless you go
totally crazy with your wedges. |
||
|
|
Tweet
 |
|
|
SIZE |
|
|
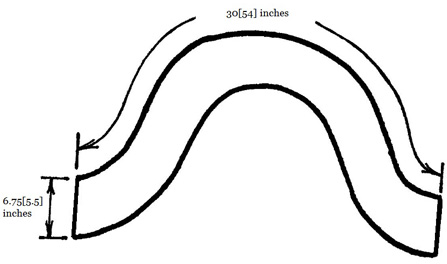
FINISHED MEASUREMENTS |
|
MATERIALS Short [shown below]: Notions |
| GAUGE |
| 22 sts/42 rows = 4 inches
in stockinette stitch (blocked) Note: Gauge is not essential for this pattern. Blocked gauge is tighter on the inner curvature of the shawl and looser on the outside curvature |
|
PATTERN NOTES |
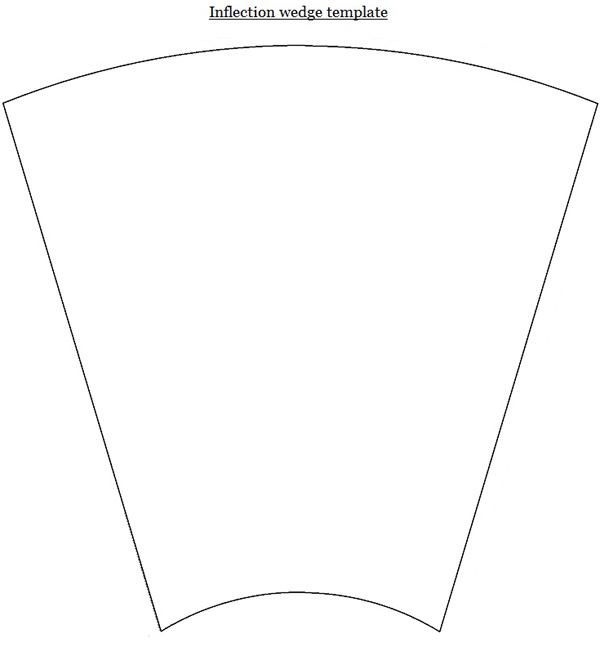
 p2tog tbl: Purl two together through the back of the loop. pbf: Similar to pfb except that I think purling through the back then the front of the same stitch is faster when you have quite a few of these increases to work. sm: slip marker Paper Wedge Design Process |
|
DIRECTIONS 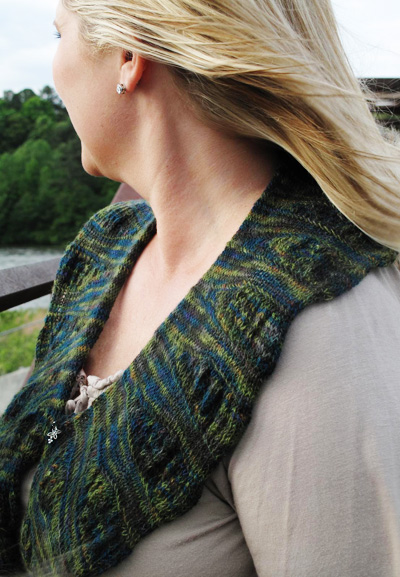
CO 42 sts. Rows 1-4: K all sts. Row 5 [WS]: K3, p to last 3 sts, k3. Right-pointing wedge Begin to work short rows: Repeat Rows 1-22 two more times to complete first Right pointing wedge. Work 1[2] Right-pointing wedges in total for S[L] scarf (unless you have designed your own curvature).  Row 1 [RS]: K all sts. Row 2 [WS]: K3, p to last 3 sts, k3. Row 3 [RS]: K all sts. Row 4 [WS]: K3, p to last 3 sts, k3. Row 5 [RS]: K all sts. Row 6 [WS]: K3, *wyif sl1 purlwise, yo, repeat from * to last 3 sts, k3. 78 sts. 36 sts increased. Row 7 [RS]: K3, *k yo and next st tog tbl; rep from * to last 3 sts, k3. 42 sts. 36 sts decreased. Row 8 [WS]: K3, p12, pm, pbf to last 3 sts, k3. 66 sts. 24 sts increased. Begin to work short rows: Repeat Rows 1-22 two more times to create first Left-pointing wedge. Work 3[5] Left-pointing wedges in total for S[L] scarf. Work 1[2] further Right-pointing wedges for S[L] scarf. Right Edge BO all stitches loosely. 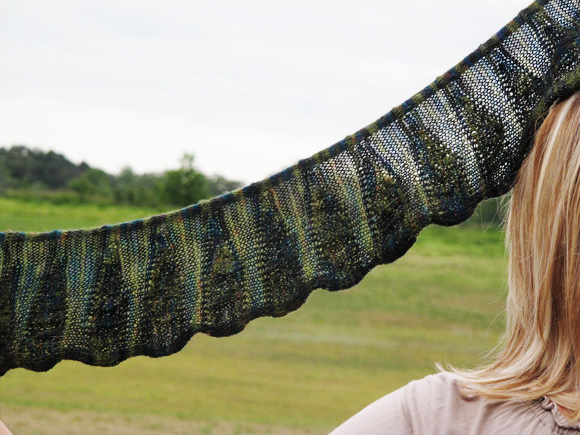
|
|
FINISHING Method 1: The longer, dark green scarf was blocked in the following manner and creates a narrower, more scarf-like piece. After dampening with your preferred method, allow the 3 st garter selvedge to curl under which it will do naturally along the curves. Pin to shape with the turned under edge in place. Scallop the rushed gussets on the outside curvature by pulling them to the desired size. Method 2: The shorter light green scarf was blocked as follows and ends up looking more like a shawlette. After dampening, pull this piece a little tighter and stretch the selvedge edge out fully. Because it is stretched more, the ruched gussets do not scallop as much as when using Method 1. |
|
| ABOUT THE DESIGNER |
|
Jean blogs here and you can find her on Ravelry as ecocrafter. |
|
Pattern & images © 2012 Jean Miller. Contact ecocrafter |
