Knitty: little purls of wisdom
The Loopy Ewe
Title
beauty shot Tangy

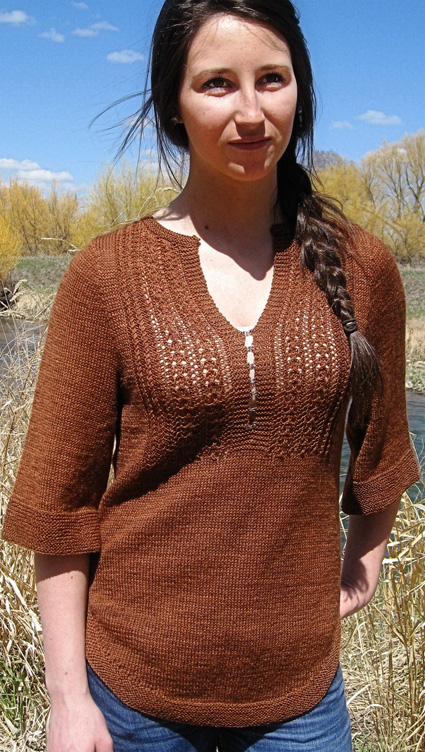
The inspiration for this design started with the shirttail hemline. I wanted to create a top that was casual and easy to wear yet beautiful enough to want to show off.

The tuxedo details at the back and front of the garment make it all the more interesting. Twist stitch cabled ribbing on the back and a blend of the twist stitch cabling and lace stitching on the front. The deep front neck split held together by simple hook and eye closures keeps that casual feel but the shine from the hardware gives it a little bit of a jewelry feel. A simple, wide sleeve worked to the elbow keep the casual vibe going.

This shirt could easily be worn for just about any season depending on the yarn you worked it in. This one is for fall.

Great as a lightweight outer layering piece for shorter cooler days. Or if the day is warmer as they sometimes are in the fall, just layer with a simple cami underneath as we've shown here.

spacer model: Rayann Brown
spacer photos: Jamie Besel
   Pin It!


SIZE
Women's XS[S, M, L, 1X, 2X, 3X]
Shown in size S with 4 inches of ease

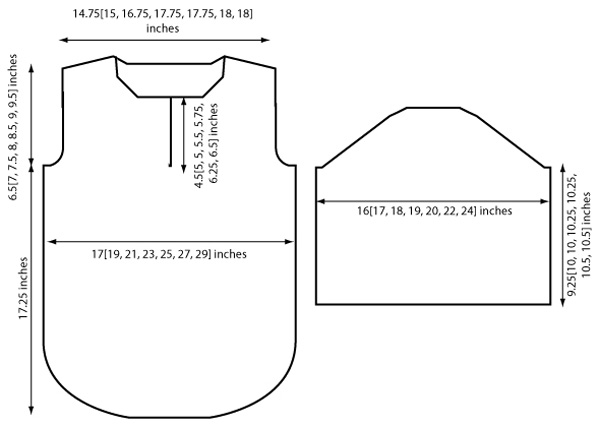
FINISHED MEASUREMENTS
Bust Circumference: 34[38, 42, 46, 50, 54, 58] inches
Length: 24.75[25.25, 25.75, 26.25, 26.75, 27.25, 27.75] inches

spacer

MATERIALS
Yarn

spacer Araucania Itata Solid [70% wool, 15% silk, 15% bamboo; 430yds/393m per 100g skein]; color:2018 Chestnut; 3 [3, 3, 3, 4, 4, 5] skeins

Recommended needle size
[always use a needle size that gives you the gauge listed below -- every knitter's gauge is unique]
spacer US #4/3.5mm needles

Notions
spacer 6-8 hook and eye closures (or as many as desired)
spacer stitch markers (including 4 removable)
spacer yarn needle

spacer

GAUGE

24 sts/32 rows = 4" in stockinette stitch
 

PATTERN NOTES
[Knitty's list of standard abbreviations and techniques can be found here.]

The hemline shape is achieved by casting on additional stitches over several rows. I used a knitted cast on for these additional cast ons.

When taking measurements while working the pattern, be sure to take the measurements from the center of the garment as that will be the longest point.

Rib Pattern (worked over a multiple of 4 sts + 2)
Row 1 [RS]: P2, *k2, p2; rep from * to end.
Row 2: K2, *purl in 2nd st on LH ndl but do not slip st from ndl, purl in 1st st on LH ndl and slip both sts from LH ndl, k2; rep from * to end.
Rep Rows 1-2 for patt.

Lace Pattern (worked over multiple of 7 sts + 4)
Row 1 [RS]: *K2, yo, ssk, yo, sl1, k2tog, psso, yo; rep from * to last 4 sts, k2, yo, ssk.
Row 2 [WS]: K2, yo, k2tog, *p3, k2, yo, k2tog; rep from * to end.
Row 3: *K2, yo, ssk, k3; rep from * to last 4 sts, k2, yo, ssk.
Row 4: K2, yo, k2tog, *p3, k2, yo, k2tog; rep from * to end.
Rep Rows 1-4 for patt.

Garter Stitch
Knit every row.

DIRECTIONS
BACK
Cast on 34[38, 42, 46, 50, 54, 58] sts.

Purl 1 row.

Starting with a RS row, cont in St st, casting on 4 sts at beg of next 4[4, 4, 4, 4, 4, 6] rows, then 3 sts at beg of next 4[4, 4, 6, 8, 8, 8] rows. Finally, cast on 2 sts at beg of next 8[8, 10, 10, 10, 12, 12] rows. 78[82, 90, 100, 110, 118, 130] sts.

Next Row [RS]: K1, m1, knit to last st, m1, k1.

Next Row [WS]: Purl.

Rep last 2 rows 11[15, 17, 18, 19, 21, 21] times more. Place a removable marker in each end of row (for later reference when seaming). 102[114, 126, 138, 150, 162, 174] sts.

Work straight in St st until piece measures 17.25 inches from center of hem or desired length to armhole, ending after a WS row.

Shape Armholes:
Bind off 2[4, 4, 6, 6, 10, 12] sts at beg of next 2 rows, 0[2, 3, 3, 6, 6, 10] sts at beg of next 0[2, 2, 2, 2, 2, 2] rows, 0[0, 0, 2, 4, 5, 4] sts at the beg of next 0[0, 0, 2, 2, 2, 2] rows, and finally 0[0, 0, 0, 2, 2, 3] sts at beg of foll 0[0, 0, 0, 2, 2, 2] rows.
98[102, 112, 116, 114, 116, 116] sts.

Next Row [RS]: Ssk, knit to last 2 sts, k2tog.

Purl 1 row.

Rep last 2 rows 4[5, 5, 4, 3, 3, 3] times more. 88[90, 100, 106, 106, 108, 108] sts.

Next Row [RS]: Work 11[12, 17, 20, 18, 19, 19] sts in St st, work in Rib Pattern for 66[66, 66, 66, 70, 70, 70] sts, work in St st over next 11[12, 17, 20, 18, 19, 19] sts.

Continue to work in newly established pattern until piece measures 6.5[7, 7.5, 8, 8.5, 9, 9.5] inches from beg of armhole, ending after a WS row.

Back Neck and Shoulder Shaping:
Next row [RS]: Bind off 6[6, 6, 7, 7, 7, 7] sts, patt until there are 27[27, 31, 32, 32, 33, 33] sts on RH ndl, attach 2nd ball of yarn and bind off next 22[24, 26, 28, 28, 28, 28] sts, patt to end.

Note: Each side of neck will now be worked separately at the same time, with instructions for each side separated by a semi-colon (;) where applicable.

Next row [WS]: Bind off 6[6, 6, 7, 7, 7, 7] sts, patt to end. 27[27, 31, 32, 32, 33, 33] sts rem each side of neck.
Next 2 rows: BO 6[6, 6, 7, 7, 7, 7] sts, patt to end of first side; BO 5[4, 6, 5, 5, 5, 5] sts, patt to end.
Next 2 rows: BO 5[6, 6, 6, 6, 7, 7] sts, patt to end of first side; BO 4[3, 4, 4, 4, 4, 4] sts, patt to end.
Next row [RS]: BO 5[5, 5, 6, 6, 6, 6] sts, patt to end of first side; BO 2[3, 4, 4, 4, 4, 4] sts, patt to end.
Next row [WS]: BO 5[5, 5, 6, 6, 6, 6] sts rem for shoulder; BO 2[3, 4, 4, 4, 4, 4] sts rem for other shoulder.

FRONT
Work as for the BACK until piece measures 12.5 inches from center of hem, ending after a WS row.

Next Row [RS]: Work 18[24, 30, 36, 38, 44, 50] sts in St st, work 10[10, 10, 10, 14, 14, 14] sts in Rib st, work 18 sts in Lace st, work 10 sts in garter st, work 18 sts in Lace st, work 10[10, 10, 10, 14, 14, 14] sts in Rib st, work rem 18[24, 30, 36, 38, 44, 50] sts in St st.
Work even in newly est patt until piece measures same as Back to armhole, ending after a WS row.

Separate Right Front and Left Front:
Next Row [RS]: Bind off 2[4, 4, 6, 6, 10, 12] sts, work in patt until there are 49[53, 59, 63, 69, 71, 75] sts on RH ndl (ending after 5 sts of garter st), attach 2nd ball of yarn and patt to end.

Continuing to work both sides separately in set patt at the same time with 2 balls of yarn, BO 2[4, 4, 6, 6, 10, 12] sts at beg of next (WS) row, 0[2, 3, 3, 6, 6, 10] sts at beg of next 0[2, 2, 2, 2, 2, 2] rows, 0[0, 0, 2, 4, 5, 4] sts at the beg of next 0[0, 0, 2, 2, 2, 2] rows, and finally 0[0, 0, 0, 2, 2, 3] sts at beg of foll 0[0, 0, 0, 2, 2, 2] rows. 49[51, 56, 58, 57, 58, 58] sts rem.

Next Row [RS]: Ssk, patt to last 2 sts of row, k2tog.
Patt 1 row.
Rep last 2 rows 4[5, 5, 4, 3, 3, 3] times more. 44[45, 50, 53, 53, 54, 54] sts rem for each side.

Work even in patt until Right and Left Fronts measure 4.5[5, 5, 5.5, 5.75, 6.25, 6.5] inches from armhole, ending after a WS row.

Front Neck and Shoulder Shaping:
Note: Each side of neck will continue to be worked separately at the same time, with instructions for each side separated by a semi-colon (;) where applicable.

Next 2 rows: Patt to end of first side; BO 8[8, 9, 9, 9, 9, 9] sts, patt to end.
Next 2 rows: Patt to end of first side; BO 3 sts, patt to end.
Next 4[4, 6, 8, 8, 8, 8] rows: Patt to end of first side; BO 2 sts, patt to end.

Dec row 1 [RS]: Patt to 3 sts before end of first side, k2tog, k1; k1, ssk, patt to end.
Dec row 2 [WS]: Patt to 3 sts before end of first side, ssp, p1; p1, p2tog, patt to end.

Rep last 2 rows 2[2, 3, 2, 2, 2, 2] times more, then rep Dec row 1 once more. 22[23, 23, 26, 26, 27, 27] sts rem.

Work even in patt until piece measures same as BACK to shoulders.

Next 4 rows: BO 6[6, 6, 7, 7, 7, 7] sts, patt to end.
Next 2 rows: BO 5[6, 6, 6, 6, 7, 7] sts, patt to end.
Next row [RS]: BO 5[5, 5, 6, 6, 6, 6] sts; patt to end.
Next row [WS]: BO 5[5, 5, 6, 6, 6, 6] rem sts.

Sleeves [make 2]
Cast on 96[102, 108, 114, 120, 132, 144] sts.

Work in garter st until piece measures 2 inches from cast on.

Work in St st until piece measures 9.25[10, 10, 10.25, 10.25, 10.5, 10.5] inches from cast on or desired length to cap, ending after a WS row.

Shape cap:
Cont in st st, BO 2[4, 4, 6, 6, 6, 6] sts at beg of next 2 rows, 2[1, 1, 1, 1, 1, 1] sts at beg of next 26[2, 6, 10, 12, 8, 2] rows, 3[2, 2, 2, 2, 2, 2] sts at beg of next 2[28, 28, 26, 28, 34, 42] rows, then 3 sts at beg of next 4 rows. BO rem 22[24, 26, 28, 28, 32, 34] sts.

Hem Trim
Note: Stitch counts given below are recommended based on given gauge, but if the picked up sts are causing bunching or flaring, feel free to adjust stitches picked up accordingly.

With RS facing, pick up and knit 122[140, 156, 170, 184, 198, 210] sts along the hemline from one stitch marker to the other on FRONT. Knit 1 WS row.

Next Row [RS]: Ssk, knit to last 2 sts, k2tog.

Next Row [WS]: Knit.

Rep the last 2 rows until piece measures 2 inches from pick up edge, ending after a WS row. Loosely bind off all sts.

Repeat for BACK.

spacer

FINISHING
Stitch front and back shoulder seams together.

Neck Edging
Note: Stitch counts given below are recommended based on given gauge, but if the picked up sts are causing bunching or flaring, feel free to adjust stitches picked up accordingly.

With RS facing, beginning at right front neck cast off, pick up and knit 23[23, 28, 28, 30, 30, 31] sts to shoulder seam, pick up and knit 39[40, 46, 47, 47, 47, 47] sts across back neck, then pick up and knit 23[23, 28, 28, 30, 30, 31] sts around the neckline to left front neck edge.
Work back and forth in garter stitch for 1 inch, ending after a RS row.
Bind off all sts.

Set in sleeves. Sew side seams from markers on FRONT and BACK to armhole, and sew sleeve seams from sleeve cap to top of garter stitch cuff, leaving garter stitch on sleeves and body unsewn.

Place hook and eye closures, evenly spaced, along the center front split to desired height (shown to approx. half-way up neck) and stitch into place. Weave in all yarn ends.

Block to measurements.

spacer
ABOUT THE DESIGNER

Designing clothes since she was able to sew for her Barbie doll, Jamie was first a seamstress. She studied apparel design and at some point realized she loved designing but disliked sitting behind a sewing machine. But as most sewers know, once people learn that you know how to sew, there is just no getting away from it!

While working as a 911 dispatcher during long graveyard shifts, Jamie was inspired to give knitting a try by a co-worker who learned to knit by watching internet videos. That was it! She was hooked. This was the perfect art...the ability to still design and create clothing without being tethered to a sewing machine.

Find her here.

spacer