|
|
 |
|
|
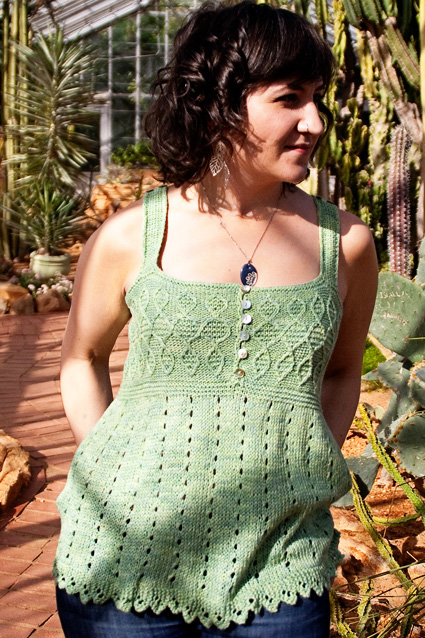 |
Inamorata: A woman with whom one is in love. With its flowing lines and sweet empire waist shaping, Inamorata invokes romance and feminine appeal. Custom-fit strap shaping provides modesty and comfort in this classic knit that fits and flatters. This project is worked with two strands of yarn held together throughout, and the soft handpainted linen/silk blend adds lovely drape and subtle color. The bodice is knit back and forth in rows from the upper edge to the under-bust, then the lower body is worked in the round to the lower edge. The bind off is worked in a simple lace garter stitch sawtooth pattern. Stitches for the straps are then picked up along the upper edge, and the straps are worked to fit. A row of single crochet trims the bodice edges, and the button loops for dainty shell buttons are worked with a simple crochet loop. |
|
|
 |
|
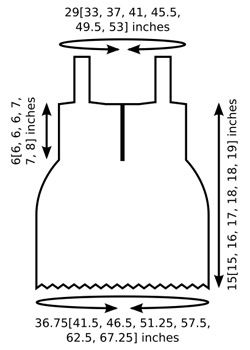
SIZE |
|
FINISHED MEASUREMENTS |
|
MATERIALS Notions |
|
GAUGE |
22.5 sts /30 rows = 4” in reverse stockinette st using smaller needles Note: Gauge measurements taken after blocking. |
|
PATTERN NOTES |
|
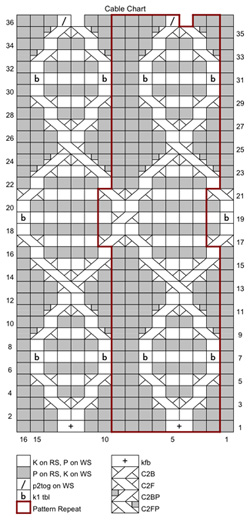
C2F: C2BP: C2FP: yo2: Yarn over twice (wrap yarn twice around right needle, from front to back). Crochet Stitches: The bodice and straps are edged with a very simple crocheted edging. Here are the abbreviations used and directions for the stitches used: |
|
DIRECTIONS Cable Pattern: Work Rows 2-36 of chart, maintaining first and last 3[2,
3, 3, 2, 2, 2] sts in reverse stockinette st as set. Note
that in Row 36 of chart, every 8-st repeat is decreased
to 7 sts; when row is complete, there will be 167[186,
209, 230, 256, 277, 298] sts. LOWER BODY Sizes S, 1X, 2X, 3X Only: All Sizes: K 3 rounds. K 2 rounds. Switch to smaller circular needle and k 1
round. Row 1 [RS]: K2, yo, k2, k last st of edging together with
next st of lower body. 6 edging sts. K 1 row, then BO all sts of
edging. |
|
FINISHING STRAPS Front Straps: Back Straps: BO all sts.
CROCHET EDGING AND BUTTONHOLES With two strands of yarn held together and with RS
facing, join yarn with sl st at bottom
of right front edge of bodice. Ch 1,
[sc along right front bodice edge to
location of buttonhole, (sc, ch 2, sc)
in next row edge st] until all buttonholes
have been worked, sc to upper corner
of right front edge; continue working
sc along edges of bodice and straps,
working two buttonholes at upper end
of each back strap [see
above], and ending
at bottom of left front bodice edge.
Fasten off and weave in ends. |
|
| ABOUT THE DESIGNER |
|
Mercedes Tarasovich-Clark spends her days dyeing a spectrum of
yarns for her indie dye company, Kitchen
Sink Dyeworks, and her evenings thinking up new projects to
play with all of those colors. |
|
Pattern & images © 2010 Mercedes Tarasovich-Clark. Contact Mercedes |