Knitty: little purls of wisdom
Handknitting.com
Title
beauty shot

Tangy

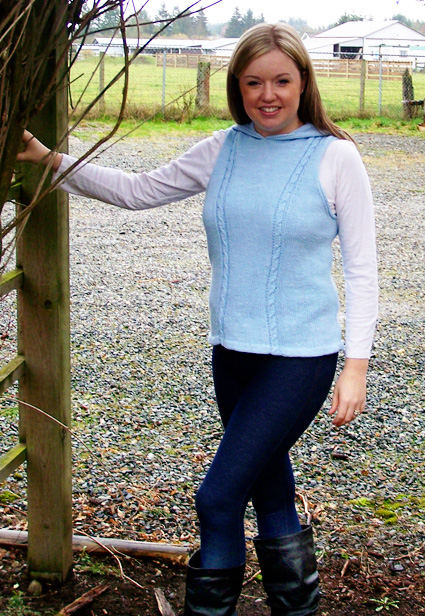
The piece was originally designed for my daughter Meghan, who is a violinist and a gypsy at heart. La Gitana means "The Gypsy" and is also the name of a wonderful violin piece "La Gitana" by Fritz Kreisler

I had in mind a garment that would service the transition of the seasons.  It can be worn with or without a shirt underneath and is light enough to throw a jacket over.

There is subtle shaping of the cables so that they actually flare out to the shoulder and decrease slightly at the waistline for a more flattering fit. I've finished the hood and armholes with an I-Cord bindoff. 

spacer model: Shayna Van Gool spacer photos: Moira Engel

SIZE
XS[S, M, ML, L, 1X, 2X, 3X] (shown in size L)

spacer

FINISHED MEASUREMENTS
Chest: 30[34, 36, 38, 40, 44, 48, 52] inches
Length: 24[24.5, 25.75, 26.5, 27.5, 28, 28.5, 28.5] inches

spacer

MATERIALS
Yarn

spacer Rowan Purelife Organic Cotton DK Naturally Dyed [100% organic cotton; 131yd/120m per 50g skein]; color: #994 Medium Indigo; 7[8, 8, 9, 9, 10, 12, 14] skeins


Recommended needle size
[always use a needle size that gives you the gauge listed below -- every knitter's gauge is unique]
spacer 24 inch US #5/3.75mm circular needle
spacer 1 set US #5/3.75mm straight needles (optional)
spacer 1 US#5/3.75mm double-point needle (used for I-cord Bind Off)

Notions
spacer Yarn needle
spacer Cable needle
spacer Stitch markers

spacer

GAUGE

spacer22 sts/28 rows = 4" in stockinette stitch

PATTERN NOTES
[Knitty's list of standard abbreviations and techniques can be found here.]

C4Btbl: Sl next 2 sts to cable needle and hold to back of work, k2 tbl from left needle, k2 tbl from cable needle.

C4Ftbl: Sl next 2 sts to cable needle and hold to front of work, k2 tbl from left needle, k2 tbl from cable needle.

m1L (left-leaning increase): Insert left needle, from front to back, under horizontal strand of yarn running between last stitch on left needle and first stitch on right needle; knit this stitch through back loop. 1 stitch increased.

m1R (right-leaning increase): Insert left needle, from back to front, under horizontal strand of yarn running between last stitch on left needle and first stitch on right needle; knit this stitch through front loop. 1 stitch increased.

Right Cable (Worked over 8 sts):
Rows 1, 3, 7 [RS]: P2, k4 tbl, p2.
Rows 2, 4, 6, 8 [WS]: K2, p4 tbl, k2.
Row 5 [RS]: P2, C4Btbl, p2.
Repeat Rows 1-8 for Right Cable.

Left Cable (Worked over 8 sts):
Rows 1, 3, 7 [RS]: P2, k4 tbl, p2.
Rows 2, 4, 6, 8 [WS]: K2, p4 tbl, k2.
Row 5 [RS]: P2, C4Ftbl, p2.
Repeat Rows 1-8 for Left Cable.

Instructions for grafting can be found here.
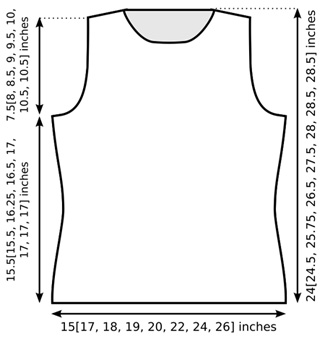
 

DIRECTIONS
BACK
Hem Facing:
Using straight or circular needle(s), CO 88[100, 106, 110, 116, 128, 138, 150] sts.

Work 6 rows in stockinette st, ending with a WS row.

Next Row [RS]: K all sts through back loops. This row forms turning row for hem.

Lower Body:
Setup Row [WS]: P27[32, 34, 36, 37, 40, 43, 47], place marker, k2, p4 tbl, k2, place marker, p18[20, 22, 22, 26, 32, 36, 40], place marker, k2, p4 tbl, k2, place marker, p27[32, 34, 36, 37, 40, 43, 47].

Next Row [RS]: K to first marker, work Row 1 of Right Cable, k to third marker, work Row 1 of Left Cable, k to end. This row sets pattern for back.

Continue in pattern, working cables as set and all other sts in stockinette st, until work measures 3 inches from turning row, ending with a WS row.

Shape Waist:
Waist Decrease Row [RS]: Work in pattern to second marker, ssk, k to 2 sts before third marker, k2tog, work in pattern to end.

Work 5 rows in pattern.

Repeat these 6 rows once more, then work Waist Decrease Row once more. 82[94, 100, 104, 110, 122, 132, 144] sts.

Work 15 rows in pattern.

Note: As written, lower body will measure 15.5[15.5, 16.25, 16.5, 17, 17, 17, 17] inches to underarm. If more or less length is desired, work more or fewer rows at this point, ending with a WS row.

Waist Increase Row [RS]: Work in pattern to second marker, slip marker, m1, k to third marker, m1, slip marker, work in pattern to end.

Work 5 rows in pattern.

Repeat these 6 rows once more, then work Waist Increase Row once more. 88[100, 106, 110, 116, 128, 138, 150] sts.

Note: Read ahead! Stitch pattern directions and armhole shaing directions are worked at the same time.

Continue in pattern until work measures 14.5[14.5, 14.75, 15.5, 16, 16.5, 16, 16.5] inches from hem turning row or 1[1, 1.5, 1, 1, 0.5, 1, 0.5] inch less than desired length to underarm, ending with a WS row.

Shift Cable Panels:
Cable Shift Row [RS]: K to 2 sts before first marker, k2tog, work in pattern to second marker, k1, m1R, k to 1 st before third marker,  m1L, k1, work in pattern to fourth marker, ssk, k to end.

Work 3 rows in pattern.

Work Cable Shift Row. Work 5 rows in pattern.

Repeat these 10 rows 5 times more.

AT THE SAME TIME, when work measures 15.5[15.5, 16.25, 16.5, 17, 17, 17, 17] inches from hem turning row or desired length to underarm, ending with a WS row, shape armholes as follows:

BO 5[5, 7, 8, 9, 10, 10, 13] sts at beginning of next 2 rows. 78[90, 92, 94, 98, 108, 118, 124] sts.

Next Row [RS]: K2, ssk, work in pattern to last 4 sts, k2tog, k2.

Work 1 WS row in pattern.

Repeat these 2 rows 4[4, 4, 5, 7, 8, 11, 13] times more. 68[80, 82, 82, 82, 90, 94, 96] sts.

Continue in pattern until work measures 7.5[8, 8.5, 9, 9.5, 10, 10.5, 10.5] from beginning of armhole (23[23.5, 24.75, 25.5, 26.5, 27, 27.5, 27.5] inches from hem turning row, ending with a WS row.

Shape Shoulders:
BO 5[7, 7, 7, 7, 8, 8, 8] sts at beginning of next 4 rows.
BO 6[8, 8, 8, 8, 7, 8, 9] sts at beginning of next 2 rows.
Place remaining 36[36, 38, 38, 38, 44, 46, 46] sts on st holder for back neck.

FRONT
Work as for back until work measures 20[20.5, 21.75, 22.5, 23.5, 23, 23.5, 23.5] (3[3, 3, 3, 3, 4, 4, 4] inches less than back to beginning of shoulder shaping), ending with a RS row.

Note: If shifting of cables is not complete, remember to continue working cable shifts as set.

Shape Neckline:
Row 1 [WS]: Work 28[34, 35, 35, 35, 38, 39, 40] sts in pattern; join second ball of yarn and BO next 12[12, 12, 12, 12, 14, 16, 16] sts; work in pattern to end. Two sets of 28[34, 35, 35, 35, 38, 39, 40] sts, each with ball of yarn attached.

Row 2 [RS]: Work first set of sts in pattern; BO first 2 sts of second set of sts knitwise, work in pattern to end.

Row 3 [WS]: Work first set of sts in pattern; BO first 2 sts of second set of sts purlwise, work in pattern to end.

Repeat Rows 2 and 3 1[1, 2, 2, 2, 2, 2, 2] times more. 24[30, 29, 29, 29, 32, 33, 34] sts in each set.

Next Row [RS]: Work in pattern to last 4 sts of first set, k2tog, k2; k first 2 sts of second set, ssk, work in patern to end.

Work 1 row in pattern.

Repeat these 2 rows 7[7, 6, 6, 6, 8, 8, 8] times more. 16[22, 22, 22, 22, 23, 24, 25] sts in each set.

When work measures same as back to beginning of shoulder shaping, shape shoulders as for back.

HOOD
Sew shoulder seams.

Place held back neck sts on needle with RS facing.

Beginning at center of front neckline BO edge, with RS facing and using circular needle, pick up and k 25[25, 27, 27, 27, 32, 33, 33] sts along right front neckline edge (approx. 1 st in each BO st and 2 sts for every 3 rows), k first 18[18, 19, 19, 19, 22, 23, 23] back neck sts, place marker, k remaining 18[18, 19, 19, 19, 22, 23, 23] back neck sts,  pick up and k 25[25, 27, 27, 27, 32, 33, 33] sts along left front neckline edge, ending at center front. 86[86, 92, 92, 92, 108, 110, 110] sts

Note: If you need to pick up a few sts more or less edge than the number given along front neckline, don't worry. It's more important to have a smooth and even line of picked-up sts than to have the right number. Just be sure to pick up the same number for the right and left sides.

Do not join work; hood is worked back and forth in rows.
Work in stockinette st until hood measures 4 inches, ending with a WS row.

Next Row [RS]: K to 1 st before marker, m1L, k2, m1R, k to end.

Work 3 rows in pattern.

Repeat these 4 rows 17 times more. 122[122, 128, 128, 128, 144, 146, 146] sts.

Continue in stockinette st until hood measures 16 inches, ending with a RS row.
Place first 61[61, 64, 64, 64, 72, 73, 73] sts on a second needle, and graft halves of hood together.

spacer

FINISHING
Armhole Edging:
Using circular needle, beginning at left front underarm with RS facing, pick up and k 1 st in each bound off st and 3 sts for every 4 rows around armhole. Do not join.

P 1 WS row.

Using double-point needle, work I-cord Bind Off as follows:
K2, k2tog; [slip 3 sts just worked back to left needle (circular needle), k2, k2tog] until only 3 sts remain; slip 3 sts back to left needle, k3tog.

Work edging for right armhole in the same way, beginning to pick up sts at right back underarm.

Hood Edging:
Using circular needle, beginning at center front neckline with RS facing, pick up and k 3 sts for every 4 rows around front edge of hood. Work as for armhole edging.

Sew side seams. Fold hem facing to WS of garment along turning row and sew in place, taking care not to sew too tightly.

Weave in ends and block as desired.

spacer
ABOUT THE DESIGNER

Living on the west coast of Canada married to a tugboat Captain, there's always a need for warm woolies. I've been knitting since I was nine years old (that's a long, long time ago). I started "designing" when my asperger's son began asking me to make things that just didn't have patterns.  A rainbow trout was my first foray into "design". Since then I've been having fun knitting originals for my daughter, friends and family.

spacer