
|
|
 |
|
|
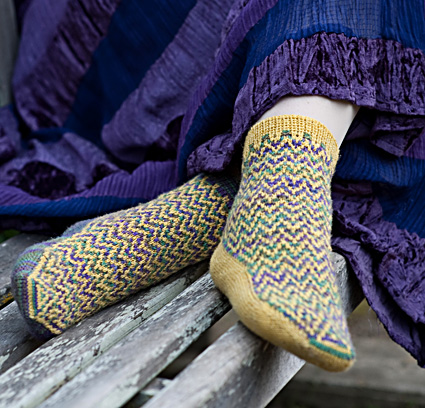 |
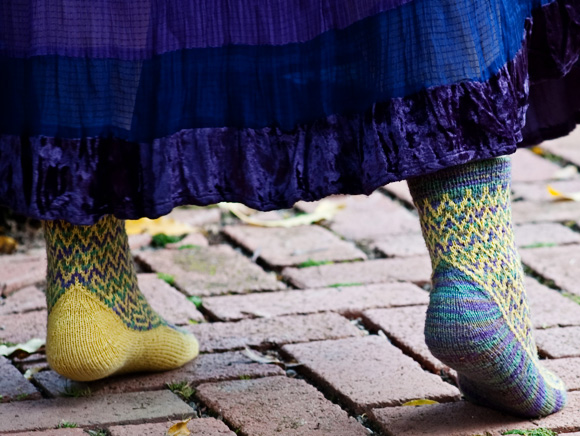
My knitting philosophy has tended toward the organic -- I like knitted objects to look as if they had just grown, like crystals, rather than being built section by section. Even though I had knitted for years, I had never made socks, because the traditional construction is so visible, especially with the gusset and heel flap. But when some hand-dyed sock yarn somehow materialized in my stash, I had to figure out a sock design to go with it. In addition to making the construction as inconspicuous as possible, I also wanted to minimize the appearance of striping -- these really are the anti-socks, here -- by using a mosaic pattern in a strongly contrasting yarn. |
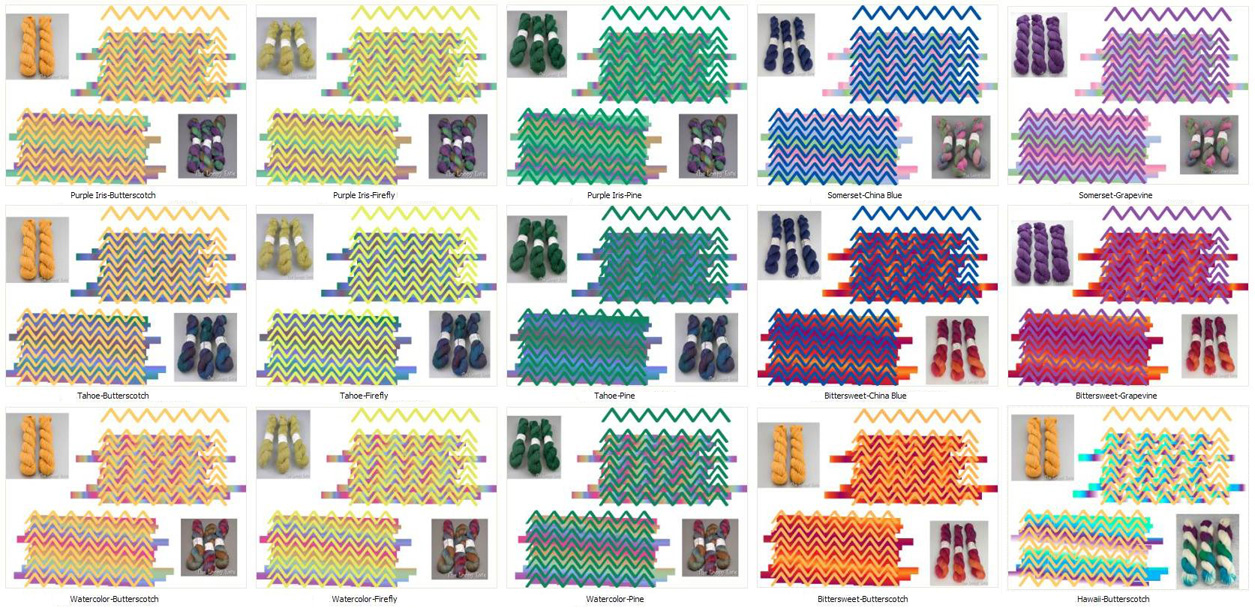
I only had about 30g of that contrast yarn to use in those first socks of mine, so I used it only on the instep, figuring that the tighter row gauge of the mosaic pattern would cancel out the difference of there being twice as many rows on the instep as on the sole. It didn't, quite, but a few short rows on the sole took care of that. The next problem was to make the right-angle turn of the knitting around the heel without the abrupt change of the usual flap or short-row heels. The solution was to intersperse short rows on the sole/heel with rounds of the foot during the arch expansion (what I have since called an integrated heel), so that when the arch was finished the heel turn was also mostly completed. A smooth transition from the solid-color sole and heel to the patterned leg was enabled during the post-heel-turn decreases by continuing the expansion of the colorwork while pairing it with additional decreases in the sole/heel, wrapping the color patterning around the leg. The result looks bizarre when laid "flat", since it's not flat at all, but it fits like a glove. These socks are named for my sister Wendy (whose name means "wanderer"), the recipient of the original pair, because of the patterning near the toe. When I was first charting out the colorwork pattern I fitted it into the shaping by putting a triangle, one of my favorite shapes, at the toe and some diamonds in the remaining space. The unexpected result of this was both a large W over the triangle and a rather reptilian face on the toe, both of which remind me of my lizard-loving sister. A note on color choice: Selecting colorways for these socks is more difficult than it might seem. The solid color needs to contrast not only in hue but in value, and a multicolor with a wide value range (major harmony, for those familiar with Deb Menz's Color in Spinning) will tend to have sections where the pattern is difficult to see. When I was asked to reknit the socks in Lorna's Laces Shepherd Sock, I used Adobe Illustrator to simulate several possible combinations, as shown in the graphic (yarn photos courtesy of The Loopy Ewe, used with permission). I found that the most successful combinations were those in which the hues in the multicolor were mostly of medium value (middle minor harmony), and the solid yarn was either high (light) or low (dark) in value. Not only does the patterning stand out, the solid yarn makes the colors of the multicolor glow almost iridescently rather than mixing into homogeneity as they do without the contrasting solid. The multicolor yarn will behave differently depending on whether it is used as the main color (worked in rounds as well as in short rows on the sole and heel) or the contrasting color (worked back and forth on the instep). I have reversed MC and CC for the second of the socks shown to illustrate this different behavior. When the multicolor is CC it argyles from side to side on the foot until the arch expansion disrupts this; when it is MC, it spirals slightly on the foot. The degree of these color effects depend on the multicolor yarn itself, of course. |
|
 |
|
|
SIZE |
|
FINISHED MEASUREMENTS |
|
MATERIALS Notions |
|
GAUGE |
40 sts/80 rounds = 4 inches in slip stitch pattern |
|
PATTERN NOTES |
|
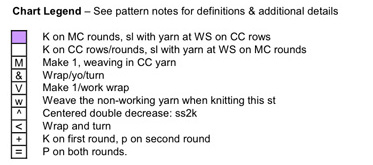
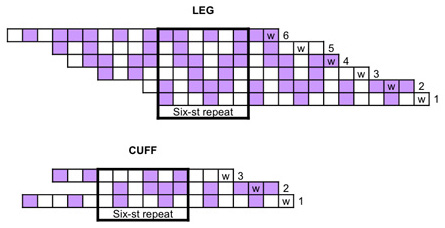
Important note: This pattern uses a variety of unusual techniques, and some of the chart symbols are non-standard. Please review these notes for more information on the chart symbols used. A more detailed explanation of mosaic knitting. Working the patterning in the round: To work the slipped stitch colorwork on the instep, the rounds are worked in an unusual manner: you first work twice over the instep stitches in rows, knitting the CC stitches and slipping the MC stitches, and then two full rounds in MC, knitting the MC stitches and slipping the CC stitches. After each repeat of this pattern, two full rounds have been worked in both colors. Stitch pattern and chart: Charts are
standard for mosaic patterns: each square
represents two rows/rounds, designated (A) and
(B) respectively.
Lifted make 1 (m1) increases are used, but with the usual symmetry reversed by having the twist go from left to right at the beginning of the needle and right to left at the end of the needle. M1L: Lifted make 1, left-leaning (used on sole & first round after cast-on only): Insert tip of RH under thread between previous and next st from back to front, and knit this strand tbl, twisting this thread from right to left around the base of the new st. M1R: Lifted make 1, right-leaning (used on sole & first round after cast-on only): Insert tip of LH needle under thread between previous and next st from back to front, and knit into the front of this thread, twisting it around the base of the new st from left to right. The instep increases are a little more complex since they involve dealing with CC yarn -- the increase at the beginning of the instep weaves in the CC yarn, and the increase at the end of the instep is set up by the preceding CC rows, as follows: M: Make 1/weave (MC only): Insert tip of RH needle from back to front under running thread between st just worked and next st on LH needle, making a new yo on the needle. Put CC yarn over RH needle from left to right. Insert tip of LH needle purlwise into CC yarn and MC yarnover and k1 from this position (similar to a ssk). 1 st made, with CC yarn woven in on WS. &: Wrap/yo/turn (CC only): After working last CC st of (A) of charted row, bring working (CC) yarn forward. Insert RH needle tip from front to back under running MC thread between st just worked and st on LH needle and keep this yarn on needle (making a MC yo). Turn, bring working yarn forward, slip new MC yo onto RH needle and work rest of row as usual. V: Make 1/work wrap (MC only): After slipping last CC st of (A) of charted row, insert the tip of the RH needle under the wrap at front of work and up through it, so that the RH needle is now pointing up through the wrap. From there, insert the RH needle through the front loop of the wrapped stitch (actually the MC yo made on the previous round by wrap/yo/turn, which ends up mounted the reverse of how yarnovers are usually mounted on the needle), so that there are now two loops on the RH needle -- the wrap itself and the wrapped yarnover. Knit these two together. This twists the previously-wrapped yarnover from left to right, as if it had been a simple m1R. (It may be easiest to put tip of RH needle first under CC wrap and then through front (leftmost) loop of MC yo and slip the MC yo off LH needle, keeping both the yo and the CC wrap on the RH needle, then insert tip of LH needle purlwise into both wrap and st and knit both loops tog as if ssk.) Tug a little as needed to make the CC wrap slip behind the twisted MC st. For best results, pull the slack of the CC wrap into adjacent CC st a few rows later. w: Weave yarn (leg and MC rounds of foot section only): Insert RH needle into first st as if to knit and bring nonworking yarn over RH needle tip from right to left, then k the st and the nonworking yarn tog. ^: Centered double decrease (ss2k, MC end of heel only): Sl 1 knitwise, then sl 2 tog knitwise; insert point of LH needle into all three st on RH needle purlwise and knit them together from this position. Wrapping and turning without increasing. This mainly occurs on the sole, which is written out rather than charted, but there are also some CC wraps and turns without increasing on the instep in the foot section. Multiple short rows may be worked on the sole of a single charted round, and the wrong-side wrap & turn is worked differently depending on whether or not the w&t is the last one to be done on that round. Follow these instructions carefully: after the turn, don’t slip the stitch back to the LH needle. Within the pattern, there are places where something needs to be done before the slip, and therefore specific slip instructions are given within the row/round. <: Wrap & turn (w&t) on RS: Bring
yarn forward to RS, slip next st knitwise, bring yarn to
back & turn. Yarn is now wrapped around that stitch
and the stitch is now mounted on the needle with the left
leg in front of the needle instead of the right. How to work a wrapped stitch on RS: When you come to a previously-wrapped st during a right-side row, insert RH needle tip under front of wrap and lift wrap over tip of LH needle to back of work, then k the st and wrap tog tbl. If that wrapped st was a fin-w&t, there will also be a very tight yo on the needle just ahead of the wrapped stitch; drop this yo off the LH needle (adding slack to the wrap) before working the wrapped stitch. How to work a wrapped stitch on WS: Lift wrap from back (RS) to front (WS) of st and p2tog the wrap and the st. Slipping stitches: Unless stated otherwise, all stitches are slipped purlwise with yarn at wrong side of work. Tension: It will be necessary to individually
adjust the tension of the stitches adjacent to the wraps
and turns at beginning and end of instep. Ease the looseness
of the stitches into the colorwork sections. |
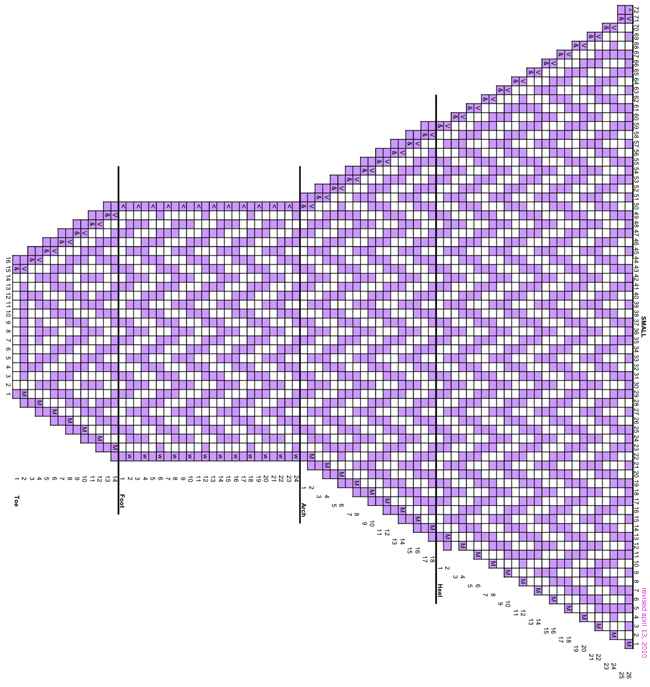
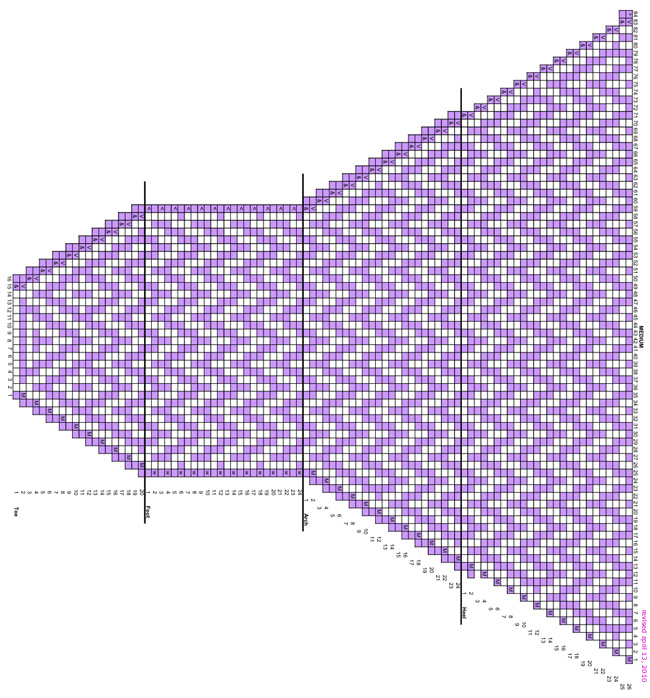
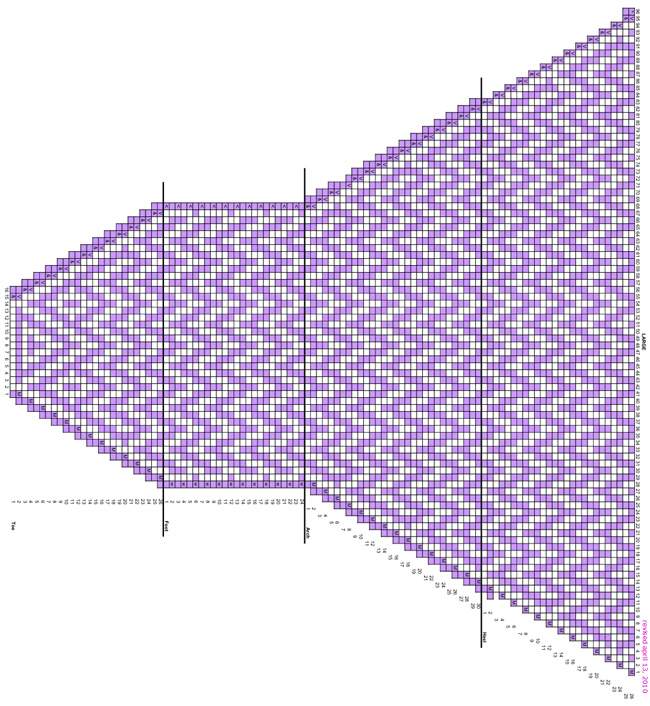
| Charts The charts for this pattern are very large. Each fits on a letter-sized page. Click the chart name below and print the resulting page. Charts revised April 13, 2010. Leg + cuff for all sizes ďż˝ Small • Medium • Large |
|
DIRECTIONS 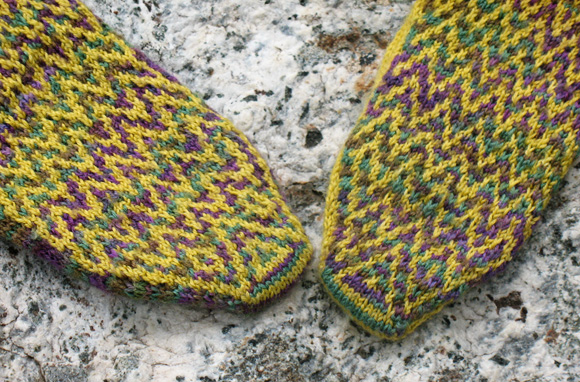
Using Judy's Magic Cast-On and Main Color, cast on 13 stitches on each of two needles -- 26 stitches total. Mark start and center of round. First 13 sts will be the instep; the second 13 will be the sole. Round 1: K. Join CC. Row 1 (CC): Work back and forth with
CC as per chart, slipping MC sts. Continue according to chart for remainder of toe. Remember that you work the increases only on (A) of each MC round. At end of toe instep and sole are each 29[35, 41] sts. 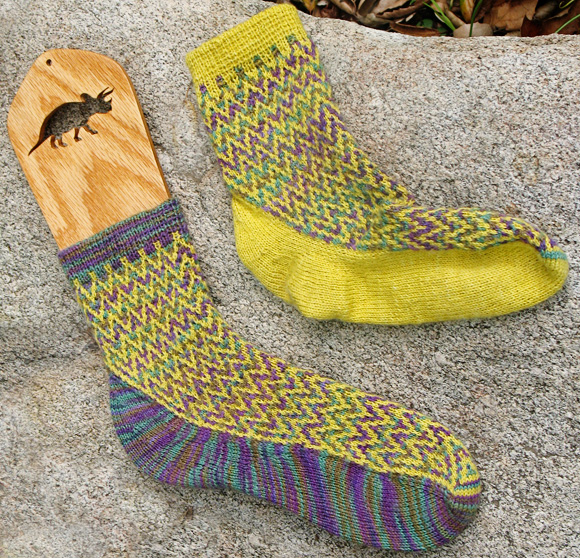
Row 1 and all subsequent odd-numbered/CC rows in foot section (CC): Work back and forth with CC as per chart, slipping MC sts. Rounds 2 and 4 (MC): (A): Work instep sts as per chart, working MC sts and slipping CC sts. Size S only: K all sole sts. Sizes M and L only (sole): K1, k to last st, w&t, slip wrapped st to RH needle, p to last st, fin-w&t, sl wrapped st to RH needle, k to end. (B): Work instep sts as per chart, working MC sts and slipping CC sts; knit all sole sts. Rounds 6 and 8 (MC): Round 10 and all subsequent even-numbered/MC rounds in foot section (MC): work instep sts according to chart and k all sole sts. For a longer or shorter foot, repeat or omit last six rows of the Foot Chart. Each 6-row repeat is approximately 3/4 inch long. 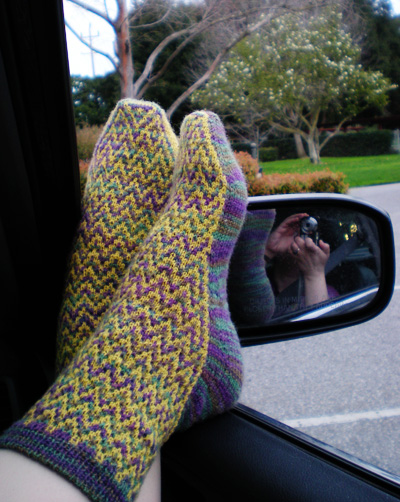 Work instep of arch according to chart, and sole as written out below. Short rows are worked on the sole sts on (A) of MC rounds for shaping, and the instep is worked with increases similar to the toe. Row 1 (CC) and all subsequent odd-numbered/CC rows in arch section: Work according to chart. Round 2 (MC): Rounds 4, 6, 8, 10, 12 (MC): After round 12, the stitch markers should be 6 sts in from either side of the sole sts, and the instep should have a total of 41[47, 53] sts. Round 14 (MC): There are now four stitch markers in the sole sts, with the outer pair six stitches away from the inner pair. Both sets will move toward the middle in the next few rounds. When looking at the sole from the right side, the markers are numbered from left to right: 3, 1, 2, 4. Remainder of even-numbered arch rounds (MC): (A) Work
instep according to chart. On sole needle:
HEEL In this section, you’re going to be working decreases at the sides of the foot to form the heel turn, and to increase the width of the patterned section so that it wraps around the foot. To facilitate this, stitches should be rearranged on the needles. The start of the round does not change, nor does the alignment of the stitches -- that is, any sts that were part of the instep before remain part of the instep and are worked according to the chart, even if they are grouped on the same needle(s) as the sole stitches. If you haven’t already got a marker in for the start of the round, add one now. Row 1 (CC): Round 2 (MC): Row 3 and all subsequent CC heel rows: Work according to chart. Rounds 4, 6 (MC): Round 8 (MC): Round 10 (MC): (A) Work
instep sts as charted. Work sole as follows: Rounds 12, 14 (MC): Rounds 16, 18 (MC): (A) Work
instep sts as charted. Work sole as follows: Ssk, k to
marker 4, ssk, k to two sts before marker 3, k2tog, k to
2 sts before end of sole, k2tog. Round 20 (MC): Round 22 (MC): Round 24 (MC): Round 26 (MC): There is now a total of 72[84, 96] sts. LEG Work Rounds 1-6 of leg chart a total of 3 times. Note: The leg is not very elastic due to the slip-stitch pattern, and the sock may become difficult to get on and off if the leg is lengthened. CUFF Round 4 (MC): The remainder of the cuff is worked in a partially tubular/double-knit ribbing, with half the sts worked while the other half are slipped, alternated with rounds of [k1,p1] rib. Round 6: [Sl 1 with yarn in back, p1]. Repeat Rounds 6-8 6 times. Note: I found it helpful to use the CC tail as a simple row counter, moving it from RS to WS or the reverse after each rep of Round 8. Knit Round 6 once more, then round 7 twice. Break yarn, leaving 1yd tail, and thread onto tapestry needle. Bind off in tubular rib (grafting just-knitted sst on RS to slipped sts on WS). Instructions can be found here. |
|
FINISHING |
| ABOUT THE DESIGNER |
|
She participates minimally on Ravelry as Alunissage, has an even less than minimal blog at alunissage.net, and dreams of selling batts at her as-yet nonexistent Etsy shop. Help drag her kicking and screaming into the '00s by contacting her at any of these venues and encouraging her to say and/or do something. |
|
Pattern & images © 2010 Robin Peters. Contact Robin |
 Shaping: All shaping and short-rows are worked
on (A) of each MC (even-numbered) chart row. (B) of every even-numbered row is worked even -- k all MC sts,
sl all CC sts -- with the occasional exception of knitting
a wrap together with a stitch near the beginning of the
sole.
Shaping: All shaping and short-rows are worked
on (A) of each MC (even-numbered) chart row. (B) of every even-numbered row is worked even -- k all MC sts,
sl all CC sts -- with the occasional exception of knitting
a wrap together with a stitch near the beginning of the
sole. 