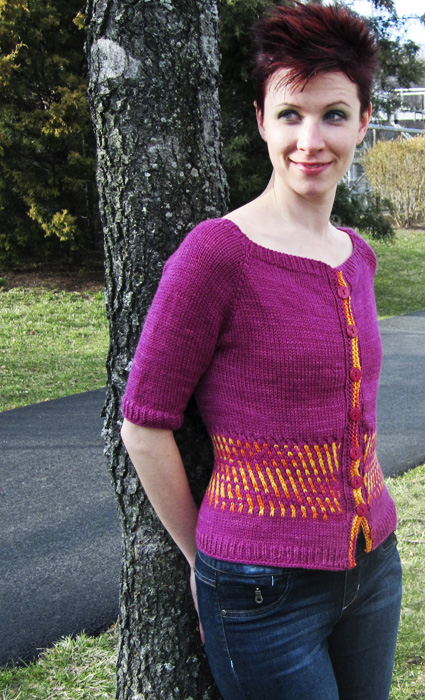
Knitty: little purls of wisdom
Lorna's Laces
Title
beauty shot

Tangy

She’s electric
She’s in a family full of eccentrics
She’s done things I never expected
And I need more time.

-Oasis

Get some intense color in the form of a flattering, simple, easy-to-fit, grown-up cardigan. This piece was designed to show off the vibrant, high-contrast variegated colors of Lorna’s Laces. In fact, Lorna’s Laces chose the colors for it after I told them they could “go nuts.”

Making a large garment out of an intensely variegated colorway like the juicy citrus Tomfoolery is daunting, I admit it. The yarn itself is filled with movement and play due to the fact that it has extreme warm/cool and light/dark contrasts. However, when paired with a solid, in this case, Berry, a skein or two of really intense yarn can be the focal point of a simply shaped sweater.

This cardigan is worked in one piece from the top down. The slimming waistband is worked in a slipped-stitch pattern that only requires using one color per row, and pulls in the stitches to create shaping.


Whether you choose solid or variegated yarns, high or low contrast, electric or subtle colors, this easy, quick project is perfect to layer or wear on its own all year long.
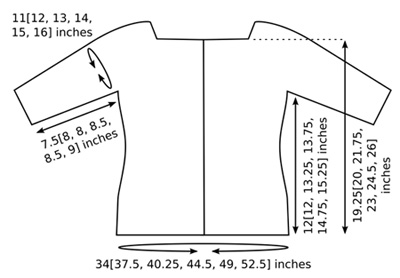
spacer model: Ann Weaver spacer photos: Beth Weaver

SIZE
Woman’s XS [S, M, L, 1X, 2X] (shown in size XS)

FINISHED MEASUREMENTS
Chest: 34[37.5, 40.25, 44.5, 49, 52.5] inches
Length: 19.25[20, 21.75, 23, 24.5, 26] inches

Note: Choose a size with 0-3 inches positive ease. Note that the combined fronts will be slightly wider than the back, to provide more ease over the bust.

spacer

MATERIALS
Yarn

Lorna’s Laces Shepherd Worsted [100% superwash merino wool; 225yd/205m per 114g skein]
spacer [MC] Berry; 3[4, 4, 5, 5, 6] skeins
spacer [CC] Tomfoolery; 1[1, 1, 1, 1, 2] skeins

Recommended needle size
[always use a needle size that gives you the gauge listed below -- every knitter's gauge is unique]
spacer 1 set US #8/5mm double-point needles
spacer 1 US #8/5mm circular needle, 32 inches or longer
spacer 1 US #9/5.5mm circular needle, 32 inches or longer

Notions
spacer Stitch markers
spacer Waste yarn
spacer Cable needle (optional; see Pattern Notes)
spacer Safety pins or split ring markers
spacer Yarn needle
spacer Sewing needle and thread
spacer 8 buttons, approx. 0.75 inch diameter
Note: Buy buttons after sweater is complete to ensure correct size.

spacer

GAUGE

18 sts/24 rows = 4" in stockinette stitch using smaller needle
22 sts/36 rows = 4" in pattern stitch using larger needle


PATTERN NOTES
[Knitty's list of standard abbreviations and techniques can be found here.]

m1L (left-leaning increase): Insert left needle, from front to back, under horizontal strand of yarn running between last stitch on left needle and first stitch on right needle; knit this stitch through back loop. 1 stitch increased.

m1R (right-leaning increase): Insert left needle, from back to front, under horizontal strand of yarn running between last stitch on left needle and first stitch on right needle; knit this stitch through front loop. 1 stitch increased.

T2RP: K into front of second st on left needle, p into first st on left needle, drop both sts from left needle.

T2LP: P into back loop of second st on left needle, k into first st on left needle, drop both sts from left needle.

Note: If you find it difficult to work the right and left twists as described above (T2RP and T2LP), they can also be worked using a cable needle as follows:

T2RP: On RS and WS Rows: Sl 1 st to cable needle and hold to back of work; k1 from left needle, p1 from cable needle.

T2LP: On RS and WS Rows: Sl 1 st to cable needle and hold to front of work; p1 from left needle, k1 from cable needle.

DIRECTIONS
YOKE
Neckband:
Using smaller circular needle, CO 113[117, 125, 129, 145, 149] sts.
Row 1 [RS]: K2, [p1, k1] to last 3 sts, p1, k2.

Row 2 [WS]: P2, [k1, p1] to last 3 sts, k1, p2.

These 2 rows set 1x1 Rib for neckband. Work 3 more rows in pattern as set.

Continuing in pattern as set, place markers as follows:
Next Row [WS]: Work 21[22, 24, 25, 29, 30] sts, place marker, work 18 sts, place marker, work 35[37, 41, 43, 51, 53] sts, place marker, work 18 sts, place marker, work remaining 21[22, 24, 25, 29, 30] sts.

Shape Yoke:
Raglan Increase Row 1 [RS]: K2, p1, *k to marker, m1R, slip marker, k1, m1L; repeat from * three times, k to last 3 sts, p1, k2. 8 sts increased.

Next Row [WS]: P2, k1, p to last 3 sts, k1, p2.

Repeat these 2 rows 10[11, 14, 16, 19, 20] times more. 201[213, 245, 265, 305, 317] sts: 32[34, 39, 42, 49, 51] sts for each front, 40[42, 48, 52, 58, 60] sts for each sleeve, 57[61, 71, 77, 91, 95] sts for back.

Raglan Increase Row 2 [RS]: K2, p1, *k to marker, m1R, slip marker, k to next marker, slip marker, k1, m1L; repeat from * once, k to last 3 sts, p1, k2. 4 sts increased.

Work 1 WS row in pattern.

Work Raglan Increase Row 1. Work 1 WS row in pattern.

Repeat these 4 rows 2[3, 2, 3, 2, 3] times more. 237[261, 281, 313, 341, 365] sts:
38[42, 45, 50, 55, 59] sts for each front, 46[50, 54, 60, 64, 68] sts for each sleeve, 69[77, 83, 93, 103, 111] sts for back.

Work 4[0, 2, 0, 0, 0] rows in pattern.

LOWER BODY
Remove existing markers when working next row. Use backward loop method for casting on underarm sts.

Dividing Row [RS]: K2, p1, *k to marker, place next 46[50, 54, 60, 64, 68] sts (all sts to next marker) on waste yarn for sleeve, CO 4 sts; repeat from * once, k to last 3 sts, p1, k2. 153[169, 181, 201, 221, 237] sts.

Work in pattern until work measures 4.25[4.25, 4.75, 5, 5.25, 5.5] inches from underarm or to approx. 2 inches above waist, ending with a RS row.
Note: This is a good time to transfer sts to waste yarn and try on sweater to check length.

Next Row [RS]: K2, p1, k14[12, 14, 18, 27, 19], m1, [k24[20, 21, 32, 53, 38], m1] 5[7, 7, 5, 3, 5] times, k13[11, 14, 17, 26, 19], p1, k2. 159[177, 189, 207, 225, 243] sts.
Next Row [WS]: P2, k1, p75[84, 90, 99, 108, 117], place marker, p3, place marker, p75[84, 90, 99, 108, 117], k1, p2.

WAISTBAND
Wind a small ball of MC. When working waistband, some rows will be worked using MC, and some rows using CC. When working CC rows, the first and last 3 sts will be worked using MC; work one set of 3 sts using main working ball of MC, and other set of 3 sts using the small ball of MC.

When switching from one color to the next, drop the color you have been knitting with, and bring the yarn for the next color up under the yarn of the previous color before you continue knitting. This will twist the 2 yarns around each other.

Always slip stitches purlwise, with yarn held to WS of work (held to back of work on RS rows and front of work on WS rows).

Set-up Row [RS]: Using larger circular needle and MC, k2, p1; using CC, [k2, sl 1] to marker, sl 3, [sl 1, k2] to last 3 sts; using MC, p1, k2.

Row 1 [WS]: Using MC, p2, k1; using CC, [p2, sl 1] to marker, sl 3, [sl 1, p2] to last 3 sts; using MC, k1, p2.

Row 2 [RS]: Using MC, k2, p1, [sl 1, T2RP] to marker, k3, [T2LP, sl 1] to last 3 sts, p1, k2.

Row 3 [WS]: Using MC, p2, k1, [sl 1, p2] to marker, p3, [p2, sl 1] to last 3 sts, k1, p2.

Row 4 [RS]: Using MC, k2, p1; using CC, k1, sl 1, [T2RP, sl 1] to 1 st before marker, k1, sl 3, k1, [sl 1, T2LP] to last 5 sts, sl 1, k1; using MC, p1, k2.

Row 5 [WS]:  Using MC, p2, k1; using CC, p1, sl 1, [p2, sl 1] to  1 st before marker, p1, sl 3, p1, [sl 1, p2] to last 5 sts, sl 1, p1; using MC, k1, p2.

Row 6 [RS]: Using MC, k2, p1, [T2RP, sl 1] to marker, k3, [sl 1, T2LP] to last 3 sts, p1, k2.

Row 7 [WS]: Using MC, p2, k1, [p2, sl 1] to marker, p3, [sl 1, p2] to last 3 sts, k1, p2.

Row 8 [RS]: Using MC, k2, p1; using CC, [sl 1, T2RP] to marker, sl 3, [T2LP, sl 1] to last 3 sts; using MC, p1, k2.

Row 9 [WS]: Using MC, p2, k1; using CC, [sl 1, p2] to marker, sl 3, [p2, sl 1] to last 3 sts; using MC, k1, p2.

Row 10 [RS]: Using MC, k2, p1, k1, sl 1, [T2RP, sl 1] to 1 st before marker, k5, [sl 1, T2LP] to last 5 sts, sl 1, k1, p1, k2.

Row 11 [WS]: Using MC, p2, k1,  p1, sl 1, [p2, sl 1] to  1 st before marker, p5, [sl 1, p2] to last 5 sts, sl 1, p1, k1, p2.

Row 12 [RS]: Using MC, k2, p1; using CC, [T2RP, sl 1] to marker, sl 3, [sl 1, T2LP] to last 3 sts; using MC, p1, k2.

Work Rows 1-12 twice more, then work Rows 1-5 once more. Waistband measures approx. 4.5 inches. Break CC and small ball of MC.

Change to smaller needles and remove markers when working next row.
Next Row [RS]: K2, p1, k13[11, 13, 17, 26, 18], k2tog, [k23[19, 20, 31, 52, 37], k2tog] 5[7, 7, 5, 3, 5] times, k13[11, 14, 17, 26, 19], p1, k2. 153[169, 181, 201, 221, 237] sts.

Continue in stockinette st, working first and last 3 sts in pattern as set, until work measures 11[11, 12.25, 12.75, 13.75, 14.25] inches from underarm or 1 inch less than desired length to lower edge, ending with a WS row.

Work 6 rows in 1x1 Rib as for neckband. BO all sts knitwise.

SLEEVES
Place 46[50, 54, 60, 64, 68] held sts of one sleeve on double-point needles. Using MC, pick up and k 4 sts in CO sts at underarm, placing marker after second st to indicate beginning of round; k all held sts, then k first 2 picked-up sts to reach end of round. 50[54, 58, 64, 68, 72] sts.

K 8[6, 5, 3, 3, 3] rounds.
Decrease Round: K2tog, k to last 2 sts, SSK.
Repeat these 9[7, 6, 4, 4, 4] rounds 3[5, 6, 9, 10, 11] times more. 42[42, 44, 44, 46, 48] sts.

Continue in stockinette st until sleeve measures 6.5[7, 7, 7.5, 7.5, 8] inches from underarm or 1 inch less than desired length.
Next Round: [K1, p1] to end.
Work 5 more rounds in 1x1 Rib as set. BO all sts knitwise.

spacer

FINISHING
Button Band:
Using smaller circular needle and MC, beginning at upper left front corner, pick up and k 2 sts for every 3 rows along left front edge, ending at lower left front corner.
K 1 row. Break MC.
Using CC, k 3 rows, ending with a RS row. BO all sts knitwise.

Buttonhole Band:
Use safety pins or split ring markers to mark desired positions of eight buttonholes, evenly spaced along right front edge.

Using smaller circular needle and MC, beginning at lower right front corner, pick up and k 2 sts for every 3 rows along right front edge, ending at upper right front corner.
K 1 row. Break MC.

Buttonhole Row [RS]: Using CC, [k to buttonhole position, yo, k2tog] eight times, k to end.
K 2 rows. BO all sts knitwise.

Weave in ends and block as desired.

Try on cardigan before placing buttons to determine how much ease to allow. Sew buttons to left front edge, opposite buttonholes.

spacer
ABOUT THE DESIGNER

Ann Weaver has been designing handknits since 2007 while working a growing string of seemingly unrelated jobs.

This fall she put out her first self-published collection of patterns, titled Craft Work Knit. You can read more about Ann on her website and on her blog.

spacer