Knitty: little purls of wisdom
Dragonfly Fiber Design
Title
spacerbeauty shot

Tangy

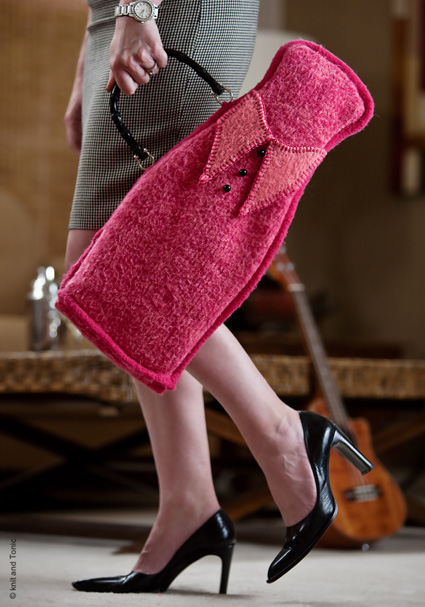
What knitter-ukulele enthusiast wouldn’t want a felted ukulele gig bag? Here are two covers for you to knit and felt. Felting is a great way to create structural pieces like purses and covers like these.

The Soprano version is small and flirty like its namesake, Betty Draper; the Tenor version is simple and sporty like the girl we named it after: Gidget. Add a purchased or re-purposed purse handle and you can take your ukulele anywhere. The optional pocket is a handy place to store your tuner.

When choosing wool yarns, know that lighter colors, especially those that have been bleached, do not felt as readily as others, so be sure to knit a large swatch and try felting it before you make a color commitment.

Here’s a tip: If you have a ukulele with a unique size and you are using the yarn specified in this pattern, the felted samples shrink approximately 20 percent width-wise. Lengthwise, they shrunk a whopping 37 percent or more.

This pattern is based on standard-sized ukuleles.

And the name of the pattern? "Hana Hou! Means "One more time!" As in "Play it again!"...it's commonly heard at Hawaiian celebrations.

spacer model: Wendy Bernard
spacer photos: Theron Tan


SIZE
Betty Draper/soprano(shown above in pink)[Gidget/tenor(shown below in blue/green stripe)]

FINISHED MEASUREMENTS
Before Felting:
Circumference at bottom: 27.5[33.5] inches
Circumference at top: 17.5 inches
Length: 37[43] inches

After Felting (Approximate):
Circumference at bottom: 22[26.75]inches
Circumference at top: 14 inches
Length: 23.25[27]inches

spacer

MATERIALS
Yarn

Cascade Yarns Cascade 220 [100% Peruvian wool; 220yd/200m per 100g skein]

Betty Draper/soprano
spacer [MC] #7801 Rouge Red; 4 skeins
spacer [CC] #7804 Shrimp; 3 skeins

Gidget/tenor
spacer [MC] #8914 Granny Smith; 5 skeins
spacer [CC] #7815 Summer Sky; 3 skeins

Recommended needle size
[always use a needle size that gives you the gauge listed below -- every knitter's gauge is unique]
spacer 1 set US #11/8mm double-point needles
spacer 1 US #11/8mm circular needle, 20 or 24 inches long

Notions
spacer Stitch markers
spacer Yarn needle
spacer Sharp yarn needle
spacer Sewing needle and thread
spacer Purse handle
spacer Sew-on or iron-on Velcro, approx. 1 inch x 3 inches
spacer Disposable razor
spacer Soprano version only: 3 small buttons

spacer

GAUGE

11 sts/14 rows = 4" in stockinette stitch using two strands of yarn held together, before felting
 

PATTERN NOTES
[Knitty's list of standard abbreviations and techniques can be found here.]

Stripe Pattern:
Work 5 rounds using MC.
Work 3 rounds using CC.
Work 1 rounds using MC.
Work 3 rounds using CC.
Repeat these 12 rounds for stripe pattern. It is not necessary to break yarn at end of each stripe.

Applied I-Cord:
All Rows: Using a double-point needle, k3; use tip of left needle to pick up st in work, k2tog. (Last I-Cord st has been worked together with picked-up st.)

Slide 4 sts just worked to other end of double-point needle and bring yarn around back of work, ready to begin working the next row.

I-Cord Bind Off
Note: I-Cord Bind Off is worked with RS facing at all times.

Using backward loop method, CO 4 sts onto left needle at beginning of next row. *K3, k2tog. Return 4 sts just worked to left needle, and pull yarn tightly at back of work.

Repeat from * until all sts have been bound off (only 4 sts of I-Cord remain on right needle). BO remaining sts.

Instructions for grafting can be found here.

Instructions for blanket stitch can be found here.

Instructions for whip stitch can be found here.

Collar pattern pieces are here. Print them out -- 1-page PDF -- and follow directions under FINISHING.

DIRECTIONS
BAG
For Betty Draper, work bag with one strand each of MC and CC held together. For Gidget, work bag following stripe pattern (see Pattern Notes).

Using circular needle and two strands of yarn held together, CO 76[92] sts. Place end-of-round marker and join to begin working in the round, being careful not to twist.

Round 1: K38[46], place side marker, k38[46].
Round 2: P1, k to 1 st before side marker, p2, k to last st, p1.

Round 2 sets pattern for bag body: 1 st is purled before and after each marker, and all other sts are knit.

Continue in pattern until work measures 16.5[19.5] inches.

Shape Neck:
Note: When shaping neck, switch to double-point needles when necessary.

Decrease Round: [P1, k2tog, k to 3 sts before marker, ssk, p1] twice. 4 sts decreased.

Work 6[5] rounds in pattern.

Repeat these 7[6] rounds 5[9] times more, then work Decrease Round once more. 48 sts.

Continue in pattern until work measures 37[43] inches. Divide sts evenly between two double-point needles, and graft together to close top of bag.

APPLIED I-CORD EDGING

Side Edging:
Note: Read through this entire section before beginning.
Using double-point needle and two strands MC held together, CO 4 sts.

Beginning at lower edge of bag, work Applied I-Cord (see Pattern Notes) along purl column at one side of bag, across grafted seam at top of neck, and down purl column at other side of bag. BO all sts.

When picking up sts while working edging along purl columns, pick up horizontal strand at center of purl column. When working edging along grafted seam, pick up one side of each “knit stitch” formed by grafting.

Lower Edging:
Using double-point needle and two strands MC held together, CO 4 sts. Beginning at one end of side edging, work Applied I-Cord around CO edge of bag. When picking up sts, pick up 1 st in each CO st.

Use yarn ends to sew ends of lower edging together, and to sew ends of side edging to lower edging. Weave in remaining ends.

BOTTOM FLAP
Note: Bottom flap and collar are worked as rectangles, which are cut to shape after felting.

For Betty Draper, work flap with one strand each of MC and CC held together. For Gidget, use two strands MC held together.

Using two strands of yarn held together, CO 36[44] sts. Work in garter stitch until work measures 7.5[9.5] inches. BO all sts.

COLLAR (Betty Draper)
Using two strands CC held together, CO 40 sts. Work in stockinette st until work measures 11 inches. BO all sts.

POCKET (Optional; shown on Gidget)
Betty Draper:
Using one strand each of MC and CC held together, CO 18 sts. Work in stockinette st until work measures 6 inches, ending with a WS row. BO all sts using I-Cord bind off.

Gidget:
Using two strands MC held together, CO 24 sts. Work in stockinette st until work measures 4.25 inches, ending with a WS row.

Note: When working stripes, break yarn at end of each stripe.
Work 3 rows using CC.
Work 1 row using MC.
Work 3 rows using CC.
Work 5 rows using MC, ending with a WS row.
BO all sts using I-Cord bind off.

spacer

FINISHING
Weave in ends on bag. Don't worry about ends on collar or pocket; these pieces will be trimmed to fit after felting. Using one strand MC and tapestry needle, whip stitch bottom flap inside lower edge of one side of bag, just behind edging.

Felting:
[Unfelted bag shown above]
Place bag, collar and pocket in a washing machine with hot water and a small amount of soap. If desired, add a pair of jeans or old towel to increase agitation and speed up felting process. (Note: Do not add a garment that is likely to produce lint.)

Turn machine to Heavy Duty setting or fast agitation, if available. Allow machine to agitate for one long wash cycle, then reset machine to continue wash cycle. Check often, and be sure not to allow the machine to drain. When checking during felting, pull bag lengthwise, and pull bag opening open widthwise, to control and guide shrinking. (You may find it helpful to have a friend help you pull on it!)

Compare the bag’s size to your ukulele when you check felting, and stop felting when the bag is the right size. Note that the flap will be floppier than the rest of the bag; it can be trimmed to fit when the bag is dry.

When you have achieved the right size and length (length will shrink approximately 17 percent more than the width, so watch the length carefully!), allow the spin cycle to run. Re-shape the bag, stuffing with plastic bags to hold shape while drying if desired. Allow to air dry thoroughly.

The felted pieces will be hairy. Use a disposable razor to shave them, taking care not to apply too much pressure.

Collar:
Felt collar very heavily. Print and cut out collar pattern pieces and check to see if they will fit your case properly, as size of case may be different from case shown; shrink or enlarge template as needed. Trace and cut out pieces from felted fabric. Using MC, work blanket stitch around edges of pieces. Sew collar and buttons to bag, using photos as guides.

Flap:
Place ukulele inside bag, tuck flap over bottom of ukulele and inside bag. You may decide that you won’t need to use Velcro to close the bag, as the bags shown close very well and securely without it. If you want to add Velcro, cut the flap so that it sits several inches deep inside the bag. Attach Velcro, placing loop (softer) side of Velcro on inside of bag and hook side on bag flap, so that they will meet when bag is closed around ukulele.

Pocket:
Trim edges of pocket, shaping as desired. Using MC, work blanket stitch around lower and side edges of piece. If you choose to add a pocket to Betty Draper, sew pocket to back of bag. For Gidget, sew pocket to front of bag, aligning stripes as shown. Attach Velcro to bag and inside of pocket if desired, to fasten pocket closed.

Sew purse handle to side of bag as shown.

spacer
ABOUT THE DESIGNER

Wendy is the author of the Custom Knits series (Stewart, Tabori & Chang/ABRAMS) and her blog, Knit and Tonic. Her first pattern was published in Knitty and others now appear in Knitscene, Interweave Knits and books such as No Sheep for You. She’s also featured in a DVD by Interweave teaching top-down knitting techniques.

Wendy does play Ukulele, but says she isn’t ready to make her debut.

spacer