|
|
 |
|
|
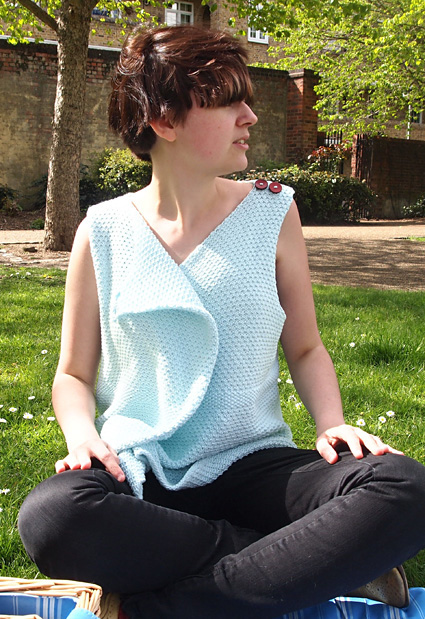
In England, in the summer, people start putting cucumbers in their drinks. More often than not, it ends up in an alcoholic punch (named after the liqueur – Pimms) on a sweltering summer’s day. We don’t just put in cucumber; it isn’t really Pimms without apples, strawberries, grapes, and mint. But it’s the cucumber that makes the drink for me. And it’s the cucumber that makes the picnic. Aside from
the punch, who wants to miss cucumber sandwiches, cucumber batons
and enough tzatziki to make you sick?
|
||
|
Tweet
|
|
|
SIZE |
|
|
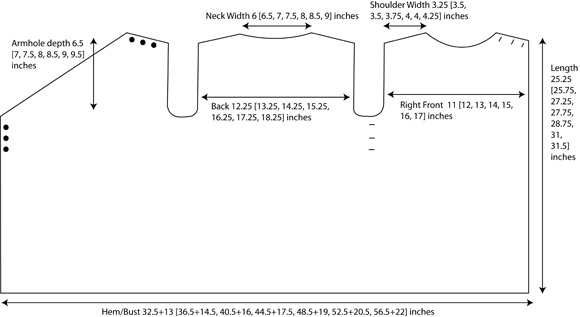
FINISHED MEASUREMENTS |
|
|
MATERIALS Recommended needle size Optional: Notions |
|
GAUGE |
21 sts/30 rows = 4 inches in Sand Stitch pattern |
|
PATTERN NOTES |
 This buttonhole method is recommended due to its rigidity and ability to support the weight of the fabric. If preferred, a Simple Horizontal Buttonhole may be worked, however additional reinforcement is recommended. If using this method, knit one additional stitch before beginning buttonhole. Both methods are outlined in this excellent post from Techknitter. Sand Stitch: Seed Stitch: |
|
DIRECTIONS 
Using US 6/4mm needle cast on 240(268, 296, 324, 356, 384, 412) sts using the cable cast on method. Beg with Row 1, work in Sand Stitch until work measures 11.5 inches ending on Row 4 of stitch pattern. Note: This design features a high waist. Knitters wanting to add/remove length are recommended to do so at this stage to prevent the displacement of the waist. Change to US 4/3.5mm needle. Change to US 6/4mm needle. Buttonhole row [RS]: K 169[189,
209, 229, 253, 273, 293], work buttonhole
[see note above in
Pattern Notes], k to
end. Work Rows 3-4 of Sand Stitch pattern across all sts. Beg with Row 1, work 2[2, 3, 3, 2, 3, 3] repeats of Sand Stitch. Rep last 12[12, 16, 16, 12, 16, 16] rows 1[1, 1, 1, 2, 2, 2] times more. Buttonhole Row [RS]: K 169[189,
209, 229, 253, 273, 293], work buttonhole,
k to end. Work Rows 3-4 of Sand Stitch pattern across all sts. 3[3, 3, 3, 4, 4, 4] buttonholes worked.  Row 1 [RS]: BO 4[5, 5, 6, 7, 7, 8], k 82[91, 101, 110, 121, 131, 140], pm, turn. Row 2 [WS]: BO 4[5, 5, 6, 7, 7, 8] so that st remaining on RH needle has been knit, k 1[0, 0, 1, 0, 0, 1], *p1, k1; rep from * to end. The marker divides the Right Front from the rest of the work. Until directed, only the stitches before this marker are to be worked. If desired, stitches beyond the marker may be placed on a stitch holder or held on waste yarn. Continue to work RS and WS rows in Sand Stitch as set: BO6 sts at beg of next two rows 0[0, 0,
0, 0, 1, 1] times. *Continuing to work in Sand Stitch, BO
2 sts at beg of all RS rows until 16[18,
18, 20, 22, 22, 24] sts remain. Back Neck Shaping: Work even in Sand Stitch for 2 rows then BO all sts. Rejoin yarn to opposite shoulder with RS facing (to the stitch you slipped before). Row 1: Knit. Work even in Sand Stitch for 3 rows then BO all sts.  Rejoin yarn with RS facing. Immediately BO 4[5, 5, 6, 7, 7, 8] sts, and knit to end of row. Next row [WS]: Work in Sand Stitch patt as set to end of row. Continuing to work RS and WS rows in Sand Stitch as set: BO 6 sts at beg of next RS row 0[0, 0,
0, 0, 1, 1] times. 58[62, 68, 74, 78, 84, 90] sts remaining. Work even until Left Front measures 6.25[6.75,
7.25, 7.75, 8.25, 8.75, 9.25] inches from
base of armhole ending on Row 4 of Sand
Stitch patt. Neck Shaping: 16[18, 18, 20, 22, 22, 24] sts remaining. Work even in Sand Stitch for 2 rows then BO all sts. Rejoin yarn to opposite shoulder with RS facing (to the stitch you slipped before). 16[17, 18, 21, 23, 24, 26] sts. Row 1 [RS]: K 5[4, 5, 6, 6, 7,
7], [work buttonhole] 2[2, 2, 2, 3, 3, 3]
times, k 1 (3, 3, 5, 2, 2, 4). Work even in Sand Stitch for 3 rows beg
with Row 4 then bind off all sts. |
|
FINISHING Using mattress stitch attach the Right Front shoulder to the left-hand Back shoulder and the left-hand Left Front shoulder (i.e. the one without the button holes) to the right-hand Back shoulder. Weave in ends, using tails to reinforce underarm divides where
appropriate. Carefully attach buttons as marked on the schematic
and matching the positioning of the buttonholes both front and
back of Cucumber in the same place. Not only does this serve
to make the garment fully reversible, it also substantially
reinforces the button, reducing stretch and sag in this area. |
|
| ABOUT THE DESIGNER |
|
|
|
Pattern & images © 2012 Michaela Moores. Contact Michaela |