|
|
 |
|
|
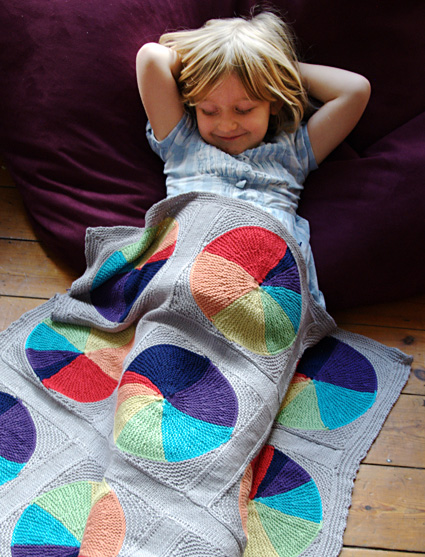
Mathematics and knitting have always gone hand in hand for me, so it was inevitable that I would attempt to encompass a few basic mathematical principles in a blanket for my first offspring. It was an enjoyable challenge both calculating the stitch circumference and relative arcs of the 'pie' slices and then transforming those calculations into a relatively simple knit-engineering solution. |
||
|
|

|
Tweet
 |
|
SIZE |
|
|
FINISHED MEASUREMENTS |
|
MATERIALS Notions |
|
GAUGE |
| 22 sts/28 rows = 4 inches in stockinette stitch 22 sts/40 rows (20 ridges) = 4 inches in garter stitch |
|
PATTERN NOTES |
|
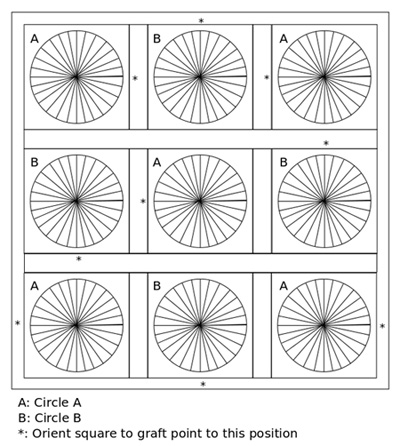
This project uses a provisional cast on. Use your preferred provisional cast on technique; directions for one technique may be found here Instructions for grafting can be found here. Sl: Slip stitch as if to knit, with yarn at the back. LLI: Use the left needle to pick up left leg of the purl stitch below the last stitch on the right needle. Knit into the back leg of this stitch. 1 stitch has been increased. Working the pickup and knit along the edges of the pieces: Construction: Changing the Size: You can use the blank schematic to design your own color sequence with the following caveat: each color 'pie' slice has a start row and a finish row in addition to the short-row segments (total of 14 additional straight rows per circle). If you wish to split the segments into less than seven color changes then the extra straight rows should be worked in internally to one or more 'pie' segments to balance out. Changing color more than seven times is not advised as this will add too many extra rows and distort your circle. |
|
DIRECTIONS 
With yarn CC1 on 2 US #6 dpns, CO 20 sts using a provisional cast on (see Pattern Notes for details). Row 1 [WS]: K19, p1. Row 2 [RS]: Sl1, k14, LLI, turn. Rows 3, 5, & 7 [WS]: Slp 1, k to last st, p1. Row 4 [RS]: Sl1, k9, LLI, turn. Row 6 [RS]: Sl1, k4, LLI, turn. Row 8 [RS]: Sl1, k4, [k2tog, k4] 3 times, LLI. Place inc st onto 3rd dpn and hold to one side. Row 9 [WS]: K19, p1. Change to CC2. Change to CC3. Change to CC4. Change to CC5. Change to CC6. Change to CC7. Slip each st from the 3rd dpn off in turn over the last inc st added (27 st are bound off in this way in total) pulling your piece into a circle. With the yarn held in front slp the rem inc st back onto the RH needle. Turn to the WS, k2tog, k to last st, p1. Cut a 12 inch yarn tail. Carefully return remaining provisional CO sts to a needle. Use the yarn tail to graft the two sides together. Weave the rem yarn through the center loops to bury it. 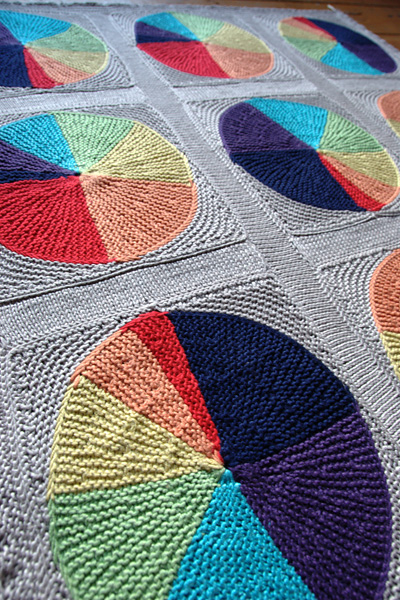 With yarn CC1 on 2 US #6 dpns, CO 20 sts using the provisional cast on. Leave bottom sts on a spare needle, stitch holder or piece of waste yarn. Work Rows 1-8 (as Circle A) 7 times, then Row 9 once. Change to CC2. Change to CC3. Change to CC4. Change to CC5. Change to CC6. Change to CC7. Slip each st from the 3rd dpn off in turn over the last inc st added (27st are bound off in this way in total) pulling your piece into a circle. With the yarn held in front slp the rem inc st back onto the RH needle. Turn to the WS, k2tog, k to last st, p1. Cut a 12-inch yarn tail. Carefully return remaining provisional CO sts to a needle. Use the yarn tail to graft the two sides together. Weave the rem yarn through the center loops to bury it. Squaring each circle Beg at the grafted join, using US #6 shorter circular needle, place the right leg of the first slipped sts onto the LH needle so that it sits as regular st would. Join yarn MC and ktbl. Rep for the next 29 slipped sts (to cover a quarter of the circumference of your circle). 30 sts total. Turn to the WS.  Row 2 [RS]: Slp 1, k25, LLI, turn. Row 3 [WS]: Slp 1, k23, LLI, turn. Row 4 [RS]: Slp 1, k21, LLI, turn. Row 5 [WS]: Slp 1, k19, LLI, turn. Row 6 [RS]: Slp 1, k17, LLI, turn. Row 7 [WS]: Slp 1, k15, LLI, turn. Row 8 [RS]: Slp 1, k13, LLI, turn. Row 9 [WS]: Slp 1, k11, LLI, turn. Row 10 [RS]: Slp 1, k9, LLI, turn. Row 11 [WS]: Slp 1, k7, LLI, turn. Row 12 [RS]: Slp 1, k5, LLI, turn. Row 13 [WS]: Slp 1, k3, LLI, turn. Row 14 [RS]: Slp 1, k2, LLI, turn. Row 15 [WS]: Slp 1, k1, pm, turn. Row 16 [RS]: Slp 1, k to end, LLI. You should now have 23st (incl lifted inc st) to the right of the marker and 22st to the left of the marker. **Pick up and ktbl each of the next 30 slipped sts as described above (the next quarter of the circumference of your circle). Turn to the WS. Rep Rows 1-16. Rep from ** twice more to completely enclose the circle. 180 sts. Join for working in the round, placing a marker for start of round. Round 1: Purl around. Joining squares into bands: With RS facing together, use US #6 dpn to pick up a loop from the appropriate BO edge of the next square (oriented according to schematic), starting at the right hand corner. Work this 'st' with the 1st st of the St st strip as a p2tog. Rep pick up and p2tog with the next sts from the BO edge and St st strip. On RH needle, pass 1st st over 2nd st to BO. Cont to work in this manner until all sts from the St st strip are joined to the next square and bound off. Pull yarn through the last rem st. On the opposite edge of the 2nd square, pick up 49 loops from the BO, joining yarn MC and knitting each in turn tbl. Rep strip and join instructions as above to add a 3rd square to the band. Joining bands: With RS facing together, use US #6 dpn to pick up a loop from the bottom edge of the next band (oriented according to schematic), starting at the right hand corner. Work this 'st' with the 1st st of the St st strip as a p2tog. Rep pick up and p2tog with the next sts from the BO edge and St st strip. On RH needle, pass 1st st over 2nd st to BO. Cont to work in this manner until all sts from the St st band are joined to the next band and bound off. Pull yarn through the last rem st. On the opposite long edge of the 2nd band, pick up 161 loops, joining yarn MC and knitting each in turn tbl. Rep strip and join instructions as above to add a 3rd band to the grid. 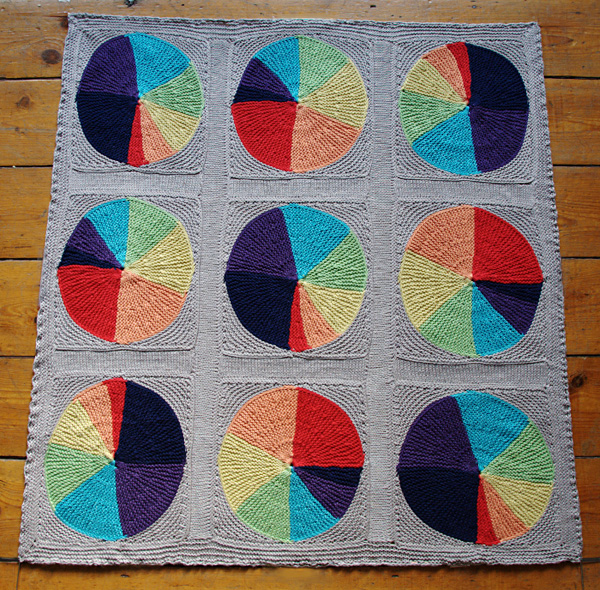
On the longer set of US #6 circular needles in MC and starting at any corner, pick up and k 161st on each of the four sides of your 3x3 grid (49st along the edge of each square, 5st across each strip, 1st in each square-strip join) placing a marker at each corner. 644 sts. Join for working in the round, placing a distinct marker for start of round. Rep Rounds 1-2 3 times more, and Round 1 again (676 sts) |
|
FINISHING |
 |
| ABOUT THE DESIGNER |
|
|
|
Pattern & images © 2013 OneHandKnits. Contact OneHandKnits |