
|
|
 |
|
|

This tee is inspired by the story of Icarus, the young Athenian who was given a pair of wings carefully crafted by his father Daedalus in order to escape the island of Crete. Daedalus instructed Icarus to keep to his flight path, and not to fly too close to the sun or the sea. Icarus fastened the wings to his shoulders, and jumping from a high cliff, took flight from the island. Overcome with the freedom of flight, Icarus soared higher and higher. As Icarus ascended, the sun began to melt the wax that held the wings together. The wings began to break apart, and Icarus fell from the sky and into the sea which now bears his name. The lace pattern on this tee symbolizes both the careful construction of Daedalus's wings, and the joy that Icarus felt when he spread his wings and reached for freedom. Structured lace spreads across and up the back of this garment, creating a shape that emulates wings and flight. |
||
|
|
Tweet
 |
|
|
SIZE |
|
|
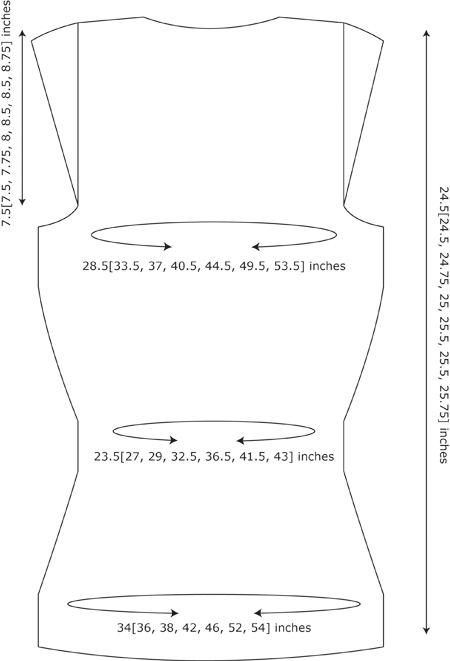
FINISHED MEASUREMENTS |
|
MATERIALS Notions |
|
GAUGE |
| 20 sts/20 rows = 4 inches in stockinette stitch 25 sts/20 rows = 4 inches in lace pattern |
|
PATTERN NOTES |
|
This garment is worked in the round from the bottom up. You don't have to shape the waist if you don't want to! It will not affect the lace pattern. If you prefer a boxier shape, do not decrease at the waist, and of course, ignore the increases for the bust as well. There are two versions of the text lace pattern: one for working in the round and one for working flat (for when the piece is split for the Front and Back). When working Chart, the first 19 rnds are worked as shown in the chart. On all subsequent rnds, repeat the "right-hand repeat" until you reach the 10 st "center cable repeat" section, work the "center cable repeat," and then repeat the "left-hand repeat section" until the end of the lace section. Please note: this is also explained within the pattern, but I'll say it here first. You will be adding 5 sts to the beginning and end of the lace section for each 6 row repeat you knit. This does not mean that you will be making stitches, you will simply be adding new stitch markers, marking more stitches as part of the lace section. M1L (left-leaning increase): Insert left needle, from front to back, under horizontal strand of yarn running between last stitch on left needle and first stitch on right needle; knit this stitch through back loop. 1 stitch increased.  Rnd 1: K7, sl1, k1, psso, yo, k2, yo, sl1, k1, psso, k7. Rnds 2, 4, 8, 10: Knit. Rnd 3: K6, sl1, k1, psso, k, yo, LT, yo, k, sl1, k1, psso, k6. Rnd 5: K7, sl1, k1, psso, yo, k2, yo, sl1, k1, psso, k7. Rnds 6 and 12: K9, LT, k9. Rnd 7: K3, sl1, k1, psso, yo, k, sl1, k1, psso, k, yo, k2, yo, k, sl1, k1, psso, k, yo, sl1, k1, psso, k3. Rnd 9: K5, (sl1, k1, psso, yo) x 2, LT, (yo, sl1, k1, psso) x 2, k5. Rnd 11: K3, sl1, k1, psso, yo, k, sl1, k1, psso, k, yo, k2, yo, k, sl1, k1, psso, k, yo, sl1, k1, psso, k3. Rnd 13: K3, (sl1, k1, psso, yo) x 3, k2, (yo, sl1, k1, psso) x 3, k3. Rnds 1-13 are only worked once. DO NOT repeat these rnds. Rnd 14 & 16: Knit. Icarus Chart worked flat: |
|
DIRECTIONS Marker Placement Rnd: K85[90, 95, 105, 115, 130, 135] sts, place side marker, k to end of rnd. Work in St St until garment measures 6 inches (or desired length before shaping for the waist. Waist Dec Rnd: *K1, k2tog, k to 3 sts before side marker, ssk, k1, sm; rep from * once more. 4 sts decreased. Rep the last 2 rnds 12[10, 10, 10, 10, 12, 12] times. 118 [136, 146, 166, 186, 208, 218] sts Sizes L, 1X, and 3X ONLY: Cont working in St St until 4 inches have been worked from first Waist Dec Rnd. (10 inches total) Lace Marking Rnd: K to side marker (Front sts), sm, k20[24, 26,31, 36, 42, 44] sts, pmA (Begin Chart marker), k5, pm, k10, pm (these 2 markers are the Central Chart Markers), k5, pmB (End Chart marker), k 19[24, 27, 31, 36, 42, 44] to end of rnd. READ AHEAD: Bust shaping and lace shaping instructions happen at the same time. Next rnd: K to mA, work Icarus Chart up to mB, k to end of rnd. Next rnd: Begin working Chart Rnds 14-19 ONLY and, on this and every subsequent 6th rnd/row, move mA 5 sts to the right (incorporating 5 more sts into the right-hand repeat) and move mB 5 sts to the left (incorporating 5 more sts into the left-hand repeat), while maintaining Central Chart Markers in place, and working the Central repeat between them. Work in this way throughout the entire back. AT THE SAME TIME, when garment measures approx 13 inches from cast-on edge, shape bust: Bust Inc Rnd: *K1, M1L, work in patt to 1 st before the side marker, M1R, k1, sm; rep from * to end. 4 sts inc'd. Rep the last 2 rnds 5[7, 9, 9, 9, 9, 12] more times. 142[168, 186, 203, 223, 248, 267] sts. Cont working in patt as established until garment measures approx 17 inches from cast-on edge, or desired length to underarm. Divide the front and back: Total 65[76,83,89,97,108,115] FRONT stitches, and 65[76,83,90,98,108,116] BACK stitches. UPPER BACKTurn work. Work 1 WS row in patt, keeping lace patt correct. Dec Row [RS]: K2, k2tog, work in pattern to 4 sts before the end of the row, ssk, k2. 2 sts decreased. Rep the last 2 rows 1[3, 1, 0, 0, 1, 1] more times. 61[68, 79, 88, 96, 104, 112] sts. Keeping patt correct, work back and forth until armhole measures 7.5[7.5, 7.75, 8, 8.5, 8.5, 8.75] inches from the dividing row, ending with a WS row. BO Row [RS]: Work across 7[10, 16, 19, 20, 22, 24] sts, BO 47 [48, 47, 50, 56, 60, 64] sts for the neck back, work the remaining 7[10, 16, 19, 20, 22, 24 sts]. Place both sets of live sts on holders or scrap yarn. UPPER FRONT Dec Row [RS]: K2, k2tog, k to 4 sts before the end of the row, ssk, k2. 2 sts decreased. Work back and forth in St st until the armholes measure 4.75[4.75, 5, 5.25, 5.5, 6, 6.25] inches from the dividing row, ending with a WS row. Separation Row [RS]: Work across 25[30, 35, 38, 40, 42, 46] sts, slip on to spare yarn or stitch holder, BO the next 11[8, 9, 11, 15, 20, 19] sts, work across the remaining 25[30, 35, 38, 40, 42, 46] sts. BO 1 st at the beg of foll 5 RS rows, then BO 3 sts at the beg of next 2 RS rows. Neck Shaping Row [RS]: K1, ssk, k to end. Work even until the armhole measures 7.5[7.5, 7.75, 8, 8.25, 8.50, 8.75] inches. Leave sts on holder. LEFT SHOULDER Neck Shaping Row [WS]: P1, p2tog, k to end. Work even until the armhole measures 7.5[7.5, 7.75, 8, 8.25, 8.50, 8.75] inches. Join Left Front Shoulder to Left Back Shoulder, RS together, and use the 3-needle BO. Join Right Front Shoulder and Right Back Shoulder in the same way. CAP SLEEVESWith smaller needles, RS facing, place the 6[8, 10, 12, 14, 16, 18] underarm held sts on the needles, then evenly pick up and knit 70[68, 70, 70, 74, 72, 72] around the armhole edge. PM for beg of rnd. 76[76, 80, 82, 88, 88, 90] sts. Rnd 1: K6[8, 10, 12, 14, 16, 18] underarm sts, [yo, k2tog] to end of the rnd. Shape the cap: Next Row [RS]: [YO, k2tog] to first wrapped st, knit each wrapped st together with its wrap to end of rnd marker. Knit 4 rnds even. BO all sleeve sts using an elastic method, such as Jeny's Surprisingly Stretchy Bind Off. |
 |
|
FINISHING |
| ABOUT THE DESIGNER |
|
Leah Goldstein is a research analyst and independent designer who lives in Brooklyn, NY. |
|
Pattern & images © 2014 Leah Goldstein. Contact Leah |