
|
|
 |
|
|

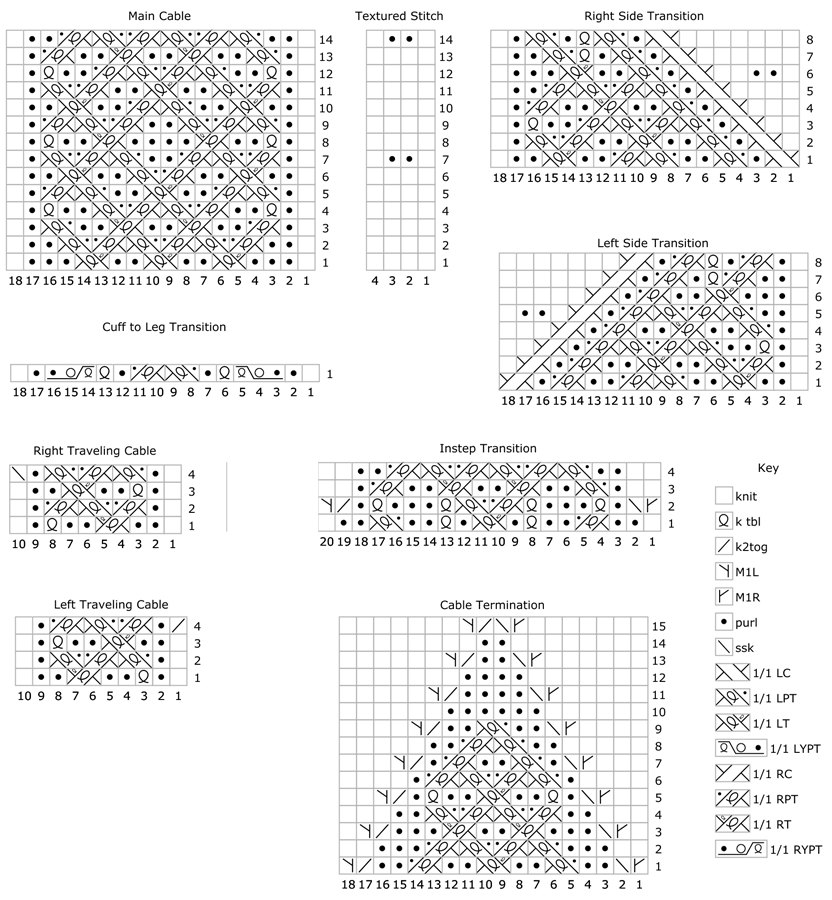
It is entirely within the realm of possibility that I have read too many fantasy novels. This may explain why I think of elves every time I see a sock pattern with twisted, travelling stitches. I just imagine elves wearing socks that have twisted stitches that weave in and out of each other as well as travel around the sock. For that reason, I chose to name this pattern Neldoreth after the beech forest on the banks of the River Esgalduin that formed the northern and lesser part of the Kingdom of Doriath in J. R. R. Tolkien's The Silmarillion. Lúthien was born there during the Years of the Trees. It was the place, during the First Age, in which Beren first saw Lúthien as she danced in the moonlight. Neldoreth features two cable panels on the sides of the legs separated by a subtle textured stitch pattern. Just above the heel, the cables change slightly so that they are set up to travel across the instep. When the two cables meet on the instep, they merge to form the same cable pattern appearing on the leg. After the mini cable, the cable ends in a point above the toes. |
||
Tweet
 |
||
|
SIZE |
|
|
FINISHED MEASUREMENTS |
|
MATERIALS Notions |
|
GAUGE |
| 32 sts/48 rounds = 4 inches in stockinette stitch 30 sts/48 rounds = 4 inches in pattern stitch |
|
PATTERN NOTES |
|
Long Tail CO Grafting |
The charts for this pattern are very large and fit on a letter-sized page. Click here and print the resulting page. |
|
DIRECTIONS Ribbing round: (K1, [p1, k1 tbl] 3 times, p2, [k1 tbl, p1] 3 times, k1; [k1, p2, k1] 3[4, 5] times) twice. Work Ribbing as set for 1 inch. Leg Leg Round: [Work Main Cable Chart across 18 sts; Work Textured Stitch Chart 3[4, 5] times] twice. Work the Leg Round until the 14 rows of Main Cable Chart have been worked a total of 3 times, and work rows 1-9 once more. Leg Transition Round: Work Right Side Transition Chart (starting at R1); work the next 12[16, 20] textured sts in pattern as set; work Left Side Transition Chart (starting at R1); work the next 12[16, 20] textured sts in pattern as set. Continue as set until Right and Left Side Transition Charts are complete. Heel Flap The heel flap is knit back and forth on 28[32, 36] stitches. Turn work so that wrong side is facing. Row 1 [WS]: Sl 1 wyif, p27[31, 35], turn. Repeat these 2 rows 13[15, 17] more times for a total of 28[32, 36] rows in the heel flap. Turn the Heel: Gusset Gusset Set Up Round: With RS facing, pick up and knit 14[16, 18] sts along the first side of the heel flap; place marker; work Instep patterning row 1 across 28[32, 36] sts, place marker; pick up and knit 14[16, 18] sts along the second side of the heel flap; k to start of instep. This is the new start of round. 78[88, 98] sts. Gusset Round 1: Work next Instep patterning row (see below), k1, ssk, k to 3 sts before end of round, k2tog, k1. 2 sts decreased. Rep Gusset Rounds 1 and 2 8[9, 10] times more, until 28[32, 36] sts rem on the sole, while working Instep Pattering as outlined below. Once Gusset decreases are complete, work even on sole and continue Instep Patterning until Cable Termination Chart is complete. Instep Patterning: Instep patterning row 2: K until the marker; sl marker; work row 2 of Right Traveling Cable Chart; work the Textured Stitch Chart in pattern as set until 10 sts before next marker; work row 2 of Left Traveling Cable Chart; sl marker; k remaining sts on instep. Instep patterning row 3: K until the marker; sl marker; work row 3 of Right Traveling Cable Chart; work the Textured Stitch Chart in pattern as set until 10sts before next marker; work row 3 of Left Traveling Cable Chart; sl marker; k remaining sts on instep. Instep patterning row 4: K until the marker; M1R; sl marker; work row 4 of Right Traveling Cable Chart; work the Textured Stitch Chart in pattern as set until 10 sts before next marker; work row 4 of Left Traveling Cable Chart; sl marker; M1L; k remaining sts on instep. Work Instep patterning row 1-4 or a total of 6[8, 10] times. Instep Transition Row: K until the marker; sl marker; work Instep Transition Chart (starting at R1); sl marker; k remaining sts on instep. Work the Instep Transition Row until the Instep Transition Chart has been completed. Remove stitch markers on the last round. Main Cable Row: K7[9, 11]; work Main Cable Chart on next 18 sts; k[7,9, 11]. Work the Main Cable Row until all rows have been worked in the Main Cable Chart on the instep. Cable Termination Row: K7[9, 11]; work Cable Termination Chart (starting at R1) on next 18 sts; k[7,9, 11]. Work the Cable Termination Row until all rows have been worked in the Cable Termination Chart. Foot Knit all sts until the foot is 1.5[1.5, 1.75] inches short of full foot length. 60[68, 74] sts rem; 32[36, 40] sts on the instep, and 28[32, 36] sts on on the sole. Toe Repeat Rounds 2 and 3 6[7, 8] more times, until 28[32, 36] total sts remain. Repeat round 3 (decreasing every round) until 20[20, 24] total sts remain. Cut the yarn leaving a 6 inch tail and graft the rem sts together. |
|
FINISHING |
| ABOUT THE DESIGNER |
|
Rich started knitting as a way to relieve stress. His first two projects were sweaters, since there was no one to tell him that perhaps a scarf would be a better starting point. At some point, Rich got it into his shiny, bald head that knitting socks might be a good idea. Rich lives in Northern Virginia with four cats who think that stitch markers solely exist to entertain them. He can be found online here and on Ravelry. |
|
Pattern & images © 2014 Rich Ensor. Contact Rich |