
|
|
|
|
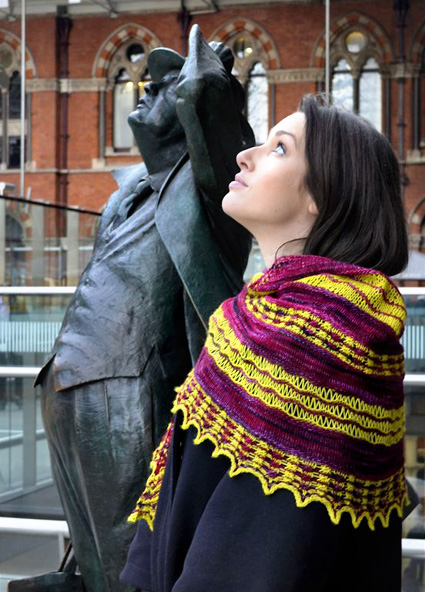
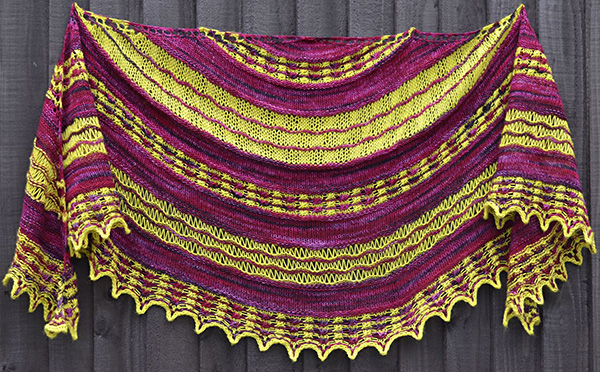
Irish knitters hold an online Secret Santa every December called "Knitmas". It's run by extremely clever and hard-working elves over diverse social media including Ravelry, Twitter and Elfster. You have to be Irish or in Ireland to participate and the gifts must include something made by hand. You must carefully research your giftee to figure out what s/he would like and really make a special package for them. Last year, I got a wonderful person with the nickname "LismoreLady" in the draw. I found out she liked bright colours and geometric shapes and that she is indeed very lady-like. I decided to design a shawl for her, and this is the result. LismoreLady has the original electric-blue-and-hot-pink one now, but I was delighted to make another for Knitty in gorgeous Pixie yarn from Dragonfly Fibers. Lady Lismore is a crescent-shaped shawlette worked in two colours. The pattern showcases a trio of multi-wrap stitch patterns. The way these stitches are worked create wavy stripes of colour in the knit. The technique is not complicated to work, which means you get a great effect without huge outlays of effort. |
||
|
SIZE |
|
|
FINISHED MEASUREMENTS |
|
MATERIALS Notions |
|
GAUGE |
| 18 sts/36 rows = 4 inches in stockinette stitch (relaxed after blocking) |
|
PATTERN NOTES |
|
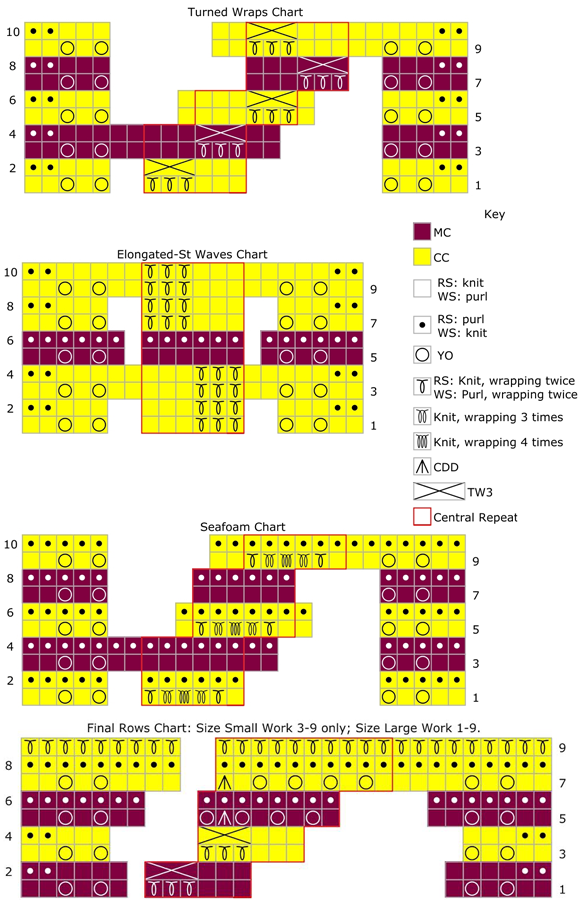
Wrapped Stitches CDD: Sl 2 sts together (as if for k2tog), k1, pass 2 slipped sts over. Turned Wraps Pattern Elongated-St Waves Pattern Seafoam Pattern |
|
The charts for this pattern are very large and fit on a letter-sized page. Click here and print the resulting page. |
|
DIRECTIONS 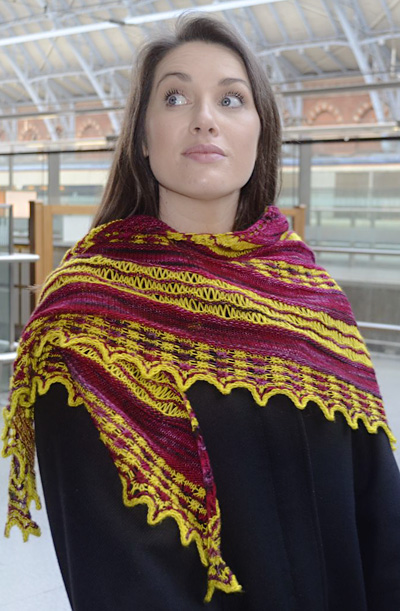
Next row [RS]: [K1, yo] twice, k2, [yo, k1] twice. 10 sts Note: Carry CC up the side of the shawl within patterned sections, but cut CC, leaving a tail, when working the stocking stitch sections and borders. Stocking St Section 34 sts after first repeat complete. Rev St St Border 42 sts after first repeat complete. Work Rows 1-10 of the Turned Wraps Chart. 62 sts Work a Rev St St Border. 70 sts Work Rows 1-10 of the Elongated-St Waves Chart, then rep rows 5-6, then rep rows 1-4 again. 134 sts Work Rows 1-10 of the Turned Wraps Chart. 194 sts Work a Rev St St Border. 202 sts Work Rows 1-10 of the Seafoam Chart. 254 sts Work a Rev St St Border. 262 sts Size Large Only: 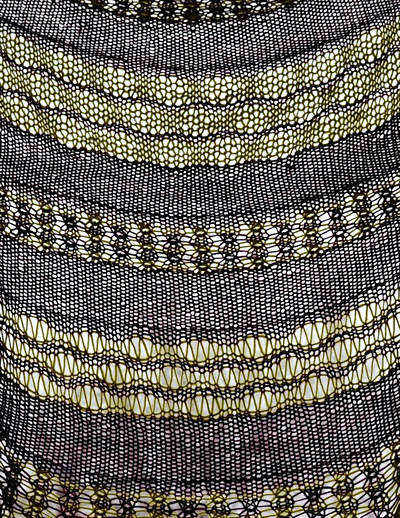 Final Rows & Bind-off Size Small start here: Bind off as follows: Sl1, dropping extra wrap, *sl1, dropping extra wrap, pass first st over; rep from * to end of row. Secure final st with MC yarn tail from Row 4. |
|
FINISHING |
| ABOUT THE DESIGNER |
|
If you'd like to see more of Elanor's designs, they're on her blog. |
|
Pattern & images © 2015 Elanor King. Contact Elanor |
