|
|
|||

|
|
|||
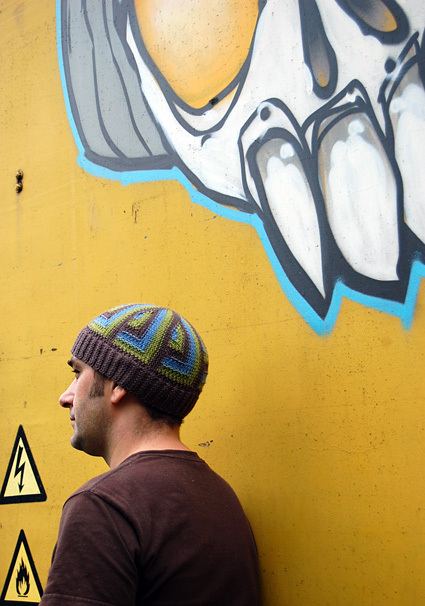
Modern living seems full of right angles. Wherever you turn, there are corners -- on buildings, windows and doors. More can be found on car bumpers, road junctions, walls and street lamps; they are everywhere. These right angled structures allow the urban sprawl to slot together, forming a connection that contains the hustle and bustle. Rigid and strong and economical on space, they have become a symbol for our crowded towns and cities. This hat explores a new way of knitting right angles. Worked on straight needles -- knitted sideways, and then grafted at the end -- the color sections are worked as stripes with some intarsia. This is an ideal hat for lovers of angles and straight lines who may be in need of something warm and woolly to soften the edges.
|
|||
| SIZE | |||
| S[M, L] To fit head circumference up to 20[22, 24] inches (shown in size L) |
|||
| FINISHED MEASUREMENTS | |||
Head circumference: 16.5[19.5, 22.75]
inches, unstretched |
|||
| MATERIALS | |||
KnitPicks Telemark [100% Peruvian Highland Wool; 103yd/94m
per 50g skein]; 1 skein each color (approx. 0.5 skeins
each of CC1 and CC2 are used)
|
|||
| GAUGE | |||
22 sts/28 rows = 4 inches in stockinette stitch |
|||
|
PATTERN NOTES [Knitty's list of standard abbreviations and techniques can be found here.] |
|||
|
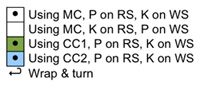
Directions for the crochet cast on method used for this project can be found here. Instructions for grafting can be found here. Wrap & turn: Bring yarn between needles to front of work, slip next stitch to right needle, bring yarn around this stitch to back of work, slip stitch back to left needle, turn work to begin purling back in the other direction. This hat is designed in reverse stockinette st, so that the 'purl side' of the fabric faces out. If you decided you prefer the stockinette st side of the fabric, the short row wraps will be picked up differently. Short row wraps are picked up on the last row of each
panel – a WS row, which is a knit row. If you plan
to use the reverse stockinette st face of the fabric
as the RS, when you come to a wrapped st, pick up the
wrap by inserting the tip of the left needle into the
back of the wrap and knitting it together with the st.
The wrap will show on the stockinette st face of the
fabric.
To make economical use of the yarn, I used both ends of the ball for each chart repeat. This may seem like a messy idea, and the yarns did get a little tangled, but at the end of each panel all yarn tails are cut except one strand of MC (which is needed for ending and starting each panel), which keeps the tangle from getting out of control. If you prefer, each ball of yarn can be divided into two smaller balls.
|
|||
| DIRECTIONS | |||
|
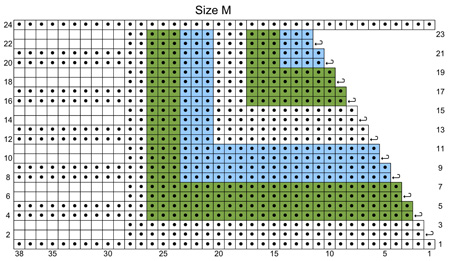
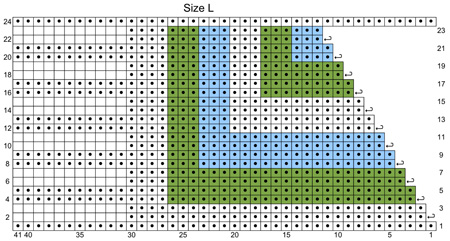
Using waste yarn and method shown in linked article (see Pattern Notes), CO 35[38, 41] sts. Following chart for your size, work as follows. When
working Row 20[24, 24] of chart, pick up wraps and work
them together with wrapped sts (see Pattern Notes). Break
all strands of CC1 and CC2, and secondary strand of MC,
at the end of each chart repeat. Read through the grafting directions below. If you find the idea of grafting across short rows too daunting, work the final row of the chart before breaking the yarn. Draw tail through edge sts of each panel at top of hat before grafting. This will effectively add one row of MC to final panel of the hat. Grafting: |
|||
| FINISHING | |||
Neatly weave in all ends
- careful weaving will
make for a fully reversible hat. |
|||
| ABOUT THE DESIGNER | |||
|
Woolly, author of 'Going Straight – A New Generation
of Knitted Hats', is constantly
dreaming up weird and wonderful
hat designs. She lives in a bus
with her partner, son and stash,
roaming Europe in search of the
best yarn stores, festivals and
sheep. You'll find her here. |
|||
| Pattern & images © 2009 Woolly Wormhead. Contact Woolly |
 Intarsia: