Knitty: little purls of wisdom
Hidden Purls
Title
beauty shot

Tangy

A shapely cardigan without shaping? By increasing fancy ribs (Little Hourglass Rib and Reverse Cross-Stitch Rib adapted from Barbara Walker’s invaluable A Treasury of Knitting Patterns) at the waistline, you can add some gentle waist shaping to a “simple”, bottom-up cardigan. Deep seed stitch hems and front bands show off Madelinetosh’s beautiful hand-dyed, worsted-weight yarn.
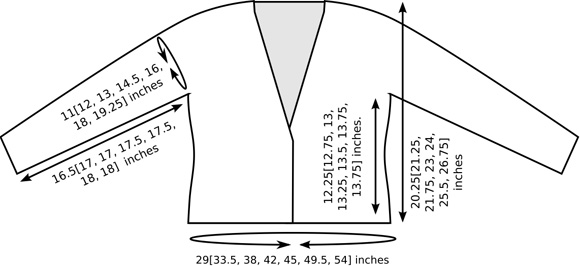
Keep it closed with one of Leslie Wind’s beautiful “C” pins, like I did, or sew in some invisible snaps, even add a button, perhaps one of those big, decorative ones you’ve been saving (buttonholes and buttons would distort the front bands too much for me).

You’ll be showing off your hourglass figure in no time!

spacer model: Kathleen Dames spacer photos: Nicholas Dames

SIZE
XS[S, M, L, 1X, 2X, 3X] (shown in size M)

spacer

FINISHED MEASUREMENTS
Chest: 29[33.5, 38, 42, 45, 49.5, 54] inches with front bands overlapped
Length: 20.25[21.25, 21.75, 23, 24, 25.5, 26.75] inches

spacer

MATERIALS
Yarn

spacer Madelinetosh Tosh DK [100% Superwash Merino Wool; 225 yards/206 meters per 50 gram skein]; color: Mourning Dove; 4[5, 5, 6, 6, 7, 7] skeins

Recommended needle size
[always use a needle size that gives you the gauge listed below -- every knitter's gauge is unique]
spacer 1 US #6/4mm circular needle, 32 inches or longer (longer needle recommended for larger sizes)
spacer 1 spare circular needle, US #6/4mm or smaller, 24 inches or longer

Notions
spacer stitch markers
spacer stitch holders or waste yarn
spacer yarn needle

spacer

GAUGE

22 sts/30 rows = 4 inches in stockinette st, after blocking
 

PATTERN NOTES
[Knitty's list of standard abbreviations and techniques can be found here.]

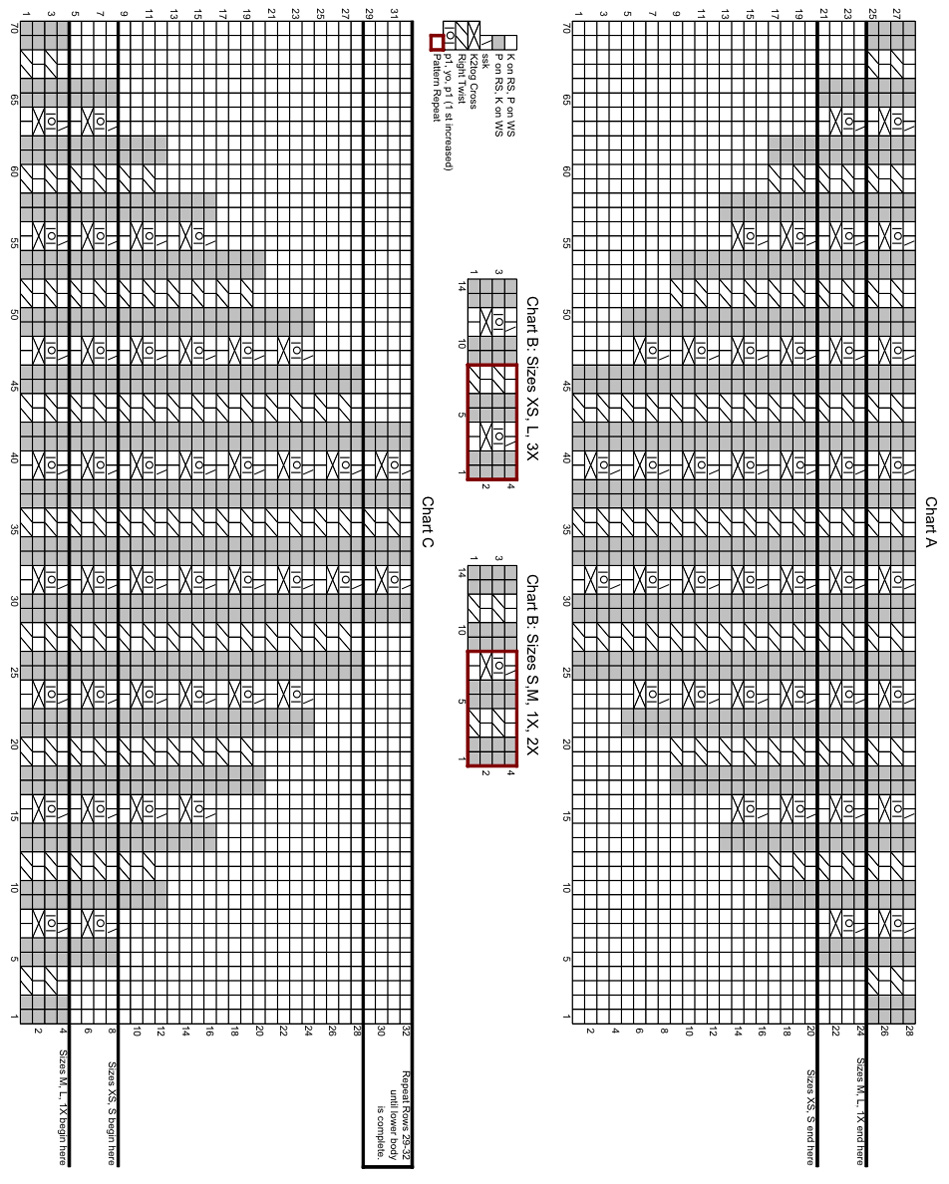
Seed Stitch (Worked over an even number of sts):
Row 1 [RS]: [K1, p1] to end.
Row 2 [WS]: [P1, k1] to end.
Repeat these 2 rows for Seed Stitch.

K2tog Cross: K2tog through back loops but do not drop sts from left needle; k same 2 sts together through front loops and drop sts from left needle.

Right Twist (Worked on WS): P into front of second st on left needle but do not drop st from left needle; p into front of first st on left needle and drop both first and second sts from left needle.

Instructions for grafting can be found here.

spacerCharts
The chart for this pattern is very large and fits on a letter-sized page.
Click here and print the resulting page.

DIRECTIONS

spacer
LOWER BODY
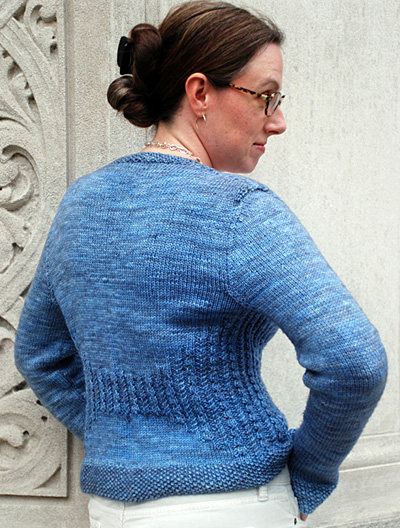
CO 170[194, 218, 242, 258, 282, 306] sts.

Work 15 rows in Seed Stitch, ending with a RS row.

Set-up Row [WS]: Work 10 sts in Seed Stitch, p4[8, 16, 20, 24, 32, 36], place marker, work Row 1 of Chart A over next 70 sts, place marker, p2[18, 26, 42, 50, 58, 74], place marker, work Row 1 of Chart A over next 70 sts, place marker, p4[8, 16, 20, 24, 32, 36], work last 10 sts in Seed Stitch.

Continue in pattern, working first and last 10 sts of row in Seed Stitch, 70 sts between each pair of markers following Chart A and all other sts in stockinette st, until you have completed Row 20[20, 24, 24, 24, 28, 28] of chart.

From this point on, work first and last 10 sts of each row in Seed Stitch as set.

Waistband:
Next Row [WS]: Work 10 sts in pattern, work Waistband Chart for your size to last 10 sts, continue in pattern to end. Do not remove markers.

Continue in pattern, working center 150[174, 198, 222, 238, 262, 286] sts following Chart B, until waistband measures approx. 1.5[2, 2, 2.5, 2.5, 2.75, 2.75] inches, ending with Row 3 of chart (a WS row). Work measures approx. 6.25[6.75, 7.25, 7.75, 7.75, 8.5, 8.5] inches.

In the next row (Row 4 of Chart B), side markers will be placed to indicate center of each underarm. Leave existing markers in place.

Next Row [WS]: Work 47[53, 59, 65, 69, 75, 81] sts in pattern, place marker, work 76[88, 100, 112, 120, 132, 144] sts in pattern, place marker, work remaining  47[53, 59, 65, 69, 75, 81] sts in pattern.

images
Begin Neckline Shaping:
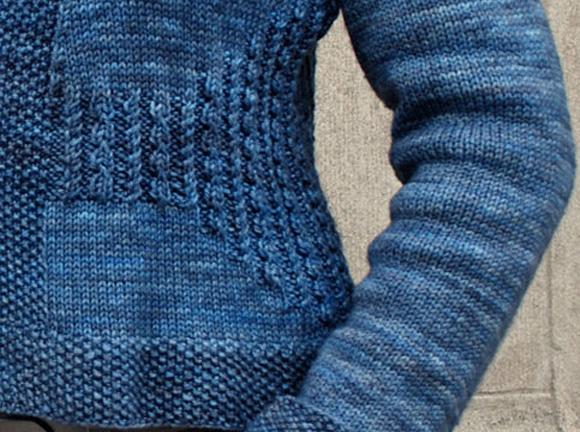
Next Row [WS]: Work 10 sts in pattern, [p to marker, work Row 9[9, 5, 5, 5, 1, 1] of Chart C over next 70 sts] twice, p to last 10 sts, work in pattern to end.
Note: Neckline shaping begins on next row; read ahead before continuing.

As you work lower body, continue working Chart C as set. Once all rows of Chart C have been completed, repeat Rows 29-32 until lower body is complete.

Neckline Decrease Row [RS]: Work 10 sts in pattern, ssk, work in pattern to last 12 sts, k2tog, continue in pattern to end.

Work 3 rows in pattern.

These 4 rows establish neckline shaping. Decrease at neck edge every fourth row as set until 20[20, 20, 22, 24, 26, 28] sts have been decreased at each neckline edge – note that neckline shaping will continue into yoke. For some sizes, it will be necessary to remove first and last markers before lower body is complete due to neckline shaping.

Continue in pattern until work measures 12.25[12.75, 13, 13.25, 13.5, 13.75, 13.75] inches or desired length to underarm, ending with a WS row.

Place all sts on st holder or waste yarn. Remove markers indicating chart placement, but retain side markers. Do not break yarn; start sleeves using new ball of yarn.

spacer
SLEEVES (Make 2)
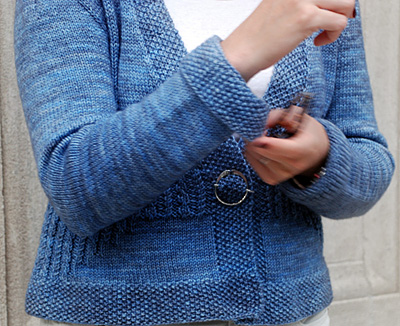
CO 36[40, 44, 48, 52, 56, 60] sts.
Work 15 rows in Seed Stitch, ending with a RS row.

Work 7[7, 7, 5, 5, 3, 3] rows in stockinette st, ending with a WS row.

Increase Row [RS]: K1, m1, k to last st, m1, k1.

Repeat these 8[8, 8, 6, 6, 4, 4] rows 11[12, 13, 15, 17, 21, 22] times more. 60[66, 72, 80, 88, 100, 106] sts.

Continue in stockinette st until work measures  16.5[17, 17, 17.5, 17.5, 18, 18] inches from top of cuff or desired length to underarm, ending with a WS row. Note that cuff is intended to be folded back when worn.

Break yarn. Place first and last 3[6, 9, 10, 11, 12, 12] sts on waste yarn or short st holders, and center 54[54, 54, 60, 66, 76, 82] sts on spare needle.

Make a second sleeve in the same way.

images
YOKE
Note: Remember to continue working neckline decreases as set. Because the number of neckline decreases that have been worked may vary due to length adjustment, the total number of sts for the sweater at each stage wil not be given until all neckline decreases have been worked. Instead, st numbers for different parts of the sweater (eg, back, sleeves) will be given.

spacer

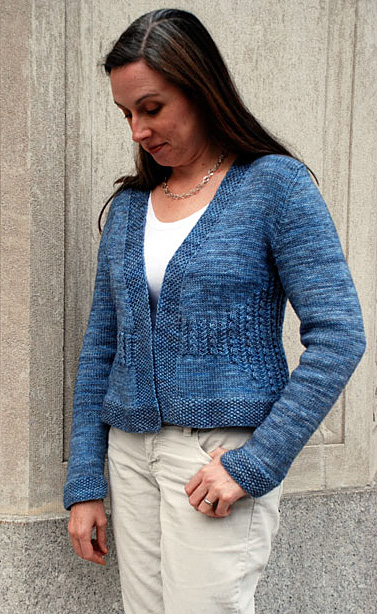
Place held sts of lower body on circular needle.

Joining Row [RS]: Using yarn attached to lower body, work in pattern to 3[6, 9, 10, 11, 12, 12] sts before first side marker, place next 6[12, 18, 20, 22, 24, 24] sts on st holder or waste yarn, removing side marker; place marker, work 46[50, 54, 60, 66, 76, 82] held sts of one sleeve, place marker; k 70[76, 82, 92, 98, 108, 120] sts of back (to 3[6, 9, 10, 11, 12, 12] sts before next side marker), place next 6[12, 18, 20, 22, 24, 24] sts on st holder or waste yarn, removing side marker; place marker, work 54[54, 54, 60, 66, 76, 82] held sts of remaining sleeve, place marker, work remaining sts of lower body in pattern. 4 markers in place.

In Decrease Rows 1 and 2, sts are decreased at armhole edges of front and back.

Decrease Row 1 [WS]: [Work in pattern to 2 sts before marker, p2tog tbl, slip marker, p to next marker, slip marker, p2tog] twice, work in pattern to end. 4 sts decreased.

Decrease Row 2 [RS]: [Work in pattern to 2 sts before marker, k2tog, slip marker, k to next marker, slip marker, ssk] twice, work in pattern to end. 4 sts decreased.

Repeat these 2 rows 0[0, 0, 1, 1, 2, 4] times more. 66[72, 78, 84, 90, 96, 100] sts for back.

Sizes XS, S, 3X Only:
Work 1 WS row in pattern.

Sizes M, L, 1X, 2X Only:
Work Decrease Row 1 once more. -[-, 76, 82, 88, 94, -] sts for back.

All Sizes:
In the decrease rows that follow, sts are decreased at edges of sleeve caps.

Decrease Row 3 [RS]: [Work in pattern to marker, slip marker, ssk, k to 2 sts before next marker, k2tog, slip marker] twice, work in pattern to end.
Work 1 WS row in pattern.
Repeat these 2 rows 9[11, 13, 14, 15, 18, 19] times more. 34[30, 26, 30, 34, 38, 42] sts for each sleeve.

Work Decrease Row 3.

Decrease Row 4 [WS]: [Work in pattern to marker, slip marker, p2tog, p to 2 sts before next marker, p2tog tbl, slip marker] twice, work in pattern to end.
Repeat these 2 rows 5[4, 3, 4, 5, 6, 7] times more. 10 sts for each sleeve.

Attach sts of right front to sts at top of sleeve cap using short rows as follows:
Row 1 [RS]: Work in pattern to 1 st before first marker; ssk, removing marker and replacing it on left needle after ssk is worked; turn work.
Row 2 [WS]: Work in pattern to end.
Repeat these 2 rows 3 times more.

Next Row [RS]: Work in pattern to 1 st before first marker; ssk, removing marker; work in pattern to end. 5 sts remain for right sleeve cap.

Attach sts of left front to sts at top of sleeve cap using short rows as follows:
Row 1 [WS]: Work in pattern to 1 st before first marker; p2tog, removing marker and replacing it on left needle after p2tog is worked; turn work.
Row 2 [RS]: Work in pattern to end.
Repeat these 2 rows 3 times more.

Next Row [WS]: Work in pattern to 1 st before first marker; p2tog, removing marker; p to next marker, slip marker. Proceed to Row 1 of next section. 5 sts remain for left sleeve cap.

Attach sts of back to remaining sleeve cap sts using short rows as follows:
Row 1 [WS]: P to 1 st before right back shoulder marker; p2tog, removing marker and replacing it on left needle after p2tog is worked; turn work.
Row 2 [RS]: K to 1 st before left back shoulder marker; ssk, removing marker and replacing it on left needle after ssk is worked; turn work.
Repeat these 2 rows 4 times more. No sleeve cap sts remain, and all neckline decreases have been worked. St marker at each side indicates division between sts of back and sts of front. 110[122, 130, 138, 146, 154, 162] sts: 22[25, 27, 28, 29, 30, 31] sts for each front, 66[72, 76, 82, 88, 94, 100] sts for back.

Shape back shoulders using short rows:
Row 1 [WS]: P to 1 st before right back shoulder marker, W&T.
Row 2 [RS]: K to 1 st before left back shoulder marker, W&T.
Row 3 [WS]: P to 3 sts before previous wrapped st, W&T.
Row 4 [RS]: K to 3 sts before previous wrapped st, W&T.
Repeat Rows 3 and 4 3[4, 4, 5, 5, 5, 6] times more.

Next Row [WS]: Work in Seed Stitch to 3 sts before previous wrapped st, W&T.
Next Row [RS]: Work in Seed Stitch to 3 sts before previous wrapped st, W&T.
Repeat these 2 rows twice more.

Next Row [WS]: Work in pattern to right shoulder marker, picking up wraps and working them together with wrapped sts.
Transfer sts of right front to spare needle and join to sts of right back shoulder using three-needle bind off.

Next Row [RS]: Continuing from three-needle bind off, work to left shoudler marker, picking up wraps and working them together with wrapped sts.
Transfer sts of left front to spare needle and join to sts of left back shoulder using three-needle bind off.
BO remaining 22[22, 22, 26, 30, 34, 38] back neckline sts in pattern.

spacer

FINISHING
Sew sleeve seams; do not sew cuffs closed. Cuffs are intended to be folded back when worn (see photo).
Graft sleeves to body at underarms. Weave in ends and block as desired.

spacerimage
ABOUT THE DESIGNER

designernamespacer Kathleen Dames lives, knits, and designs in New York City and Bath, Maine. When she’s not wrangling her children or designing books, she knits and knits and knits.

You can follow her knit-knatterings on her blog and see more of her designs on Ravelry.

spacer