Knitty: little purls of wisdom
Sanguine Gryphon
Title
beauty shot

Tangy

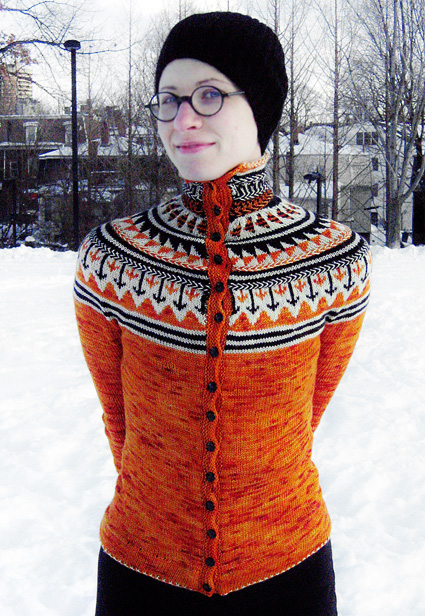
My fascination with Dutch athletic uniforms began after I watched the Dutch speed skaters in the 2010 Winter Olympics. Their graphic, aerodynamic suits inspired me to design a mitten pattern this spring called “Go Dutch!”.

However, the fascination was intensified when the Netherlands’ national football (that’s “soccer” to the American readers), nicknamed the “Oranje,” made it to the World Cup finals this past summer. I had the good fortune of being in a tiny, old, wood-paneled pub in Rotterdam, watching the game projected onto a screen, when the team beat highly favored Brazil in the quarterfinal match. That day I decided to knit a tribute cardigan, and sketched up this design.

This cardigan is as bold as the “total football” of the Oranje, filled with graphic patterns that create both vertical and horizontal movement around the yoke. Surprising details like the striped hem facings, braids, and a row of tiny glass buttons make this piece one of a kind.


Don’t be afraid of all the techniques involved in this project! Just take it step by step. If you choose colors that inspire you and make use of all the tutorials available, you’ll love the process and the product!

Editor's note: Oranje is pronounced O-rang-ye

spacer model: Ann Weaver spacer photos: Chris Bergh

SIZE
XS[S, M, L, 1X, 2X, 3X] (shown in size XS, worn with 0 inches ease)

spacer

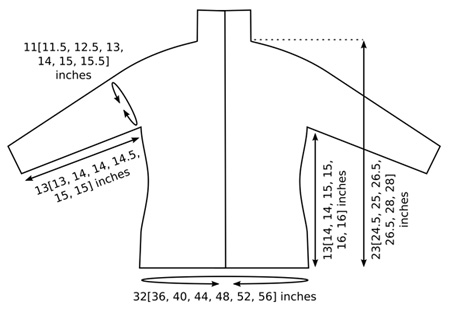
FINISHED MEASUREMENTS
Chest: 32[36, 40, 44, 48, 52, 56] inches
Length: 23[24.5, 25, 26.4, 26.5, 28, 28] inches (not including collar)
Note: Sweater is intended to be very close-fitting; choose a size close to actual bust measurement.

spacer

MATERIALS
Yarn

Sanguine Gryphon Bugga! [70% superwash merino, 20% cashmere, 10% nylon; 412yd per 4 oz. skein]; spacer [MC] Orange Assassin Bug; 2[3, 3, 3, 4, 4, 4] skeins
spacer [CC1] Rhinoceros Beetle [black]; 1 skein
spacer CC2] In the Nude; 1 skein

Recommended needle size
[always use a needle size that gives you the gauge listed below -- every knitter's gauge is unique]
spacer 1 set US #5/3.75mm double-point needles
spacer 1 set US #6/4mm double-point needles
spacer US #5/3.75mm circular needles, 16- and 32-inch lengths
spacer US #6/4mm circular needles, 16- and 32-inch lengths
Note: Larger sizes may also wish to have a 40-inch US #6/4mm circular needle for working lower yoke.

Notions
spacer 4 stitch markers – be sure one marker is a different type or color from the others
spacer Safety pin or split ring marker
spacer Yarn needle
spacer 15 buttons, approx. 0.5 inch diameter. Buy buttons after cardigan is complete to ensure a good fit.
spacer Sewing thread and needle
spacer Recommended: Sewing machine for reinforcing steeks (see Pattern Notes)

spacer

GAUGE

22 sts/36 rows = 4 inches in stockinette stitch using larger needles


PATTERN NOTES
[Knitty's list of standard abbreviations and techniques can be found here.]

The body and sleeves are worked in the round to the underarms, then are joined before working the yoke. After reinforcing the edges of the front steek, the sweater is cut open to create a cardigan.

Here's a clear, step-by-step tutorial on sewn steeks.

I strongly recommend using sewn steeks if you work this cardigan in a yarn that is not particularly “woolly.” If the yarn won’t felt easily, it’s better to sew your steeks rather than crochet them. The yarn used in the sample, with its soft, smooth hand, will pull free of crocheted steeks and begin to unravel.

m1L (left-leaning increase): Insert left needle, from front to back, under horizontal strand of yarn running between last stitch on left needle and first stitch on right needle; knit this stitch through back loop. 1 stitch increased.

m1R (right-leaning increase): Insert left needle, from back to front, under horizontal strand of yarn running between last stitch on left needle and first stitch on right needle; knit this stitch through front loop. 1 stitch increased.

Knitted Braids:
When working braids, both strands of yarn are held to RS of work. Two colors are designated A and B.

Right-leaning Braid:
Round 1: *K1 using A, k1 using B; repeat from * to end.
Round 2: Using A, p1; *cross B under A, p1 using B; cross A under B, p1 using A; repeat from * to last st, cross B under A, p1 using B.
Round 3: Using A, p1; *cross B over A, p1 using B; cross A over B, p1 using A; repeat from * to last st, cross B over A, p1 using B.

Left-leaning Braid:
Round 1: *K1 using A, k1 using B; repeat from * to end.
Round 2: Using A, p1; *cross B over A, p1 using B; cross A over B, p1 using A; repeat from * to last st, cross B over A, p1 using B.
Round 3: Using A, p1; *cross B under A, p1 using B; cross A under B, p1 using A; repeat from * to last st, cross B under A, p1 using B.


spacerCharts
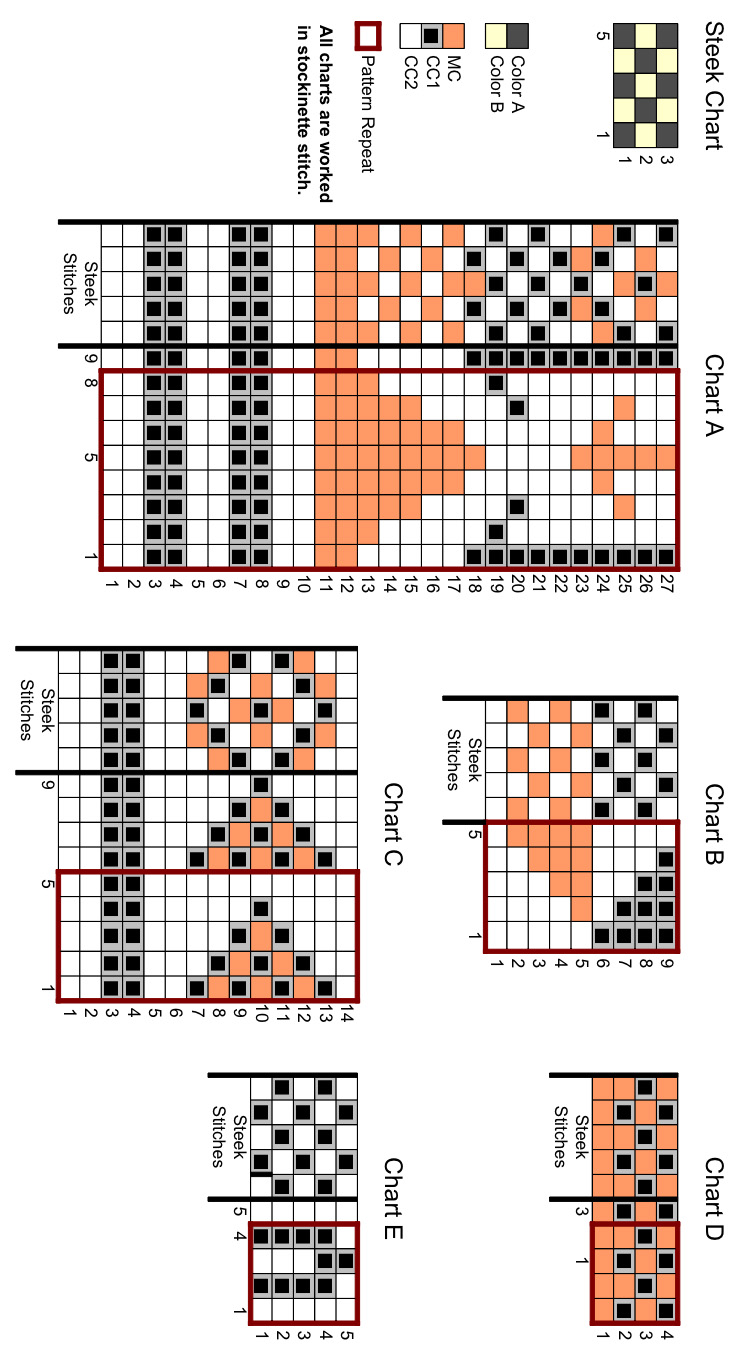
The charts for this pattern are very large and fit on a letter-sized page.
Click here and print the resulting page.

DIRECTIONS
LOWER BODY
Hem Facing:
Using CC1 and long circular needle in smaller size, CO 185[209, 229, 249, 273, 293, 317] sts. Place marker and join to begin working in the round, being careful not to twist. Use marker which is different from the others, to indicate beginning of round.

K 2 rounds using CC1. K 2 rounds using CC2.

Repeat these 4 rounds once, then k 2 more rounds using CC1. 5 stripes have been worked. Break CC1.

Changing to long circular needle in larger size, work braided turning ridge as follows:
Next Round: Using MC as color A and CC2 as color B, work Round 1 of Right-Leaning Braid to last 5 sts, place marker, work Round 1 of Steek Chart.

Work Rounds 2-3 of Right-Leaning Braid and Steek Chart as set. Braid forms turning ridge for hem. Break CC2; from this point, lower body will be worked using MC only.

Next Round: K46[52, 57, 62, 68, 73, 79], place marker, k88[100, 110, 120, 132, 142, 154], place marker, k51[57, 62, 67, 73, 78, 84].
Sts to first marker form right front, sts between first and second markers form back, sts between second and third markers form left front, last 5 sts form steek for front opening.

Work in stockinette st until work measures 4[4, 4, 4.5, 4.5, 5, 5] inches from turning ridge.

Shape Waist:
Decrease Round: [K to 3 sts before marker, ssk, k1, slip marker, k1, k2tog] twice, k to end.

K 3 rounds.

Repeat these 4 rounds 4 times more. 165[189, 209, 229, 253, 273, 297] sts.

Increase Round: [K to 1 st before marker, m1R, k1, slip marker, k1, m1L] twice, k to end.

K 3 rounds.

Repeat these 4 rounds 4 times more. 185[209, 229, 249, 273, 293, 317] sts.

Continue in stockinette st until work measures 13[14, 14, 15, 15, 16, 16] inches from turning ridge or desired length to underarm.

Next Round: [K to 5[5, 5, 5, 5, 6, 6] sts before marker, BO 10[10, 10, 10, 10, 12, 12] sts, removing marker] twice, k to end. Leave steek marker and end-of-round marker in place. 165[189, 209, 229, 253, 269, 293] sts: 78[90, 100, 110, 122, 130, 142] sts for back, 87[99, 109, 119, 131, 139, 151] sts for fronts and steek.

Set lower body aside and work sleeves. Do not break yarn; begin first sleeve with a new ball of yarn.

SLEEVES (Make 2)
Using double-point needles in smaller size, CO 44[50, 56, 58, 60, 60, 64] sts. Join to begin working in the round, being careful not to twist. If desired, place safety pin or split ring marker in work after several rounds have been worked, to indicate beginning of round.

Cuff Facing:
K 2 rounds using CC1. K 2 rounds using CC2.
Repeat these 4 rounds once, then k 2 more rounds using CC1. 5 stripes have been worked. Break CC1.

Changing to double-point needles in larger size, work Rounds 1-3 of Right-Leaning Braid, using MC as color A and CC2 as color B. Break CC2; from this point, sleeve will be worked using MC only.

Cuff:
K 11 rounds using MC. Fold hem facing along braid to inside of sleeve, so that WS of CO edge is directly behind sts on needle.

Joining Round: [Insert tip of left needle into CO st that is directly behind first st on needle, k this CO st together with first st on needle] until all sts have been joined.
From this point, all lengths will be measured from folded edge of hem.

Work in stockinette st until work measures 3 inches.
Note: As written, finished sleeve length will be 13[13, 14, 14, 14.5, 15, 15] inches to underarm. If longer or shorter sleeves are desired, work more or less length before shaping sleeve as follows.

When shaping sleeve, switch to short circular needle in larger size if desired, once enough sts have been increased to move comfortably around the needle.

Shape Sleeve:
Increase Round: K1, m1L, k to last st, m1R, k1.
K 19[19, 21, 19, 19, 13, 13] rounds.
Repeat these 20[20, 22, 20, 20, 14, 14] rounds 2[2, 2, 2, 2, 4, 4] times more. 50[56, 62, 64, 66, 70, 74] sts.

Work Increase Round. K 5[6, 10, 9, 7, 5, 5] rounds.
Repeat these 6[7, 11, 10, 8, 6, 6] rounds 3[2, 1, 2, 3, 4, 4] times more, then work Increase Round once more. 60[64, 68, 72, 76, 82, 86] sts.

Continue in stockinette st until work measures 13[13, 14, 14, 14.5, 15, 15] inches, ending last round 5[5, 5, 5, 5, 6, 6] sts before end of round.

BO 10[10, 10, 10, 10, 12, 12] sts (last  5[5, 5, 5, 5, 6, 6] sts of current round and  first 5[5, 5, 5, 5, 6, 6] sts of next round). Break yarn and place remaining 50[54, 58, 62, 66, 70, 74] sleeve sts on hold on short circular needle in smaller size.

Make a second sleeve in the same way. Break yarn but do not remove sts of second sleeve from working needle(s).

YOKE
Pick up lower body and resume working using attached ball of yarn, working all sts onto long circular needle in larger size, as follows.Joining Round: K to first set of bound off sts, k all sts of one sleeve, k to next set of bound off sts, k all sts of second sleeve, k to end of round. 265[297, 325, 353, 385, 409, 441] sts.

Work in stockinette st until work measures 1[1.5, 2, 2.5, 2.5, 3, 3] inches from joining round. When working last round, increase or decrease as follows (see note below):
Sizes XS and S: Increase 5 sts.
Size M: Increase 1 st.
Sizes L, 1X, 2X and 3X: Decrease 3 sts.
270[302, 326, 350, 382, 406, 438] sts.

Note: When instructed to increase or decrease stitches within a round, be sure to space increases or decreases evenly across round. Do not work increases or decreases over steek sts.

When shaping yoke, switch to shorter circular needle in larger size when necessary.

Work Rounds 1-27 of Chart A.

Work Rounds 1-3 of Right-Leaning Braid, using CC1 as color A and CC2 as color B, and working steek sts following Steek Chart. From this point on, when working a braid, work steek sts following Steek Chart.

K 1 round using CC1.

Next Round: Using CC1, [k1, k2tog] to 1[0, 0, 0, 2, 2, 1] sts before steek marker, k to end. 182[203, 219, 235, 256, 273, 294] sts.

K 1 round using CC2.

Next Round: Using CC2, k all sts, increasing or decreasing as follows:
Sizes XS, S, M, 3X: Increase 3[2, 1, -, -, -, 1] sts.
Size L: K all sts without increasing or decreasing.
Sizes 1X, 2X: Decrease -[-, -, -, 1, 3, -] sts.
185[205, 220, 235, 255, 270, 295] sts.

K 2 rounds using CC1.
Work Rounds 1-3 of Left-Leaning Braid, using CC2 as color A and MC as color B.

Work Rounds 1-9 of Chart B.
Next Round: Using CC1, [k1, k2tog] to 0[2, 2, 2, 1, 1, 2] sts before steek marker, k to end. 125[139, 149, 159, 172, 182, 199] sts.
Next Round: Using CC1, k all sts, decreasing 6[0, 5, 5, 3, 3, 5] sts. 119[139, 144, 154, 169, 179, 194] sts.

Work Rounds 1-14 of Chart C.

Sizes XS, S, L, 1X, 2X, 3X Only:
Next Round: Using CC2, [k1, k2tog] to 0[2, -, 2, 2, 0, 0] sts before steek marker, k to end. 81[95, -, 105, 115, 121, 131] sts.

Size M Only: Using CC2, k2, [k1, k2tog] to 2 sts before steek marker, k to end. 99 sts.

All Sizes:
Using CC1, shape back neck using short rows as follows:
Row 1 [RS]: K59[71, 74, 79, 85, 90, 99], W&T.
Row 2 [WS]: P42[52, 54, 58, 60, 64, 72], W&T.

Note: When working short rows that follow, pick up wraps and work them together with wrapped sts (see list of Techniques).
Row 3 [RS]: K45[55, 57, 61, 64, 68, 76], W&T.
Row 4 [WS]: P48[58, 60, 64, 68, 72, 80], W&T.
Row 5 [RS]: K51[61, 63, 67, 72, 76, 84], W&T.
Row 6 [WS]: P54[64, 66, 70, 76, 80, 88], W&T.
Row 7 [RS]: K to end of round; resume working in the round.

Next Round: Using CC1, k all sts, decreasing 3[1, 1, 3, 5, 7, 9] sts. 78[94, 98, 102, 110, 114, 122] sts.

Work Rounds 1-3 of Right-Leaning Braid, using MC as color A and CC1 as color B.
Work Rounds 1-4 of Chart D.
Work Rounds 1-3 of Left-Leaning Braid, using CC2 as color A and CC1 as color B.
Work Rounds 1-5 of Chart E.
Work Rounds 1-3 of Right-Leaning Braid, using CC1 as color A and CC2 as color B.
K 2 rounds using CC1.
K 2 rounds using CC2.
K 2 rounds using MC.
Work Rounds 1-3 of Left-Leaning Braid, using CC2 as color A and MC as color B.

Switching to shorter circular needle in smaller size, work collar facing as follows:
K 2 rounds using CC2.
K 2 rounds using CC1.
Repeat these 4 rounds 5 times more, then k 2 rounds using CC2. 13 stripes have been worked. Loosely BO all sts.

spacer

FINISHING
Weave in ends and block sweater to measurements shown in schematic.

Steeks:
Reinforce and cut steeks (see linked article in Pattern Notes above).

Steam steek edges toward WS of cardigan, and pin if desired. You will be picking up stitches for the front button bands along the outer edge stitches of the steek.

Front Bands
Before picking up front band sts, fold, steam and pin hem and collar facing sts toward WS of sweater. When picking up hem and collar facing sts for bands, pick up facing st with body st and k these sts together; the picked-up sts will hold the edges of the hem and collar facings in place. Bands are worked in garter stitch.

Buttonhole Band:
Use pins or waste yarn to mark positions of 15 buttons evenly spaced along right front edge.
Using MC and long circular needle in smaller size, with RS facing and beginning at lower right front corner, pick up and k 2 sts for every 3 rows along right front edge.

K 3 rows.
Next Row [RS]: [K to desired position of buttonhole, yo, k2tog] 15 times, k to end.
K 3 rows.
Loosely BO all sts.

Button Band:
Using MC and long circular needle in smaller size, with RS facing and beginning at upper left front corner, pick up and k 2 sts for every 3 rows along right front edge.
K 7 rows.
Loosely BO all sts.

Sew buttons to button band opposite buttonholes.

Hem, Cuff and Collar Facings:
Steam and pin cuff facing (hem and collar facings should already be steamed and pinned). Using MC, sew edge of each facing to WS of work, taking care to keep stitches loose.

spacer
ABOUT THE DESIGNER

Ann Weaver has been designing handknits since 2007 while working a growing string of seemingly unrelated jobs. This past fall, she put out her first self-published collection of patterns, titled Craft Work Knit.

You can read more about Ann on her website and on her blog.

spacer