
|
|
 |
|
|
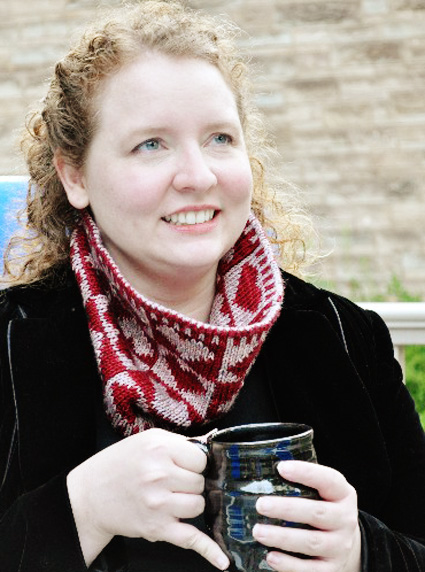
One of my favorite movies is Love Actually. The storyline depicts how love comes in all forms and can turn you inside out and upside down, make you laugh, and make you cry. I designed this cowl to capture this idea. With extra warmth and soft comfort, love is all around and no matter how you put it on, even inside out and backwards, it's right. Double knitting is a technique that allows you to create two layers of fabric at once by working pairs of stitches together. Double knits have no wrong side because of this, making it a wonderful technique when the "wrong side" can be seen. It is a great way to work a color pattern that is shown in negative on the opposite side of the fabric and unlike stranding, you have a smooth fabric on both sides. |
||
|
|
Tweet
 |
|
|
SIZE |
|
|
FINISHED MEASUREMENTS |
|
MATERIALS Notions |
|
GAUGE |
| 19 sts/26 rounds = 4 inches in double knit stockinette stitch |
|
PATTERN NOTES |
|
Instructions for Judy's Magic Cast on can be found here. Instructions for grafting can be found here. |
|
DIRECTIONS Set up the round: Hold the CO stitches with the purl side up, and the MC sts closet to you. With a single circular needle, work across the cast on stitches as follows: [K front st with MC, purl back st with CC]. Lower Edging Body Upper Edging Tubular Bind Off Using MC, purl one round on just the back side fabric (the sts on needle 2). Cut MC and weave in end between fabrics. Using CC, graft front and back sts together. |
|
FINISHING |
| ABOUT THE DESIGNER |
|
Sara J. Bench is a knitter, spinner, and budding weaver who works as a software architect to pay for her yarn and fiber habit. She lives with her two growing boys, her understanding husband, and their dog, Ginger the Werebeast, in Pittsburgh, PA. |
|
Pattern & images © 2013 Sara J Bench. Contact Sara |
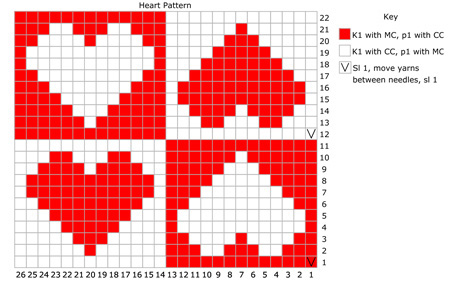 Double knitting is a technique that creates two layers of fabric at once. This pattern uses it to create a negative image on the backside of the cowl. To achieve this, both yarns will travel together as follows: