Knitty: little purls of wisdom
Skein - Gloves - sivia
Title
beauty shot
Tangy

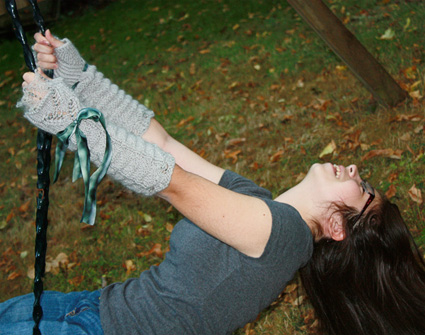
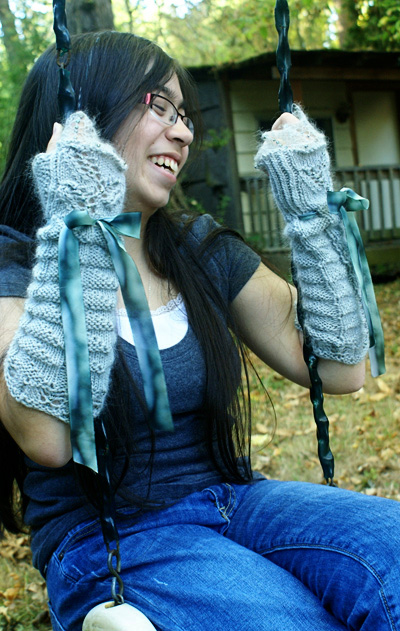
Mochi's name comes from a soft chewy Asian sweet made from sticky rice. According to Wikipedia, mochi is mostly popular in soup and as a snack. However, my authorities, a delightful Vietnamese/American family I know, enjoy a sweet version made with marshmallow inside. And just recently, there is a new little Mochi, their Scottish Fold kitten. See photos below.

Ever since I visited Knit Purl/Shibui Knit's booth at Sock Summit 09 and came away with a few choice skeins, I have been tossing ideas around for combining their baby alpaca dk and silk cloud, two yarns that are each soft beyond belief. Together, they are amazingly, lusciously soft and warm. All I can say is YUM and I think you will agree.

Mochi Mitts are fingerless gloves entirely worked in the round, constructed of two yarns held together until almost the very end. The mirrored right and left gloves are each cast on at the widest part of the arm and worked up to the wrist in a textured, self-pleating pattern. Ribbon ties at the wrist sweetly snug the pleats. The hand features a beaded lace motif at front and twisted rib at back. The hand ends with the mohair/silk yarn alone, which floats over the fingers in an ethereal manner. I think you will be wearing these mitts to tea, don't you?

spacer model: McKenna Nguyen
spacer photos: Katrina Nguyen, Sivia Harding
   Pin It!


SIZE
One

FINISHED MEASUREMENTS
Hand circumference: 6.5 inches/17.75 cm, unstretched.
Pattern allows hand to stretch 2 inches/5 cm above stated measurement.
Arm circumference: 9 inches/22.75 cm, unstretched.
Arm length: 9.5 inches/24 cm from cast on to base of hand.

spacer

MATERIALS
Yarn

spacer [MC1] Shibui Baby Alpaca DK [100% baby alpaca; 255 yd/233 m per 100 g
skein]; color: Ash; 1 skein
spacer [MC2] Shibui Silk Cloud [60% mohair, 40% silk; 330 yds/302 m per 25 g
skein]; color: Ash; 1 skein

Recommended needle size
[always use a needle size that gives you the gauge listed below -- every knitter's gauge is unique]
spacer US #6/ 4 mm needles for working in the round: DPNs, 1 long circular or 2 short circulars

Notions
spacer yarn needle
spacer smooth waste yarn used to hold thumb stitches
spacer 162 size 6/0 beads (81 for each glove)
spacer steel crochet hook, US #13 or 14/0.6 or 0.75 mm for beads
spacer stitch markers
spacer silk ribbon, 1 inches/2.5 cm wide, 2 yds/1.75 m. Sample used Hana hand-painted silk ribbon.

spacer

GAUGE

21 sts and 28 rounds = 4 inches/10cm in stockinette stitch with two yarns held together.
24 sts and 28 rounds = 4 inches/10cm in arm chart pattern with two yarns held together.
 

PATTERN NOTES
[Knitty's list of standard abbreviations and techniques can be found here.]


To Bead a stitch: With crochet hook, slide bead onto hook, insert hook into stitch loop where the bead will sit, making sure that the hook is facing you, and gently pull the stitch off the needle. Flick the bead over the top of the hook, seating it onto the stitch. Transfer the beaded stitch to the right needle and proceed. In all cases, work stitch or decrease indicated before placing bead on the resulting stitch loop.

For more details on working with beads, see Sivia's article Seduced by Beads.

1/3 RC: Slip next 3 stitches to cable needle and hold in back, k1, k3 from cable needle.

1/3 LC: Slip next stitch to cable needle and hold in front, k3, k1 from cable needle.

LLI (Left Lifted Increase): Insert the left needle from front to back under the left leg of the stitch two rows below the first stitch on the right needle, lifting this loop onto the left needle, then knit into the back of this loop to create a new stitch.

RLI (Right Lifted Increase): Insert right needle from front to back under right leg of stitch below first stitch on left needle. Lift this loop onto left needle and knit into the back of this loop to create a new stitch.
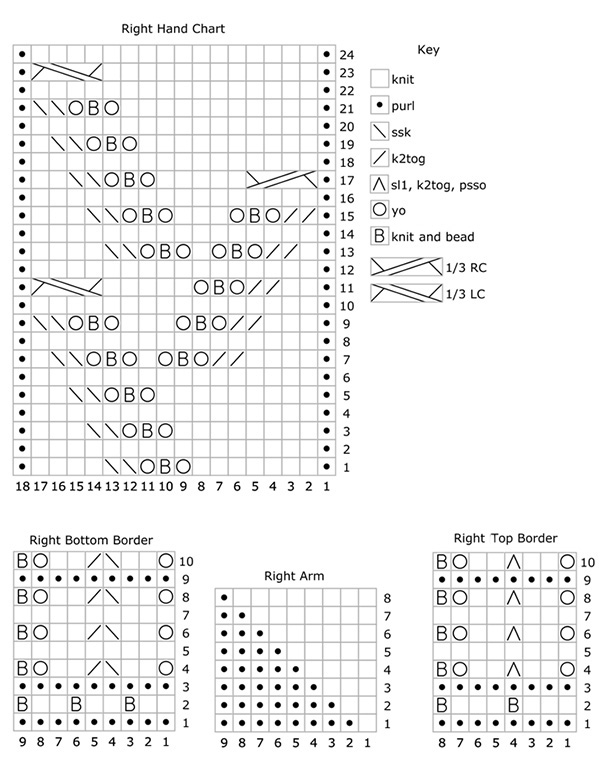

Charts

The charts for this pattern are very large. Each fits on a letter-sized page.
Click below and print each resulting page.

Left Arm, Left Bottom Border, Left Hand, Left Top Border

Right Arm, Right Bottom Border, Right Hand, Right Top Border

DIRECTIONS

spacer
RIGHT MITT
Using both yarns held together, CO 45 sts. Distribute sts across needles as you prefer and join to begin working in the round, being careful not to twist.

Work Rounds 1-10 of Right Glove Bottom Border Chart.

Work Rounds 1-8 of Right Arm Chart 8 times, for 64 rows total.

Eyelet Round: K2, [k1, ssk, yo, k2tog, k2] to last st, k1. 39 sts.
Next round: Knit.

Thumb Gusset and Hand
Thumb Gusset Round 1: P1, k16, p1, k1 tbl, M1P, [p1, k1 tbl] to end. 40 sts.

Thumb Gusset Round 2: Work Round 1 of Right Hand Chart over 18 sts, k1 tbl, p1, place marker, LLI, RLI, place marker, [p1, k1 tbl] to end. 2 gusset sts, 42 sts total.

Thumb Gusset Round 3: Work in pattern as established to first marker, slip marker, purl to next marker, slip marker, work in pattern to end of round.

Thumb Gusset Round 4: Work in pattern as established to first marker, slip marker, LLI, knit to next marker, RLI, slip marker, work in pattern as established to end of round. 2 more gusset sts.

Repeat Thumb Gusset Rounds 3 & 4 until there 10 gusset sts; 50 sts total.

Continuing in established pattern, work even for 10 rounds; end ready to work Round 20.

Divide thumb:
Work in pattern to one stitch before the first marker, remove marker and transfer next 12 gusset sts (10 sts between the markers and the two purl sts on either side) to waste yarn, remove second marker, CO 1 st using backwards loop method, work to end of round. 39 sts.

Hand round: Work even in pattern as set, knitting the CO stitch over the thumb.
Work 2 more rounds as set.

Final hand round: K19, m1, k20. 40 sts.

Leaving an end to weave in later, cut strand of Baby Alpaca DK.

Using the strand of Silk Cloud only, work Rounds 1-10 of the Right Glove Top Border chart.

BO loosely purlwise. Cut yarn and draw through final loop.

Thumb
Return the 12 thumb sts to double-pointed or circular needles and distribute for knitting in the round.
Round 1: P12, then pick up and knit 1 st over the CO stitch for the hand. 13 sts.
Join for working in the round.
Round 2: Knit
Round 3: Purl
BO loosely knitwise.
Cut yarn and draw through final loop.
Weave in all ends.

spacer
LEFT MITT
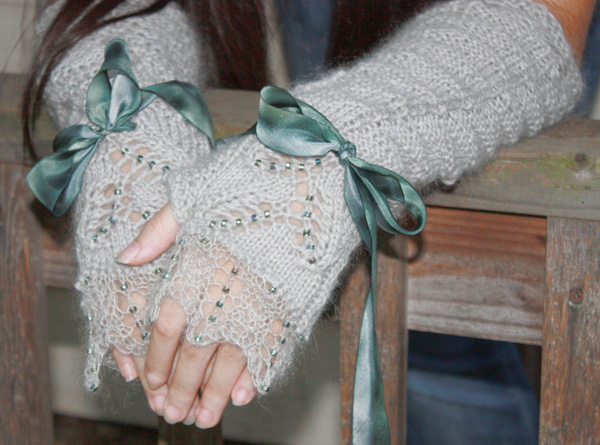
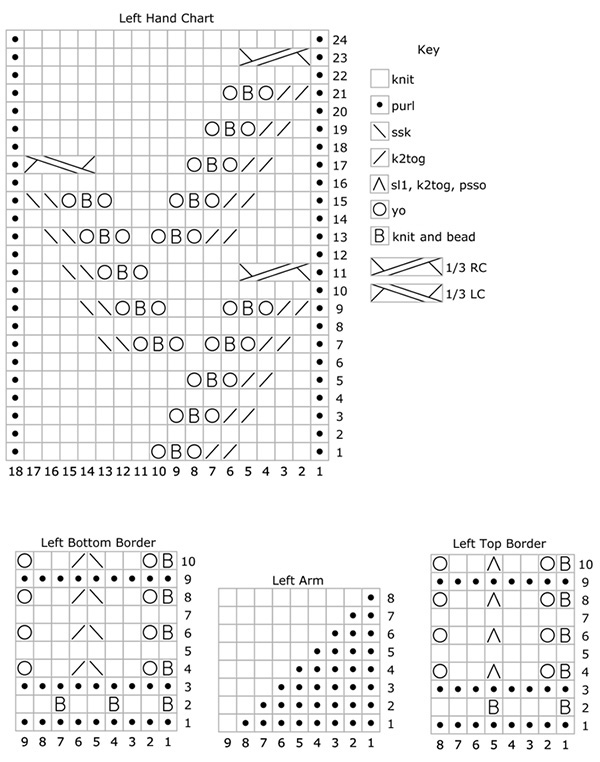
Using both yarns held together, CO 45 sts. Join to begin working in the round, being careful not to twist.

Work Rounds 1-10 of Left Glove Bottom Border Chart.
Work Rounds 1-8 of Left Arm Chart 8 times, or 64 rows total.
Eyelet Round: K2, [k1, ssk, yo, k2tog, k2] to last st, k1. 39 sts.
Next round: Knit.

Left Thumb Gusset and Hand
Thumb Gusset Round 1: P1, k16, p1, [p1, k1 tbl] 9 times, to last 3 sts, k1 tbl, Mp1, p1, k1 tbl. 40 sts.

Thumb Gusset Round 2: Work Round 1 of Left Hand Chart over 18 sts, [p1, k1 tbl] 10 times, place marker, LLI, RLI, place marker, p1, k1 tbl. 2 gusset sts, 42 sts total.

Thumb Gusset Round 3: Work in pattern as established to first marker, slip marker, purl to next marker, slip marker, work in pattern to end of round.

Thumb Gusset Round 4: Work in pattern as established to first marker, slip marker, LLI, knit to next marker, RLI, slip marker, work in pattern as established to end of round. 2 more gusset sts.

Repeat Thumb Gusset Rounds 3 & 4 until there 10 gusset sts; 50 sts total.

Continuing in established pattern, work even for 10 rounds; end ready to work Round 20.

Divide thumb: Work in pattern to one stitch before the first marker, remove marker and transfer next 12 gusset sts (10 sts between the markers and the two purl sts on either side) to waste yarn, remove second marker, CO 1 st using backwards loop method, work to end of round. 39 sts.

Hand round: Work even in pattern as set, knitting the CO stitch over the thumb.
Work 2 more rounds as set.

Final hand round: K19, m1, k20. 40 sts.

Leaving an end to weave in later, cut strand of Baby Alpaca DK.

Using the strand of Silk Cloud only, work Rounds 1-10 of the Left Glove Top Border chart.

BO loosely purlwise. Cut yarn and draw through final loop.
Work Thumb as for Right Mitt.

spacer

FINISHING
Cutting on the diagonal so that the ends will not ravel, cut length of silk ribbon in half, leaving one yard for each glove. Beginning in front, thread ribbon around the wrist in and out the eyelets, ending once again in the front. Tie ribbon so that the self-pleating arm pattern closes to the width of the wrist, plus enough ease to pull the glove on over the hand. If desired, steam lightly to block.

spacer
ABOUT THE DESIGNER

designernamespacer Sivia Harding learned how to knit in 2000 and has being churning out patterns since 2003. Her work has appeared in publication under her own name and in various magazines and books and clubs. Sivia is known for her work with exceptional beaded knits.

Her website is siviaharding.com, although she generally hangs out on her forum on Ravelry and Facebook.

spacer