Knitty: little purls of wisdom
Indigo Dragonfly
Title
beauty shot

Tangy

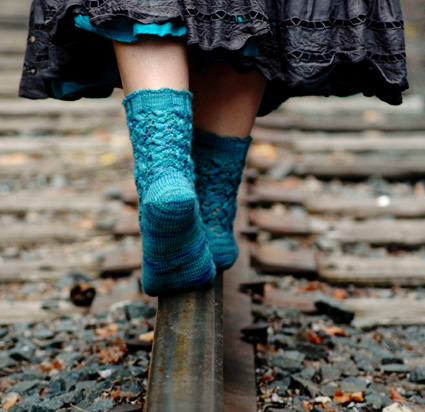
As the cool weather settles into southeastern Pennsylvania the leaves lay crispy on the ground and the streams and lakes that are along the paths I walk with my dogs gently lap the shore with tiny wind blown waves. These socks, inspired by these tiny waves gently lap at your ankles and keep them warm and toasty on long walks in the chilly winter air.

These socks are constructed with an unusual cable paired with a decrease. While a little tricky at first, it adds a great texture that traps air, making them nice and toasty. Toe-up construction lets you get the most out of your yardage.

spacer photos: Kelly Straub
   Pin It!


SIZE
S[M, L]

FINISHED MEASUREMENTS
Foot Circumference at ball of foot, sock lightly stretched: 7[7.5, 8] inches
Length of foot:
adjustable to fit
Length of leg:
6 inches, adjustable to desired length

spacer

MATERIALS
Yarn

spacer Koigu KPPPM [100% Merino; 175 yards per 50g skein] 2 skeins; color P529; 2 skeins

Recommended needle size
[always use a needle size that gives you the gauge listed below -- every knitter's gauge is unique]
spacer US #1/2.25mm needles for working in the round

Notions
spacer Yarn needle
spacer cable needle
spacer stitch markers (if necessary)

spacer

GAUGE

32 sts/48 rounds = 4 inches in stockinette stitch
44 sts/51 rounds = 4 inches in pattern stitch
 

PATTERN NOTES
[Knitty's list of standard abbreviations and techniques can be found here.]

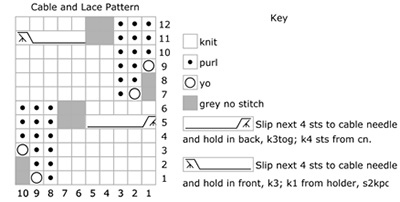
The toe increases create a fairly short, rounded toe. If you'd prefer a more traditional toe shaping, alternate increase and even rounds until you have the number of stitches required. This also delays the start of the patterning a little, so that it starts where the toes meet the foot.

A demonstration for EZ's (Elizabeth Zimmermann's) sewn bind off can be found here.
Do not pull the bind off yarn too tight or it won't allow enough elasticity to go over the heel.

A demonstration of the Turkish Cast On can be found here.

Cable and Lace Pattern
Worked over a multiple of 8 sts, in the round. Stitch count increases by 1 st per repeat on each of rounds 1, 3, 7 and 9, and decreases back to the original count on rounds 5 & 11. You may wish to place st markers every 8 sts on the setup round to define pattern repeats.

Written Instructions
Round 1: [K7, p1, yo]. 9 sts per repeat.
Round 2: [K7, p2]. 9 sts per repeat.
Round 3: [K7, p2, yo]. 10 sts per repeat.
Round 4: [K7, p3]. 10 sts per repeat.
Round 5: [Slip next 4 sts to cable needle and hold in back, k3tog; k4 sts from cn, p3]. 8 sts per repeat.
Round 6: [K5, p3]. 8 sts per repeat.
Round 7: [Yo, p1, k7]. 9 sts per repeat.
Round 8: [P2, k7]. 9 sts per repeat.
Round 9: [Yo, p2, k7] 10 sts per repeat.
Round 10: [P3, k7]. 10 sts per repeat.
Round 11: [P3, slip next 4 sts to cable needle and hold in front, k3; k1 from holder, s2kpo]. 8 sts per repeat.
Round 12: [P3, k5]. 8 sts per repeat.

DIRECTIONS
Toe
Using the Turkish Cast On, CO 20 sts (10 on each needle).
Distribute across needles as you prefer and join for working in the round.

The first 10 sts of the round will form the instep; the rem 10 sts will form the sole.
Round 1: Knit.

Round 2: K1, m1, k to 1 st before end of instep, m1, k1; k1, m1, work to 1 st before end of round, m1, k1. 4 sts increased.

Repeat Rounds 1 & 2 twice more. 32 sts.

Repeat Round 2 6[8, 10] times until there are 56 [64 ,72] sts. 28[32, 36] sts each on sole and instep.

Size S & M Only: Knit 1 round.
Size L only: Knit 1, round, stopping 2 sts before end of round. This position wil be the new start of your instep and round.

Establish pattern: K2[-, -], work Round 1 of Lace Cable Pattern across next 32[32, 40] sts, k to end of round. 32[32, 40] sts for instep; 24[32, 32] sts for sole. Rearrange sts as you prefer.

Foot
Work even as set until sock measures 2 inches short of full foot length, ending with either Round 4 or 10 of the Pattern.

Heel step 1
Heel setup: Work across instep sts in pattern as set (Round 5 or 11 of the Pattern as appropriate), and stop.
Heel is worked across the 24[32, 38] sole sts.

Row 1 [RS]: K23[31, 37], w&t.
Row 2 [WS]: P22[30, 36], w&t.
Row 3 [RS]: K21[29, 35], w&t.
Row 4 [WS]: P20[28, 34], w&t.
Row 5 [RS]: K19[27, 33], w&t.
Row 6 [WS]: P18[26, 32], w&t.
Row 7 [RS]: K17[25, 31], w&t.
Row 8 [WS]: P16[24, 30], w&t.
Row 9 [RS]: K15[23, 29], w&t.
Row 10 [WS]: P14[22, 28], w&t.
Row 11 [RS]: K13[21, 27], w&t.
Row 12 [WS]: P12[20, 26], w&t.
Row 13 [RS]: K11[19, 25], w&t.
Row 14 [WS]: P10[18, 24], w&t.
Size Small only: Proceed to Heel Step 2.

Medium and Large sizes only:
Row 15 [RS]: [K17, 23],w&t.
Row 16 [WS]: [P16, 22],w&t.
Row 17 [RS]: [K15, 21], w&t.
Row 18 [WS]: [P14, 20], w&t.
Row 19 [RS]: [K13, 19], w&t.
Row 20 [WS]: [P12, 18], w&t.
Row 21 [RS]: [K11, 17], w&t.
Row 22 [WS]: [K10, 16], w&t.

Heel Step 2
Note: There will be 10[10, 16] unwrapped stitches at the center of your needle.
Row 1 [RS]: K11[11, 17] working wrapped st together with its wraps, w&t.
Row 2 [WS]: P12 [12, 18] working wrapped st together with its wraps, w&t.
Row 3 [RS]: K13[13, 19] working wrapped st together with its wraps, w&t.
Row 4 [WS]: P14[14, 20] working wrapped st together with its wraps, w&t.
Row 5 [RS]: K15[15, 21] working wrapped st together with its wraps, w&t.
Row 6 [WS]: P16[16, 22] working wrapped st together with its wraps, w&t.
Row 7 [RS]: K17[17, 23] working wrapped st together with its wraps, w&t.
Row 8 [WS]: P18[18, 24] working wrapped st together with its wraps, w&t.
Row 9 [RS]: K19[19, 25] working wrapped st together with its wraps, w&t.
Row 10 [WS]: P20[20, 26] working wrapped st together with its wraps, w&t.
Row 11 [RS]: K21[21, 27] working wrapped st together with its wraps, w&t.
Row 12 [WS]: P22[22, 28] working wrapped st together with its wraps, w&t.
Row 13 [RS]: K23[23, 29] working wrapped st together with its wraps, w&t.
Size Small only: Proceed to Leg.

Medium and Large sizes only:
Row 14 [WS]: [P24, 30] working wrapped st together with its wraps, w&t
Row 15 [RS]: [K25, 31] working wrapped st together with its wraps, w&t
Row 16 [WS]: [P26, 32] working wrapped st together with its wraps, w&t
Row 17 [RS]: [K27, 33] working wrapped st together with its wraps, w&t
Row 18 [WS]: [P28, 34] working wrapped st together with its wraps, w&t
Row 19 [RS]: [K29, 35] working wrapped st together with its wraps, w&t
Row 20 [WS]: [P30, 36] working wrapped st together with its wraps, w&t
Row 21 [RS]: [K31, 37] working wrapped st together with its wraps, w&t

Leg
At this point you will resume working in the round.
Note: There will be one st left wrapped, this st will be addressed on the next round as it helps prevent a large hole where the heel and leg meet. If the first chart round to be worked is a Round 6, then the wrapped stitch is knitted together with its wrap; if the first chart round to be worked is a Round 12, then the wrapped stitch is purled together with its wrap.

Round 1: Resume working in established pattern at the beginning of the instep (either round 6 or 12), pick up wrap on first sole st and work together with st in pattern (see note above), work in chart pattern to end of round starting at stitch 2 of the pattern.

Leg round: Work Pattern around all needles.

Continue as set until leg is desired length, ending with Pattern Round 12. Sample as shown has 5 pattern repeats.

Cuff
Cuff setup round: [P3, k2tog, k3] around. 49[56, 63] sts.
Ribbing round: [P3, k4] around.
Work as set until cuff measures 1 inch.

Bind off loosely using EZ's sewn bind off or another stretchy bind off method.

spacer

FINISHING
Weave in ends and block lightly.

spacer
ABOUT THE DESIGNER

Kelly accidentally began knitting and hasn't stopped. With a passion for fiber arts she blogs about all things wooley and otherwise. Her other patterns can be found here.

spacer