
|
|
 |
|
|

Farewell, heat, and welcome frost! --The Merchant of Venice I really hate being cold. I dread the coldest days of winter when my teeth chatter like castanets indoors, even when the furnace is blasting its pitiful best. This year, though, I'm going to be toasty warm wearing this incredible jacket. Made in worsted-weight wool, the base jacket is worked in one piece in a way that allows the unique cabling to proceed without interruption around the arms. The jacket avoids being too boxy by using tapered Wood Grain panels to join the front and back. These panels appeal to the sewing phobic since they allow most of the assembly of the basic jacket to be done on knitting needles and not with the sewing needle. While the body of the jacket is both eye-catching and unusually constructed, its true distinguishing feature is that every opening is weather proofed. There is a close fitting, lined hood. The gapless front opening is achieved with a zipper which is then camouflaged by a wide button placket. The cuffs extend to become fingerless mitts or can be worn retracted providing a barrier to cold air that might otherwise sneak up the arm. Finally, a narrow band of ribbing sewn into the interior of the jacket around the waist provides a simple yet effective draft excluder while providing a bit of gentle shaping to the waist. Other unique features of the design include a grommet style button hole developed for this design and a grafting cheat sheet which makes the grafting of the cabled fabric of the hood a bit of a challenge. All these features combine to create the perfect jacket for indoor use in the winter or outdoor use on a crisp fall day. So, why would this jacket be a good addition to a cold-weather wardrobe? Rime's* the Reason. *Rime (noun): frost formed on cold objects by the rapid freezing of water vapor. |
||
|
|
 |
Tweet
 |
|
SIZE |
|
|
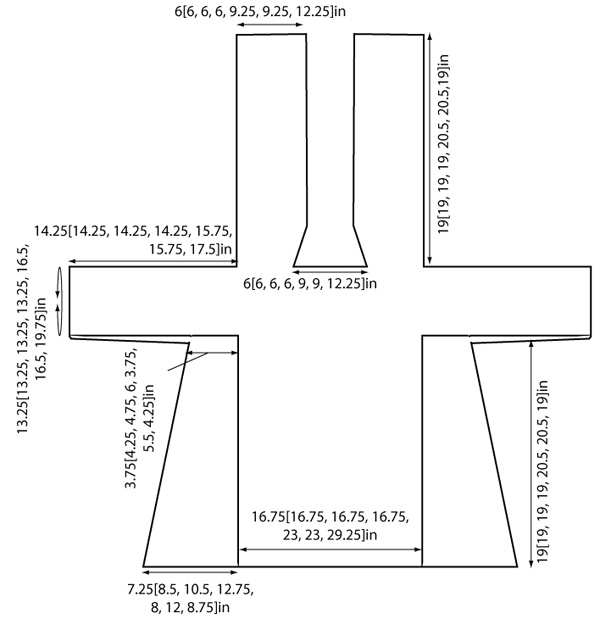
FINISHED MEASUREMENTS Please note: sizing revised significantly 12/12/12. Due to the nature of the pattern repeat, the gradient of sizes does not fully cover our usual spectrum. Two sizes that were non-functional have been deleted. The numbers for each size that remains have not changed. If you had planned to knit 2X or 4X, we recommend you choose another size from those that remain. We recommend a size that will give you enough ease for layering. Bust: 36.5[37.25, 38.5, 40.75, 49, 52.5, 62.25] inches |
|
MATERIALS Notions |
|
GAUGE |
| After blocking: 23 sts/25 rows = 4 inches in Rime Cables 23 sts/20 rows = 4 inches in Wood Grain 16 sts/ 21 rows= 4 inches in Stockinette stitch |
|
PATTERN NOTES |
|
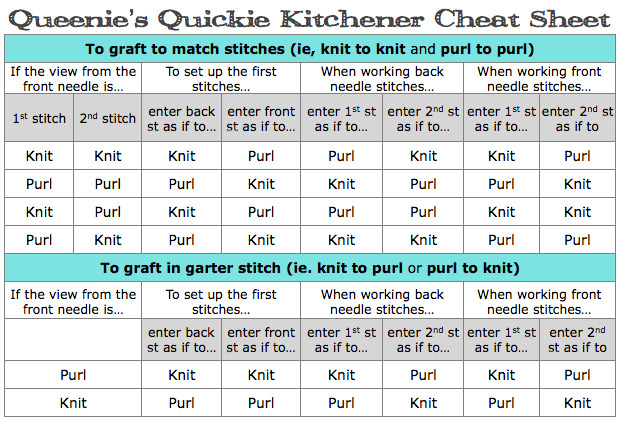
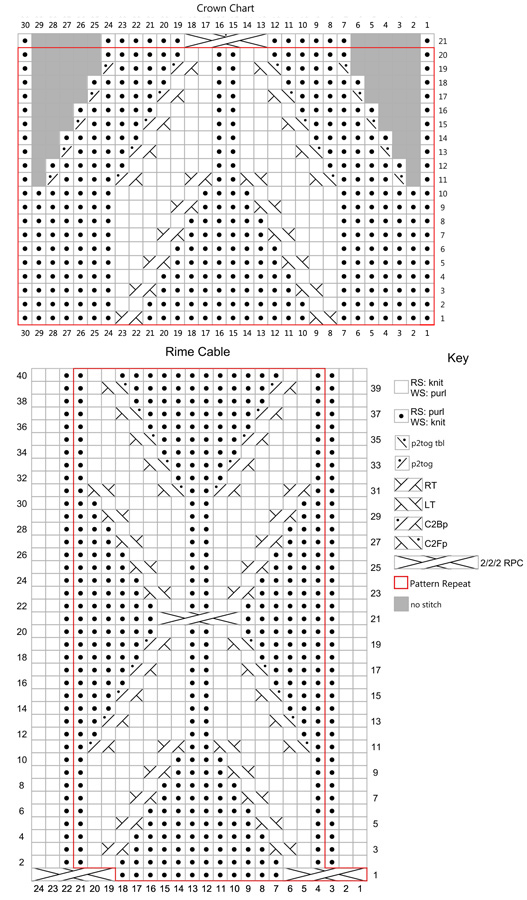
2/2/2 RPC: Slip 4 sts to cn and hold to back, k2 from LH needle, slip 2 sts from left end of cn to LH needle, p2 from LH needle, then k2 from cn. Provisional cast on using a crochet chain: Wood Grain (worked over an odd number of sts) Mistake Rib (Worked in multiples of 4 sts + 3): Seed Stitch (Worked over an odd number of sts) Rime Cable (Worked in multiples of 18 sts + 6) Jeny's Surprisingly Stretchy Bind Off is suggested for the all bind offs. Grafting with Kitchener Stitch
Queenie's Grommet
To finish, pull both strands of the yarn ends to the wrong side. To reinforce the opening, hold the shorter strand along the grommet opening and use the longer strand to sew it in place using small, closely placed stitches. Once one circuit of the grommet has been made, pull the remainder of the yarn tails under the reinforcing stitches for up to one full circuit of the grommet; trim yarn end close to the grommet edge. |
The charts for this pattern are very large and fit on a letter-sized page. Click here and print the resulting page. Hood chart updated 1/7/13 |
|
DIRECTIONS Body set-up row [WS]: P36[42, 52, 64, 40, 60, 44], pm, work Row 20[20, 20, 20, 40, 40, 40] of Rime Cable, working 18-st repeat a total of 5[5, 5, 5, 7, 7, 9] times across row, pm, p36[42, 52, 64, 40, 60, 44]. Row 1 [RS]: Slk, k1, LLI, k15[18, 23, 29, 17, 27, 19], s2kp2, knit to 1 st before marker, RLI, k1, sl m, work Row 21[21, 21, 21, 1, 1, 1] of Rime Cable to next marker, sl m, k1, LLI, k15[18, 23, 29, 17, 27, 19], s2kp2, knit to 2 sts from end, RLI, k2. Row 2 [WS]: Slp, purl to marker, sl m, work Row 22[22, 22, 22, 2, 2, 2] of Rime Cable to next marker, sl m, purl to end. Work in established pattern for 12[12, 4, 2, 16, 12, 14] rows more, working rows as foll:
Decrease row [RS]: Slk, knit to 2 st before center st of panel, s2kp2, knit to marker, sl m, work Rime Cables to marker, sl m, knit to 2 sts before center st of panel, s2kp2, knit to end. 4 sts dec'd Rep Decrease row every 16[12, 10, 8, 12, 8, 10] rows 6[8, 11, 14, 8, 13, 9] times more. 140[144, 152, 164, 176, 196, 216] sts Work 7[7, 1, 1, 13, 9, 11] more rows even in patt, ending on Row 18[18, 18, 18, 8, 8, 38] of Rime Cable pattern. 118[118, 118, 118, 128, 128, 118] total rows worked after set-up row. Do not bind off. Break yarn and slip 22[24, 28, 34, 22, 32, 24] sts on either end of work onto waste yarn/stitch holder (all sts between beg of row and first marker and second marker and end of row). 96[96, 96, 96, 132, 132, 168] sts remaining on needle. Cast on for sleeves: Note: For Sizes XS, S, M, L and 5X, the following row of the Chart will not sequentially follow from the previous row. Please note new row number of chart worked in Set-up Row. Set-up Row [WS]: P1, work Row 40[40, 40, 40, 10, 10, 20] of Rime Cables to last st (for a total of 14[14, 14, 14, 17, 17, 20] chart reps), p1. Row 1 [RS]: Slk, Row 1[1, 1, 1, 11, 11, 21] of Rime Cables to last st, k1. Work 38[38, 38, 38, 48, 48, 58] more rows even in patt, ending on Row 40[40, 40, 40, 20, 20, 40] of Rime Cables. Sizes XS, S, M, L & 5X Only: Place first 113[113, 113, 113, 140, 140, 167] sts of row (all sts from right edge to first marker) onto holder. Place next 36 sts (between markers) onto a second holder. Separate for left half: Left Neck Increase Row [RS]: Slk, RLI-p, work in est patt to end of row. 1 st inc'd Work even in established patt for 7[7, 7, 7, 17, 17, 27] rows more (for a total of 82[82, 82, 82, 102, 102, 122] rows from the beginning of sleeves, not including set-up row), and ending on Row 2[2, 2, 2, 12, 12, 22] of Rime Cables. Break yarn. With RS facing, transfer last 82[82, 82, 82, 91, 91, 100] sts of row to holder. 34[34, 34, 34, 52, 52, 70] sts remain. Left front set-up [RS]: Slk, k2, p1, beg on St 4[4, 4, 4, 13, 13, 4], work Row 3[3, 3, 3, 13, 13, 23] of Rime Cables over next 27[27, 27, 27, 45, 45, 63] sts (ending on St 12[12, 12, 12, 21, 21, 12]), p1, k2, LLI. 35[35, 35, 35, 53, 53, 71] sts Work even in est patt for 120[120, 120, 120, 130, 130, 120] rows from end of sleeve, ending on Row 2[2, 2, 2, 22, 22, 22] of Rime Cables. Slip sts to holder. Right half: Work 19 more rows in est patt, ending on Row 22[22, 22, 22, 2, 2, 22] of chart. Right Neck Increase Row [RS]: Slk, work next Row of Rime Cables to last st, LLI-p, k1. 1 st inc'd Work even in established patt for 7[7, 7, 7, 17, 17, 27] rows more (for a total of 82[82, 82, 82, 102, 102, 122] rows from the beginning of sleeves, not including set-up row), and ending on Row 2[2, 2, 2, 12, 12, 22] of Rime Cables. With RS facing, transfer first 82[82, 82, 82, 91, 91, 100] sts of row to holder. 34[34, 34, 34, 52, 52, 70] sts remain Right front set-up [RS]: RLI, k1, work Row 3[3, 3, 3, 13, 13, 23] of Rime Cables to last st (ending on stitch 12), k1. 35[35, 35, 35, 53, 53, 71] sts
Work even in est patt for 120[120, 120, 120, 130, 130, 120] rows from end of sleeve, ending on Row 2[2, 2, 2, 22, 22, 22] of Rime Cables. Slip sts to holder. Right SleeveNote: Sleeves are continued with a type of underarm "saddle," with the Wood Grain panel continuing up the length of the sleeve on the underside, working toward the cuff and decreasing 1 st from each side of the held sleeve stitches from the cast on and previously held sts. With RS facing, place 22[24, 28, 34, 22, 32, 24] sts held sts of Wood Grain panel on right side of body on needle; remove 82[82, 82, 82, 91, 91, 100] sts from crochet chain of the Right Sleeve and place them on the needle. Mark center stitch of Wood Grain panel with a safety pin. Use this marked stitch to keep track of rows worked. Sleeve Row 1 [RS]: Slk, pm, k1, LLI, knit to 2 sts before center st of Wood Grain panel, s2kp2, knit to 1 st from end of Wood Grain panel, RLI, k1, pm, M1 in the gap between the side panel and sleeve, slip next 2 sts separately knitwise, slip last 3 sts worked back to LH needle and k3tog tbl. 21[23, 27, 33, 21, 31, 23] sts between markers. **Row 2 [WS]: Slp, sl m, purl to marker, sl m, p3tog. 2 sts dec'd Row 3 [RS]: Slk, sl m, k1, LLI, knit to 2 sts before center st, s2kp2, knit to 1 st before marker, RLI, k1, sl m, sssk. 2 sts dec'd Rep last two rows 4[2, 3, 5, 3, 2, 3] more times; 12[8, 10, 14, 10, 8, 10] rows worked from start of arm panel, 70[74, 72, 68, 81, 83, 90] sts for each sleeve side (not including slipped sts). Decrease row 1 [RS]: Slk, sl m, knit to 2 sts before center st, s2kp2, knit to marker, sl m, sssk. 4 sts dec'd Rep Row 4 once, then rep Rows 3 - 4, 2[1, 2, 3, 1, 1, 1] times more. Decrease row 2 [RS]: Slk, sl m, k1, s2kp2, k1, sl m, sssk. 4 sts dec'd; 3 sts rem between markers Work foll two rows 2[1, 1, 2, 2, 2, 1] time(s), then work WS row once more: Decrease row 3 [RS]: Slk, sl m, s2kp2, sl m, sssk 1[1, 1, 1, 0, 0, 1] time, ssk 0[0, 0, 0, 1, 1, 0] time. 1 st rem between markers Next row [WS]: Slp, sl m, p1, sl m, p3tog 1[1, 1, 1, 0, 0, 1] time, p2tog 0[0, 0, 0, 1, 1, 0] time. 3 sts rem Do not break yarn. Continue to sleeve edge. Sleeve edge:Joining round [RS]: Slk, remove marker, k1, sl m, k1. Remaining marker will be the beginning of round for the sleeve edge. Pick up and knit 42[42, 42, 42, 52, 52, 62] along the edge of the sleeve (1 st for every slipped st along edge), knit rem 2 sts to marker. Work is now joined in the round. 45[45, 45, 45, 55, 55, 65] sts Round 1: (Kfb) around. 90[90, 90, 90, 110, 110, 130] sts Place every other st on a length of waste yarn to be worked later as follows: Exterior cuff: Interior cuff/fingerless mitt: Repeat last two rounds 6[6, 6, 6, 7, 7, 10] times more. 31[31, 31, 31, 39, 39, 43] sts Work Mistake Rib until interior cuff measures 4 inches from dividing round. Turn at end of last round. Row 1: [K2, p2] to last 3 sts, k2, p1. Turn. Join to work in the round once more and rep Rounds 1 - 2 of Mistake Rib for 2 inches more for mitts that end at the fingers or for 6 inches (or more) for a folded mitt. Left Sleeve Mark center stitch of Wood Grain panel with a safety pin. Use this marked stitch to keep track of rows worked. Sleeve Row 1 [RS]: M1 in gap between side panel and Back, pm, k1, LLI, knit to 2 sts before center st of Wood Grain panel, s2kp2, knit to 1 st from end of Wood Grain panel, RLI, k1, pm, sssk. 21[23, 27, 33, 21, 31, 23] sts between markers Work as for Right Sleeve from ** to ***. Fingerless mitt set-up round: K8[8, 8, 8, 9, 9, 10], pm to mark beg of rnd. Work as for Right Sleeve from Mistake Rib to end. Right neck edge set up: Left neck edge set up: Hood neck: Row 2 [WS]: Slp, work Row 2 of Rime Cable to last st (working repeat 4 times), p1. Cont in pattern for 40 rows more, ending after Row 2 of Rime Cable pattern. Row 43 [RS]: Slk, work 24 sts in Row 3 of Rime Cable, ending on st 24, pm, p6, pm, work 18 stitch repeat of Row 23 of Rime Cable (beginning on stitch 4 and ending on stitch 21), pm, p6, pm, work 24 sts in Row 3 of Rime Cable, beginning on stitch 1 and ending on st 24, k1. Front panel: Hood Crown: Work Rounds 1-21 of Crown Chart, following Chart or Written Instructions below: Round 1: (P7, LT, p12, RT, p7) 2 times. 60 sts. Lower Edge: Place removable markers in center sts of Wood Grain Side Panels. Row 1 [RS]: Slk, (knit to center stitch of Wood Grain side panel, LLI, knit center stitch, RLI) twice, knit to end of row. 242[254, 274, 298, 322, 362, 402] sts Bind off all sts using Jeny's Surprisingly Stretchy Bind Off in established pattern. Do not break yarn. Row 1 [WS]: (Kfb) across. Note: If omitting the zipper work all sts from beg of row to first marker and all sts from second marker to end in plain knit. If omitting hood lining, work all sts between 2 markers in plain knit. Place every other st on a length of waste yarn to be worked later as foll: Dividing row [RS]: *With separate length of waste yarn, (slp, place next st on waste yarn held on WS of work) to 1 st before marker, slp. Rep from * once more. With separate length of waste yarn, (slp, place next st on waste yarn and hold on WS of work) to last st, slp. With RS facing for first row, work 6 rows in seed st. Row 8 [RS]: Seed st to first marker, bind of all sts between markers using Jeny's Surprisingly Stretchy Bind Off, seed st to end of row. Buttonband: Work 6 rows more in seed st. Bind off these sts using Jeny's Surprisingly Stretchy Bind Off. Hood lining: Rep Rows 2-3 until lining measures 4 inches from Dividing Row. Bind off these sts using Jeny's Surprisingly Stretchy Bind Off. Zipper Panel: Slip sts to holder. They will be used to install the zipper after blocking. Draft Excluder: Row 1 [RS]: K1, [k2, p2] to 3 sts from end, k3. Rep Rows 2-3 until work measures 2 inches from cast on Bind off these sts using Jeny's Surprisingly Stretchy Bind Off, leaving a long tail to sew in place. |
 |
|
FINISHING Sew buttons on buttonband opposite buttonholes. Fold over hood lining and sew into place. Try on jacket and mark the waist -- ideally along a 2/2/2 RPC row. Stretch draft excluder evenly between front edges and pin into place. Sew along top, bottom and sides, taking care not to allow stitches to show through to the right side. Measure zipper panel before preparing zipper. If zipper is too long, fold the excess at the top to the wrong side and stitch into place. Using the techniques described here, prepare zipper using a knit picker to pull loops of yarn through the zipper tape and onto the larger straight needle. Return Zipper Panel sts to the circular needle. With right side facing, hold zipper stitches behind panel stitches, being very sure the zipper is aligned correctly. Using the second larger needle to work the stitches, bind off using three-needle bind off. When working the three needle bind off, wrap the yarn as you would for Jeny's Surprisingly Stretchy Bind Off before working each pair of stitches. Weave in ends. Sew down zipper tape ends. |
| ABOUT THE DESIGNER |
|
Jodie likes to play with sticks and string in the beautiful foothills of the Appalachian mountains. |
|
Pattern & images © 2012 Jodie Gordon Lucas. Contact Jodie |