|
|
 |
| by Franklin Habit | ||
|
||
|
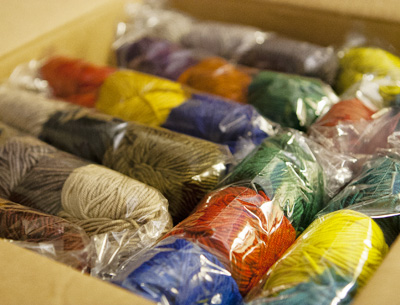
Some days I have the best job in the world. Some days the mail lady staggers up to my door with a box and I open the box and inside the box are, like, three hundred pounds of Plucky Knitter yarn in, like, five million colors.
I didn't ask for five million colors, I asked for five. I got five million. Here's what happened. I stumbled across the vintage pattern I wanted to play with for this issue of Knitty in a book I picked up at our neighborhood charity shop for a quarter. Most of the book is ho-hum, but about halfway through is a pattern for the "Princess Mary" plaid scarf. Here's the thing about plaid: I love it, but it's supposed to be woven. I'm not a weaver, so I have considered it Off Limits as I usually dislike knitting that pretends to be something else. Most takes on the knitted plaid involve more crazy (hey, let's do intarsia and stranded colorwork at the same time!) than I'm willing to accommodate in return for results that crudely ape the fabric they're trying to emulate. But this knitted plaid -- even in a smudgy, grimy black-and-white photograph -- looked pretty good. By which I mean it looked like the genuine article, and moreover the technique was shockingly straightforward. It was based on garter stitch, for heaven's sake. How much simpler could you get than garter stitch? I got curious, which is where these adventures always begin. The vintage colors of the "Princess Mary" were classic: hunter green, scarlet, canary, black, white. Nothing wrong with that. But I felt that you, the discerning Knitty reader, deserve more than a straightforward retread. I felt that you, the discerning Knitty reader, would best enjoy a plaid in a palette that is fresh and unexpected. Also, I planned to wear this one if it worked out, and the original colors make me look blotchy. So I wrote to Plucky Knitter, whose range of colors is second to none. When you're asking for help you might as well aim for the top. Our exchange went something like this. Franklin: Hey, I want to do a knitted plaid. Please may I have some yarn? Plucky Knitter: Sure, kid. Whatcha want? Franklin: I'm doing a plaid. I need five fresh colors. Here are the original colors, and here are the proportions they were used in. Please send me five colors that discerning Knitty readers will find fresh and unexpected. Thank you. Plucky Knitter: No sweat. Watch your mailbox. Then she sent me five million colors, plus a note that said, "I want you to have options." I am not ashamed to admit to you that there was a time -- not long ago -- when this display of largesse would have sent me straight under the bed whimpering, like a puppy in a thunderstorm. Like many (I'd like to say most) North American men, I was raised to wrap myself in a rainbow that runs from beige to black, with intermediate stops at gray and navy. I therefore once rejected a yarn shop owner's suggestion of moss green as an accent in beige and brown mittens as "over the top." Things have changed, probably because I spend so much of my life (see "Best Job in the World," above) surrounded by attractive yarns in astounding colors. I've decided that life is too short to spend it in black and brown.* So instead of crying under the bed, I poured Plucky Knitter's generous allotment onto the living room floor and rolled naked in it. No, I didn't. (Maybe I did.) But I certainly did sort it roughly into color families, then scoot individual skeins around on the carpet like toy boats (complete with toot toot noises) until a flotilla suitable for the new plaid had been safely harbored. There are many ways to assemble a set of colors. There is no "correct" way. I used to think you had to be a genius or a scientist to do it, but you don't. A little knowledge goes a long way, yes; but you can also do what I did: just mess around. Here is a thumbnail sketch of my mess-making, which may perhaps help you to make a mess of your own. In the original plaid, the dominant color was hunter green. I liked the idea of standing the plaid on its head, as it were; so I jumped straight across the color wheel (I love my color wheel) from green to red. I piled up all the reds in my Plucky selection and settled on Rouge, a red with a bunch of purple in it, as my dominant color.
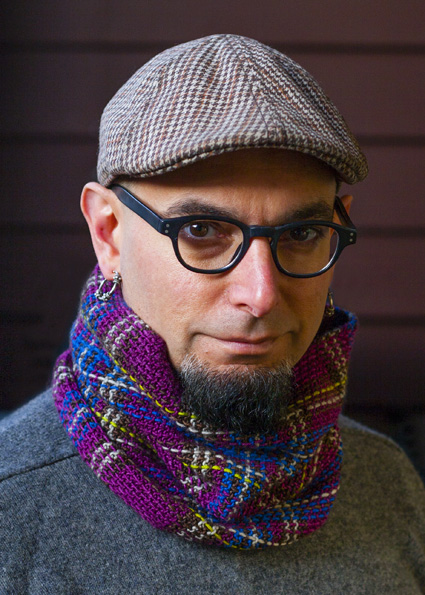
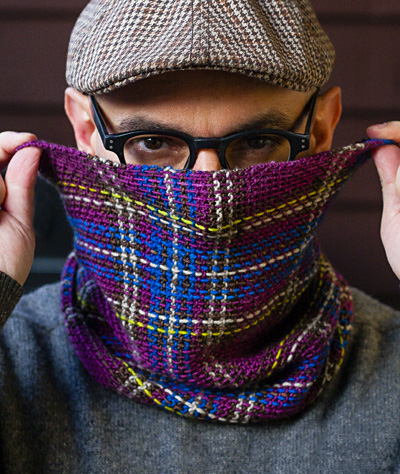
Rouge, therefore, became the foundation. All the other colors would need to play nicely with it. I needed a very, very light color -- white in the original. I wanted something less stark than bone white, so I pulled a skein of Oatmeal. Next to Rouge it reads as perfectly pale, but not colorless. The original plaid's white alternates with black -- the darkest neutral. Since my light neutral had a brown tinge, I chose a deep brown, Smokey the Bear, as my dark neutral. Then there was scarlet. Scarlet always packs a wallop -- unadulterated (but possibly adulterous) red. Scarlet is power. I needed a color that was similarly intense, pure, and weighty. All the others, even Rouge, were a bit muted by hints of gray and brown. My scarlet-equivalent needed to look well next to Rouge, but be brighter and visually heavier. All the pure, bright colors went into a pile and one by one I piled them together with the three other colors until Sounds Like a Carnival gave me the happy feeling in my stomach that usually tells me when I'm headed in the right direction. Finally, canary. It was telling how little canary was used in the original plaid: just four vertical rows. Four, out of seventy four. But what a punch those four rows give. They're so different from everything else that they shock the combination into life. They're distracting, they're jarring. They're punctuation. They're percussion. Without them, the plaid has no beat. I've learned something about colors like this canary. When you're selecting yarns, you need a percussion color and it's always the color other people will tell you to put back on the shelf. So I tossed the skein of Pollen into the pile, then called in somebody who is frequently privy to my design process and asked his opinion. "Pretty," he said. "But that weird greeny-yellow has to go." And with that, discerning Knitty reader, the "Princess Franklin" plaid was born. |
||
|
||
 Adapted by Franklin Habit from "Princess Mary Plaid" from Minerva Complete Knitting Manual (1940)
|
|
Tweet

|
|
| SIZE |
One |
|
FINISHED MEASUREMENTS |
| Height: 12 inches high Circumference: 20.5 inches |
 |
|
MATERIALS Notions |
| 32 sts/32 ridges = 4 inches in garter stitch |
|
PATTERN NOTES |
Method. The collar is worked flat and joined into a tube using garter stitch grafting. If grafting really, truly scares you to death (it shouldn't) then you could join the ends with a three-needle bind off on the wrong side. It won't look quite as perfect; but I don't have to wear it so it's none of my business. Garter Stitch Grafting. Not difficult -- in fact rather easier than its sibling, Kitchener Stitch -- but do be sure to take time after the graft is finished to gently tug and pull your grafted row with the tip of a needle until it perfectly matches the tension of the knitted rows. The method can be found at the end of the article. Instructions for a three-needle bind off can be found here. Provisional Cast-On. There are many methods for provisional cast-ons, but my favorite -- and the one employed in knitting the sample -- is extremely simple. Use your scrap yarn to CO the number of sts required, and k 3 rows; then join C1 and proceed as pattern dictates. To remove the CO, snip it near the edge with a pair of sharp scissors and unravel, placing the live sts on the second ndl as they are revealed. Carrying Unused Colors. There is no way to avoid having a lot of ends to weave in, but you can eliminate a few of them by carrying the unused stripe color along the selvage of the work. This can be done only when the distance between color changes is four rows or fewer. |
|
DIRECTIONS |
 Join C1 and work in garter stitch as follows: C1: 8 rows Repeat from * twice more. Fourth repeat: Work from * through final rows of C2. With C1, k 15 rows. Remove provisional cast on, carefully placing revealed live sts on second circular ndl. Break working yarn, leaving a length equal to three times the width of the work plus about 8 inches. Thread working yarn onto tapestry ndl and work garter stitch graft to join two sets of live sts. When graft is complete, use tip of tapestry needle to adjust tension of grafted row to exactly match tension of knitted rows. Weave in all ends on WS before proceeding to next step.  All 74 columns of sts created during the knitting of stripes will have a length of yarn woven through them to form the vertical stripes of the plaid. Begin at either CO or BO edge of the collar, and work column by column until you reach the other selvage. You'll weave the following colors, in the following pattern, twice across the columns of stitches: Begin each round by threading a suitable length -- about 30 inches -- of yarn up from the WS of the fabric. End the round by bringing the weaving yarn down through the fabric to the WS, immediately adjacent to the spot from which it began. Weave the yarn up and down over the garter ridges: weave over a garter bump of one ridge, then under a garter bump in the following ridge. The weaving yarn does not penetrate the fabric completely, but only goes over and under the surface bumps. (One the WS, you will see only knitting, no weaving.) 
Be sure to alternate which bumps are woven over, and which are woven under, with each successive round of weaving. Start a new length of yarn for each woven round, even if successive rows are in the same color. Weaving rounds may be started anywhere on the round. I recommend that you vary your starting points so as not to wind up with one narrow portion of the collar in which all the loose ends will be buried -- this would tend to cause distortion on the RS of the fabric. Take care that the tension of your woven rounds is even. The weaving yarn should lie gently and neatly on the surface of the fabric. It should not form loose loops, and neither should it pull the fabric into puckers. Before weaving in ends, a gentle stretch around the circumference of the collar should help to settle the weaving nicely. FINISHING |
| ABOUT THE DESIGNER |
 He found a pea under his mattress this morning. |
| Pattern & images © 2014. Franklin Habit. |