Knitty: little purls of wisdom
Kelbourne Woolens
Title
beauty shot

Tangy

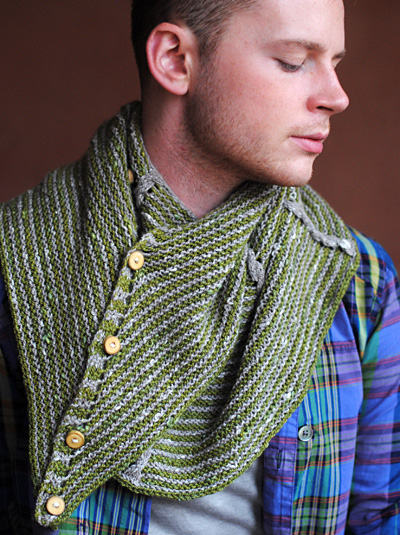
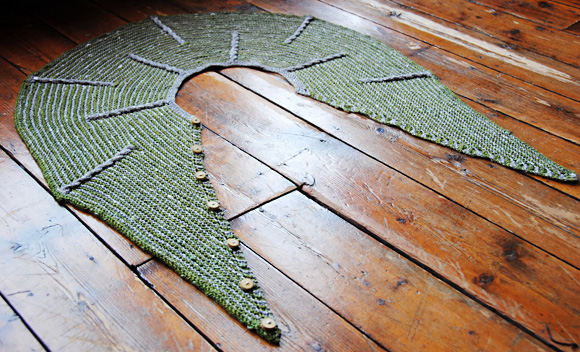
Stripes and cabled slipped stitches add a punch of graphic sophistication to this stylish scarf.

Groove is not your typical rectangular scarf and it can be worn in many different ways thanks to the uniquely curved shape. Buttons can go through the yarnovers at the edge or into the fabric next to the cables.

Wear it as a cape with buttons in front or to the side, wrap it, tie it, drape it!

I love combining playful shapes and construction techniques with simple fabrics. Groove starts by casting on 72 sts. Yarn over increases within the fabric lie next to the slipped stitch columns, shaping the fabric into an arch. The simple garter stitch allows you to focus on the construction elements while the addictive stripes keep you saying, "Just one more row!"


spacer model + photos: Stephen West


SIZE
One

FINISHED MEASUREMENTS
Length:  11.5 inches along center
Width:  86 inches along BO edge
Note: Measurements taken after blocking

spacer

spacer
MATERIALS
Yarn

The Fibre Company Acadia [60% Merino, 20% Silk, 20% Alpaca; 145 yd/133m per 100g skein]
spacer [MC] Driftwood, 2 skeins
spacer [CC] Asparagus, 2 skeins

Recommended needle size
[always use a needle size that gives you the gauge listed below -- every knitter's gauge is unique]
spacer 1 40-inch US #6/4mm circular needle

Notions
spacer
cable needle
spacer yarn needle
spacer 18 stitch markers
spacer 7 1.5-inch buttons


GAUGE

18 sts/40 rows = 4 inches in garter stitch

PATTERN NOTES
[Knitty's list of standard abbreviations and techniques can be found here.]
Carry strands of yarn along the right edge while striping.

Slip markers when you come to them unless otherwise indicated. All stitches are slipped purlwise. 

C4B: Slip next 2 stitches to cable needle and hold in back; k2, then k2 from cable needle

C4F: Slip next 2 stitches to cable needle and hold in front; k2, then k2 from cable needle

DIRECTIONS

spacer
SETUP
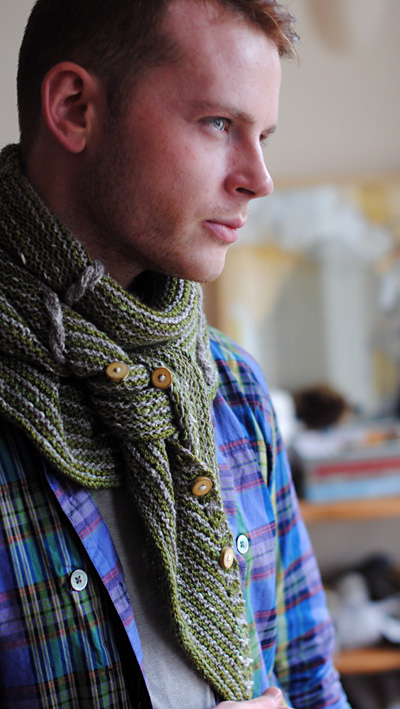
Using MC, CO 72 sts.
K 5 rows.

Row 6 [RS]: K3, yo, (k10, yo, pm, k4, pm, yo) 4 times, k10, yo, k3. 82 sts.

Row 7 [WS]: (K to m, p4) 4 times, k to end of row.

SECTION 1
Join CC. 

Row 1 [RS]: Using CC, k3, yo, (k to m, sl4) 4 times, k to last 3 sts, yo, k3. 2 sts increased.

Row 2 [WS]: (K to m, sl4) 4 times, k to end of row.

Row 3 [RS]: Using MC, k3, yo, (k to m, yo, slm, C4B, slm, yo) 4 times, k to last 3 sts, yo, k3. 10 sts increased.

Row 4 [WS]: (K to m, p4) 4 times, k to end of row.

Row 5 [RS]: Using CC, k3, yo, (k to m, sl4) 4 times, k to last 3 sts, yo, k3. 2 sts increased.

Row 6 [WS]: (K to m, sl4) 4 times, k to end of row.

Row 7 [RS]: Using MC, k3, yo, (k to m, yo, slm, k4, slm, yo) 4 times, k to last 3 sts, yo, k3. 10 sts increased.

Row 8 [WS]: (K to m, p4) 4 times, k to end of row.

Repeat last 8 rows 4 more times, then repeat Rows 1-3 once more. There should be 11 CC stripes and 214 sts: 48 before first marker; 34 between the cables; 48 sts after the last marker.

In the next row, place additional markers; leave the existing ones in place.

Next Row [WS]: K29, (pm, p4, pm, k15, p4, k15) 4 times, pm, p4, pm, k29.

spacer
SECTION 2
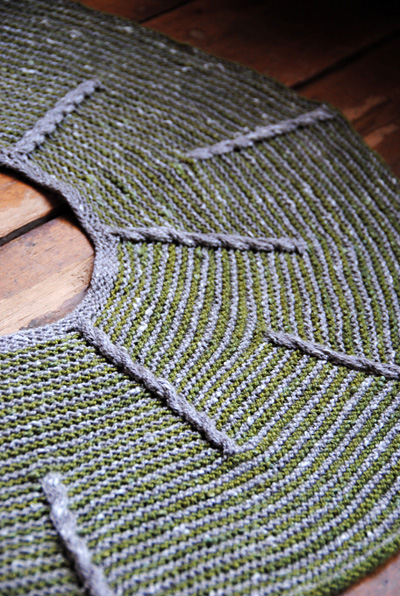
Row 1 [RS]: Using CC, k3, yo, (k to m, sl4) 9 times, k to last 3 sts, yo, k3. 2 sts increased.

Row 2 [WS]: (K to m, sl4) 9 times, k to end of row.

Row 3 [RS]: Using MC, k3, yo, (k to m, C4B, k to m, yo, slm, k4, slm, yo) 4 times, k to m, C4B, k to last 3 sts, yo, k3. 10 sts increased.

Row 4 [WS]: (K to m, p4) 9 times, k to end of row.

Row 5 [RS]: Using CC, k3, yo, (k to m, sl4) 9 times, k to last 3 sts, yo, k3. 2 sts increased.

Row 6 [WS]: (K to m, sl4) 9 times, k to end of row.

Row 7 [RS]: Using MC, k3, yo, (k to m, k4, k to m, yo, slm, C4B, slm, yo) 4 times, k to m, k4, k to last 3 sts, yo, k3. 10 sts increased.

Row 8 [WS]: (K to m, p4) 9 times, k to end of row.

Repeat Rows 1-7 once more. There should be 15 CC stripes and 262 sts: 37 sts before the first marker; 19 sts between the cables, and 37 sts after the last markers.

In this next row, you’ll remove the first set of the markers but leaving the second set in place.

Next Row [WS]: (K to m, p4, k to m, remove m, k4, remove m) 4 times, k to m, p4, k to end of row.

SECTION 3
Row 1 [RS]: Using CC, k3, yo, (k to m, sl4) 5 times, k to last 3 sts, yo, k3. 2 sts increased.
Row 2 [WS]: (K to m, sl4) 5 times, k to end of row.
Row 3 [RS]: Using MC, k3, yo, (k to m, yo, C4B, yo) 5 times, k to last 3 sts, yo, k3. 12 sts increased.
Row 4 [WS]: (K to m, p4) 5 times, k to end of row.
Row 5 [RS]: Using CC, k3, yo, (k to m, sl4) 5 times, k to last 3 sts, yo, k3. 2 sts increased.
Row 6 [WS]: (K to m, sl4) 5 times, k to end of row.
Row 7 [RS]: Using MC, k3, yo, (k to m, yo, k4, yo) 5 times, k to last 3 sts, yo, k3. 12 sts increased.
Row 8 [WS]: (K to m, p4) 5 times, k to end of row.

Repeat last 8 rows 4 more times. 402 sts.

spacer

FINISHING
Using strand of CC attached to shawl, work a 3 stitch I-cord BO as follows:
CO 3 sts.
Row 1: K2, k2tog tbl.  Slip these 3 sts back to left hand needle.
Repeat Row 1 until all shawl sts have been cast off.  3 sts rem.
Break yarn and pull it through remaining 3 sts.

Weave in ends. Block to desired dimensions. Sew buttons as pictured. The yarn overs along the shawl’s edge serve as buttonholes.
spacer
ABOUT THE DESIGNER

designernamespacer Stephen West was born and raised in Tulsa, OK, and now resides in Amsterdam where he studies choreography at the School for New Dance Development.

You can find his self-published patterns and pattern books, Westknits Book One, Book Two, and Book Three at your local yarn shop and at westknits.com.  

spacer