
|
|
 |
|
|
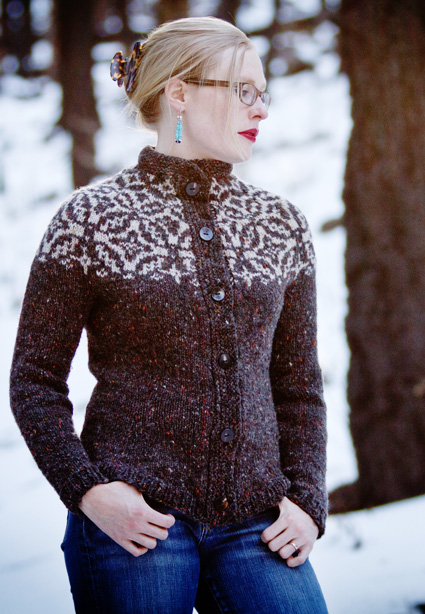
The pottery created by the artists from the Nine Northern Pueblos in New Mexico is some of the finest in the world. Indigenous potters (like many knitters) span the space from craft to high art, drawing upon centuries-old traditions and techniques to push their craft in exciting, modern directions. The Fair Isle-style pattern on the yoke of Sky Isle was inspired by a pottery style created by artists and craftspeople from Acoma Pueblo in New Mexico. Many Acoma pots are painted in black-and-white patterns that expand and contract to follow the shape of the vessel. I have tried to recreate this effect by designing a two-color pattern in which the yoke shaping is accomplished with increasingly smaller designs that echo the shape of the largest motif. Sky Isle is a bottom-up, seamless cardigan worked in the round
in a lovely, durable Donegal tweed, a woolen yarn that gives
a weathered appearance to the sweater. The body and sleeves are
worked separately, then joined to form the yoke. Once the neckband
has been completed and bound off, the sweater is steeked and
cut up the midline and the steeked portions are secured to the
sweater body. Stitches are picked up on either side of the steek
to form the button band, which joins the collar at a mitered
angle. |
||
|
|

|
Tweet
|
|
SIZE |
|
|
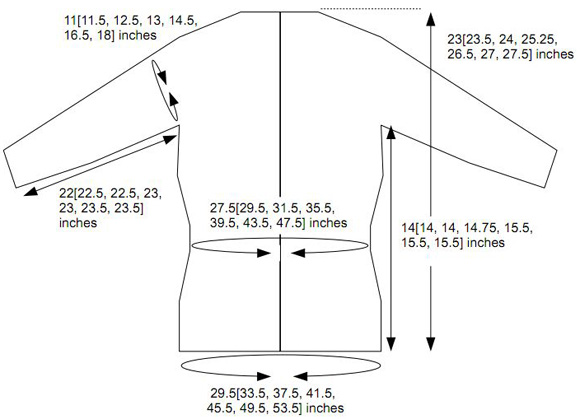
FINISHED MEASUREMENTS |
|
MATERIALS Notions |
|
GAUGE |
| 16 sts/22 rows = 4" in stockinette stitch |
|
PATTERN NOTES |
|
K1, p1 rib: Information about steeking can be found here |
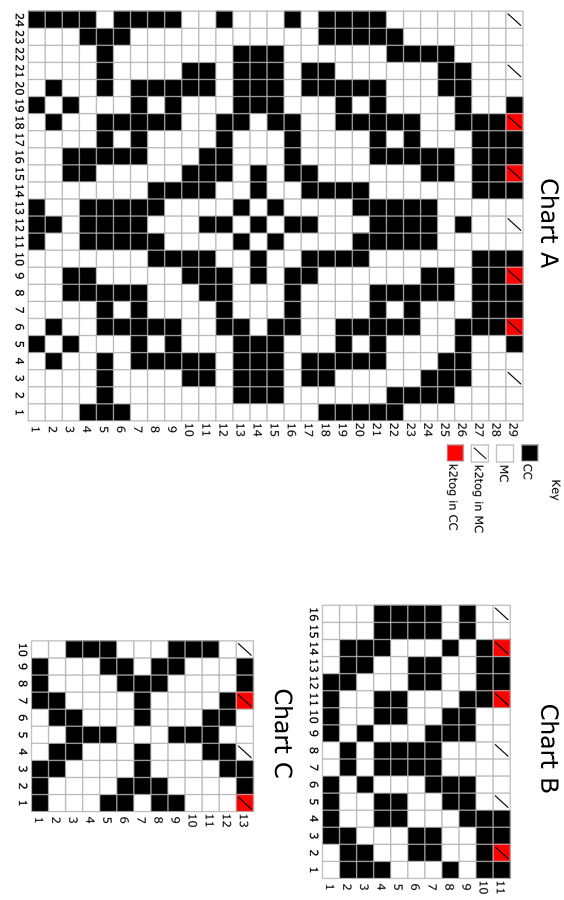
The charts for this pattern are very large and fit on a letter-sized page. Click here and print the resulting page. |
|
DIRECTIONS Rnds 2-5: Work even in St st. Rep Rnds
1-5 a total of 10[10,
10, 10, 11, 13, 14] times: sleeve increased to 44[46, 50, 52,
58, 66, 72] sts. Change to 16” circular needle when/if
desired. Next Rnd: Knit to 5[5, 6, 7, 7, 8, 8] sts before marker, place next 10[10, 12, 14, 14, 16, 16] sts on holder. 34[36, 38, 38, 44, 50, 56] sts BODY Set-up Rnd: From steek marker, k15[17, 19, 21, 23, 25, 27], pm, *k1, pm, k28[32, 36, 40, 44, 48, 52], pm; rep from * 2 more times, k1, pm, k15[17, 19, 21, 23, 25, 27]. Rnd 1 (Dec Rnd): From steek marker, *knit to 2 sts before first marker, ssk, slip marker, k1, slip marker, k2tog; rep from * 3 more times. 8 sts dec Rnds 2-7: Work even, slipping markers. Rep these 7 rnds 0[1, 2, 2, 2, 2, 2] more times. 110[118, 126, 142, 158, 174, 190] sts. Work even until piece measures 7 inches, or from desired length
to just above the waist, slipping markers. Remove waist shaping markers, keeping center marker and steek marker in place. Work even until piece measures 14[14, 14, 14.75, 15.5, 15.5, 15.5] inches or desired length from underarm to hem, ending at steek marker. Set-up Rnd: K24[28, 31, 34, 38, 41, 45] sts, pm, k10[10, 12, 14, 14, 16, 16] sts, pm, k50[58, 64, 70, 78, 84, 92] sts, pm, k10[10, 12, 14, 14, 16, 16] sts, pm, k24[28, 31, 34, 38, 41, 45] sts, pm, knit to steek marker. Joining Rnd: Knit to first joining marker, remove marker, place 10[10, 12, 14, 14, 16, 16] underarm sts on holder, remove marker. Place live sts from sleeve on body needle. Join MC, cont working to next marker, remove marker, place underarm sts on holder as before. Place live sts from other sleeve on body needle. Join MC and cont working to center marker. 166[186, 202, 214, 242, 266, 294] sts YokeWork even for 4[4, 2, 5, 7, 10, 13] rnds. Starting at steek marker, beg working Chart A, starting with Row 4[4, 1, 1, 1, 1, 1] and stitch 17 [19, 24, 17, 15, 15, 24], making sure to strand yarn loosely across the WS; rep Chart patt to center marker, then alternate k1 in MC and k1 in CC across 6 steek sts; cont working Chart A through Row 29, alternating MC and CC over the steek so that the colors form a checkerboard patt. Beg working Chart B, starting on Row 2 and stitch 11[12, 16,
11, 10, 10, 16]. Beg working Chart C, starting on Row 2 and stitch 7[8, 10, 7,
6, 6, 10]. Cont using MC, knitting to 11[13, 15, 16, 18, 19, 21] sts before steek marker; sl 1, turn, wrap yarn, pass stitch back, and purl to 11[13, 15, 16, 18, 19, 21] sts before center marker; wrap and turn, knit to 9[11, 13, 14, 16, 17, 19] sts before steek marker, picking up wrap and knitting it tog with st; wrap and turn, purl to 9[11, 13, 14, 16, 17, 19] sts before center marker, picking up wrap and knitting it tog with st; wrap and turn, knit to 2 sts before steek marker. Collar: Next Row [WS]: Turn, k1, m1, knit to end of collar. |
|
FINISHING Buttonhole Band: Buttonband: Place held underarm sts on needles. Join using 3-needle bind
off or Kitchener st. |
|
| ABOUT THE DESIGNER |
|
Candace Joggerst is a PhD scientist working in
computational astrophysics who lives on a mesa (an island-in-the-sky,
of sorts) in Northern New Mexico. She has found that satisfying
the urge to create real, complicated objects with knitting is far
more portable and space- (not to mention finger-) saving than building
furniture in a woodshop. Candace has been knitting for 20+ years,
but only designing wearable garments for the past 2 years. |
|
Pattern & images © 2011 Candace Joggerst. Contact Candace |