Knitty: little purls of wisdom
Name Maker
Title
beauty shot

Tangy

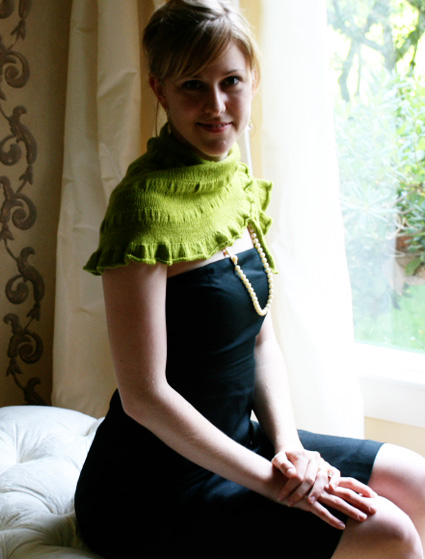
As this little shawlette was taking shape, I couldn’t help but notice a resemblance to a slice of citrus due to its semi-circular shape and increases subtly radiating from the center. With its bit of ruffle and ruching, and especially its reference to my favorite of the California winter crops, I knew I would be wearing this wintry fruit accessory to each and every holiday party this year. 

Designed to use one skein of laceweight Malabrigo, this shawlette could easily be knit in other weights of yarn and to any size you please, since it is knit from the top center downwards. 

Draped around the shoulders or scrunched around the neck, this piece will add just a bit of dressiness to any holiday outfit.  

spacer model: Hilary Smith Callis spacer photos: Neill Callis

SIZE
One

spacer

FINISHED MEASUREMENTS
Length of straight edge: 34 inches
Height at center: 14 inches
Note: Measurements taken after blocking.

spacer

MATERIALS
Yarn

spacer Malabrigo Lace Baby Merino [100% Baby Merino Wool; 470yd/430m per 50g skein]; color: Lettuce; 1 skein

Recommended needle size
[always use a needle size that gives you the gauge listed below -- every knitter's gauge is unique]
spacer 1 24-inch US #6/4mm circular needle

Notions
spacer Yarn needle

spacer

GAUGE

spacer24 sts/36 rows = 4" in stockinette stitch
 

PATTERN NOTES
[Knitty's list of standard abbreviations and techniques can be found here.]

This semi-circular shawlette is worked from the center of the upper edge outwards, so the size can be easily customized; see notes within pattern. Heavier weights of yarn can also be substituted; adjust needle size to suit yarn choice.

spacer

DIRECTIONS
CENTER
CO 3 sts.
K 6 rows.

At end of 6th row, do not turn work. Rotate piece 90 degrees clockwise; pick up and k 3 sts (1 st in each garter st ridge) along adjacent edge of piece.
Rotate piece again, 90 degrees clockwise; pick up and k 3 sts (1 st in each CO st) along CO edge. 9 sts.

Row 1 [WS]: K3, place marker, p3, place marker, k3.

Row 2 [RS]: K3, slip marker, [m1, k1] three times, m1, slip marker, k3. 13 sts.

Rows 3-5: Work in pattern as set, maintaining first and last 3 sts in garter st and working sts between markers in stockinette st.

Row 6 [RS]: K3, slip marker, [m1, k1] seven times, m1, slip marker, k3. 21 sts.

Rows 7-11: Work in pattern.

Row 12 [RS]: K5, [m1, k1] twelve times, k4. 33 sts.

Work 1 row in pattern.

SHAWL BODY
Note: In all directions that follow, “work in pattern” means to work in stockinette st, maintaining first and last 3 sts in garter st as set. In the sequence of rows below, Rows 1-7 will form a ruched band. Increase rows will be worked on Rows 9 and 19, which will increase the diameter of the shawl section.

First Section:
Row 1 [RS]: K3, [kfb] in each st to next marker, k3. 60 sts.
Rows 2-6: Work in pattern.
Row 7 [RS]: K3, [k2tog] to next marker, k3. 33 sts.
Row 8 [WS]: Work in pattern.
Row 9 (Increase Row) [RS]: K3, slip marker, m1, [k2, m1] twice, [k1, m1] 19 times, [k2, m1] twice, slip marker, k3. 57 sts.
Rows 10-18: Work in pattern.
Row 19 (Increase Row) [RS]: K3, slip marker, m1, [k3, m1] twice, [k2, m1] 18 times, [k3, m1] three times, slip marker, k3. 81 sts.
Row 20 [WS]: Work in pattern.

For each section below, work Rows 1-20 as for the first section, EXCEPT that the Increase Rows (Rows 9 and 19) will be worked differently. St numbers for Rows 1 and 7 are given for each section, as well as directions for each Increase Row.

Second Section:
Row 1: 156 sts.
Row 7: 81 sts.
Row 9 [RS]: K3, slip marker, m1, [k4, m1] three times, [k3, m1] 17 times, [k4, m1] three times, slip marker, k3. 105 sts.
Row 19 [RS]: K3, slip marker, m1, [k5, m1] three times, [k4, m1] 16 times, [k5, m1] four times, slip marker, k3. 129 sts.

Third Section:
Row 1: 252 sts.
Row 7: 129 sts.
Row 9 [RS]: K3, slip marker, m1, [k6, m1] four times, [k5, m1] 15 times, [k6, m1] four times, slip marker, k3. 153 sts.
Row 19 [RS]: K3, slip marker, m1, [k7, m1] four times, [k6, m1] 14 times, [k7, m1] five times, slip marker, k3. 177 sts.

Fourth Section:
Row 1: 348 sts.
Row 7: 177 sts.
Row 9 [RS]: K3, slip marker, m1, [k8, m1] five times, [k7, m1] 13 times, [k8, m1] five times, slip marker, k3. 201 sts.
Row 19 [RS]: K3, slip marker, m1, [k9, m1] five times, [k8, m1] 12 times, [k9, m1] six times, slip marker, k3. 225 sts.

Fifth Section:
Row 1: 444 sts.
Row 7: 225 sts.
Row 9 [RS]: K3, slip marker, m1, [k10, m1] six times, [k9, m1] 11 times, [k10, m1] six times, slip marker, k3. 249 sts.
Row 19 [RS]: K3, slip marker, m1, [k11, m1] six times, [k10, m1] 10 times, [k11, m1] seven times, slip marker, k3. 273 sts.

Note: To change size of shawl, more or fewer sections may be worked. If working more sections, be sure to increase 24 sts evenly across each Increase Row.

After Row 20 of last section has been worked, proceed to ruffled edging.

RUFFLED EDGING
Next Row [RS]: K3, [kfb] in each st to next marker, k3. 540 sts.
Work 11 rows in pattern. BO all sts.

spacer

FINISHING
Weave in ends.
Wash and block shawl, ensuring that upper edge of shawl is straight and flat.

spacer
ABOUT THE DESIGNER

Hilary Smith Callis lives in San Francisco with her husband and step-cat and has worked at NASA since a few months after she received her highly relevant degree in Greek and Latin.

You can read her ongoing knitting epic, The Yarniad, and see her awkward attempts at translating modern knitting terms into Latin here.

spacer