
|
|
 |
|
|
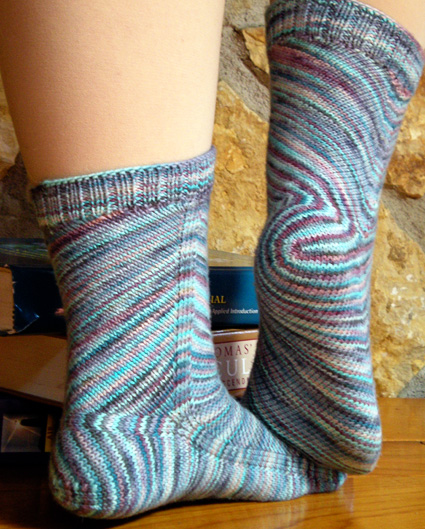 |
Skew takes the concept of the bias design element to a new extreme by turning the entire architecture of the sock, including the heel, on the diagonal. Rather than attempt to compensate for the non-squareness of stockinette stitch, I chose to exploit it, resulting in delightfully anatomically correct toes followed by an innovative heel shaping which continues the diagonal flow of the stitches without interruption. This heel requires neither short rows nor picking up stitches, but it does require a little bit of faith until the origami moment when a short grafted seam transforms an unfamiliarly-shaped object into a finished heel. A fair amount of high-school algebra and geometry was resurrected for the design process, but the knitter only needs to be able to count. Don’t let the clean stockinette swaths fool you; the unconventional shaping will keep you on your toes! |
|
SIZE |
|
FINISHED MEASUREMENTS |
|
MATERIALS Notions |
|
GAUGE |
|
PATTERN NOTES |
|
LLinc: Left-leaning Lifted Increase. Insert your
left needle, from front to back, under the left leg of the stitch
two rows below the stitch just knit. Knit into the back of this
stitch. RLinc: Right-leaning Lifted Increase. Insert your right needle, from front to back, under the right leg of the stitch below the first stitch on the left needle. Transfer this stitch to your left needle and knit into the front of it. K3tog: Knit next 3 stitches together. SSSK: Slip next 3 stitches one at a time as if to knit, insert the left-hand needle into the fronts of those three stitches, and knit them together. COR: Center of Round. (You may choose to divide the stitches between the two needles at this point instead of using a marker.) Notes: Handpainted or self-striping yarns are particularly suitable for this design, as they will highlight the unusual stitch direction flow. The use of dpns is not recommended: since increases and decreases occur on opposite sides of the foot, frequent redistribution of stitches would be necessary. In addition, there are up to 102 stitches on the needles at one time. Although the main portions of the foot and leg are worked on 72 stitches, because they are turned diagonally, the fit of this sock is comparable to a 60-stitch traditional sock circumference at the same gauge. Heel fit is similar to a short-row heel with mini-gussets. Instructions are the same for both left and right socks except for the heel and decrease mini-gusset sections. There are various markers with different purposes – different colors or styles will help you keep track. |
|
DIRECTIONS Round 1: K2, LLinc, k2, RLinc, k2, place COR marker (sl
marker on subsequent rnds), k2, LLinc, k2, RLinc, k2. 16
sts. Round 1: K to last 2 sts before COR marker, RLinc, k2, sl marker, k2, LLinc, k to end. Round 2: K. Repeat these two rounds 11 times more: 72 sts. Foot: Round 1: K1, k2tog, k to last 2 sts before COR marker, RLinc, k2, sl marker, k2, LLinc, k to last 3 sts, SSK, k1. Round 2: K. Repeat these two rounds until work measures 7.5 inches (or 2 inches less than desired foot length) along long side from corner of big toe (stretch edge slightly if necessary so that stockinette is undistorted). At correct round gauge, that’s approximately 14 more repeats. Inner ankle Note: Stitches created between new markers at inner ankle will become back leg stitches when heel is complete. Round 1: K1, k2tog, k to last 2 sts before COR marker, (RLinc, k1) twice, sl marker, (k1, LLinc) twice, k to last 3 sts, SSK, k1. 2 sts increased. Round 2: K. Round 3: K1, k2tog, k to last 3 sts before COR marker, RLinc, k2, place first ankle marker, RLinc, k1, sl COR marker, k1, LLinc, place second ankle marker, k2, LLinc, k to last 3 sts, SSK, k1. 2 sts increased. Round 4: K. Round 5: K1, k2tog, k to 2 sts before first ankle marker, RLinc, k2, sl marker, k2, LLinc, sl COR marker, RLinc, k2, sl second ankle marker, k2, LLinc, k to last 3sts, SSK, k1. 2 sts increased. Round 6: K. Round 7: K1, k2tog, k to 2 sts before first ankle marker, RLinc, k2, sl marker, k2, LLinc, k to COR, sl marker, k to 2 sts before second ankle marker, RLinc, k2, sl marker, k2, LLinc, k to last 3sts, SSK, k1. 2 sts increased. Round 8: K. Repeat Rounds 7 and 8 twice more: 84 sts total, with 12 sts total between ankle markers (6 on either side of COR marker). Increase mini-gusset: Round 1: K to 2 sts before first ankle marker, RLinc, k2, sl marker, k2, LLinc, k to COR, sl marker, k to 2 sts before second ankle marker, RLinc, k2, sl marker, k2, LLinc, k to end. 4 sts increased. Round 2: K. Round 3 (Same as Round 7 of previous section): K1, k2tog, k to 2 sts before first ankle marker, RLinc, k2, sl marker, k2, LLinc, k to COR, sl marker, k to 2 sts before second ankle marker, RLinc, k2, sl marker, k2, LLinc, k to last 3sts, SSK, k1. 2 sts increased. Round 4: K. Repeat Rounds 1-4 twice more. 102 sts total, with 24 sts total between ankle markers (12 on either side of COR marker).Heel shaping (LEFT SOCK ONLY): (For right sock, skip to section labeled “Heel shaping (RIGHT SOCK ONLY)”.) Round 1: K to 2 sts before first ankle marker, RLinc, k2,
sl marker, k2, LLinc, k to COR, sl marker, k to 2 sts before
second ankle marker, RLinc, k2, sl marker, k2, LLinc, k10,
SSK, k1, place heel marker (sl marker on subsequent rounds),
k1, k2tog, k to end. (Note: there will be 15 sts between
second ankle marker and heel marker throughout heel shaping.) Heel joining round (origami moment): In this round, you will move the COR to the current location of the first ankle marker, remove the second ankle marker and heel marker, and graft the heel. K to first ankle marker and remove it. This will now become the new COR position – if you’ve got removable stitch markers, place your COR marker here. If your stitch markers are the closed kind, place a new marker for COR. Knit around to existing COR and remove marker if necessary; knit around to second ankle marker, and remove it; 30 sts remain to end of round. Transfer next 15 sts (up to heel marker) to a dpn and remaining 15 sts to another dpn. With a separate length of yarn (about a yard), Kitchener stitch the two sets of 15 sts together. There will remain 42 sts before new COR for front leg,
36 sts after new COR for back leg. Round 1: K1, k3tog, k to last 2 sts before (new) COR, RLinc, k2, sl marker, k2, LLinc, k to last 3 sts, SSK, k1. One mini-gusset stitch has been decreased. Round 2: K. Round 3: K1, k2tog, k to last 2 sts before COR, RLinc, k2, sl marker, k2, LLinc, k to last 3 sts, SSK, k1. Round 4: K. Repeat Rounds 1-4 4 times more, then rnds 1-2 once: 36 sts before COR and 36 sts after COR. Continue with instructions for Leg. Heel shaping (RIGHT SOCK ONLY): Round 1: K 21, SSK, k 1, place heel marker, k1, k2tog, k to 2 sts before first ankle marker, RLinc, k2, sl marker, k2, LLinc, k to COR, sl marker, k to 2 sts before second ankle marker, RLinc, k2, sl marker, k2, LLinc, k to end. (There will be 15 sts between heel marker and first ankle marker throughout heel shaping.) Round 2: K. Round 3: K1, K2tog, K to 3 sts before heel marker, SSK, k 1, sl marker, k1, k2tog, k to 2 sts before first ankle marker, RLinc, k2, sl marker, k2, LLinc, k to COR, sl marker, k to 2 sts before second ankle marker, RLinc, k2, sl marker, k2, LLinc, k to last 3 sts, SSK, k1. Round 4: K. Round 5: K to 3 sts before heel marker, SSK, k 1, sl marker, k1, k2tog, k to 2 sts before first ankle marker, RLinc, k2, sl marker, k2, LLinc, k to COR, sl marker, k to 2 sts before second ankle marker, RLinc, k2, sl marker, k2, LLinc, k to end. Round 6: K. Repeat Rounds 3-6 once more, then rnd 3 once: 15 sts remain between the beginning of the round and the heel marker. Heel joining round: As with left sock, you will be moving the COR position (this time, to the current location of the second ankle marker), removing all other markers, and grafting the heel. Transfer first 15 sts (up to heel marker) to one dpn and next 15 sts (up to first ankle marker) to another dpn. With a separate length of yarn (about a yard), Kitchener stitch the two sets of 15 sts together. K to second ankle marker, removing old COR marker as you go. Place new COR marker at this point. Knit to end of round. There will remain 36 sts before COR for back leg, 42 sts
after COR for front leg. Round 1: K1, k2tog, k to last 2 sts before (new) COR, RLinc, k2, sl marker, k2, LLinc, k to last 4 sts, SSSK, k1. One mini-gusset stitch has been decreased. Round 2: K. Round 3: K1, k2tog, k to last 2 sts before COR, RLinc, k2, sl marker, k2, LLinc, k to last 3 sts, SSK, k1. Round 4: K. Repeats Rounds 1-4 four times more, then rnd 1 once: 36 sts before COR and 36 sts after COR. (Note: to add length to the leg, repeat rnds 2 and 3 as many times as desired.) Continue with instructions for Leg. Note: leg is worked using short rows. Each pair of short rows begins and ends at the current beginning of round, and does NOT cross the COR. You will find it helpful if your sts are arranged so that the sts between start of round and COR are on one needle, and sts from COR to end of round are on a second. Short row pair one (set-up row) needle 1:
K35 (until 1 st remains before COR), turn; with WS facing,
slp 1, p31 (to last 3 sts before beg of rnd), p2tog, p1, do not turn. Short row pair 3: Continuing with RS facing, k32 (until
2 sts remain before gap from previous turning), turn; with
WS facing, slp 1, p28 (to last 3 sts on before beg of rnd),
p2tog, p1, do not turn. Short row pair 5: K29, turn; slp 1, p25, p2tog, p1, do
not turn. First set-up round: K2, [LLinc, k2] to COR, sl marker,
[k2, RLinc] to last 2 sts, k1, transfer last st to beg
of round. 74 sts. Ribbing round: [P1, k2] around. |
|
FINISHING |
| ABOUT THE DESIGNER |
|
The designer has two math degrees and is
a contributing author of the book Making Mathematics with Needlework,
but dropped out of grad school twice because
she prefers to do research with yarn. She
is a technique junkie, a process knitter, and occasionally a machine
for turning coffee into socks. |
|
Pattern & images © 2010 Lana Holden. Contact Lana |