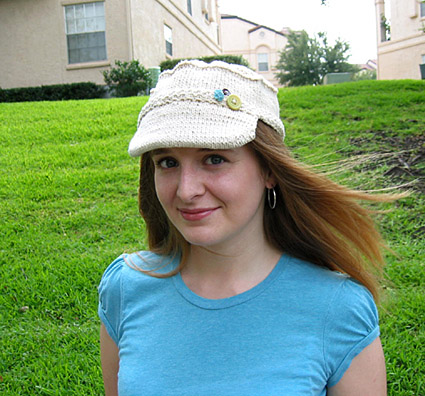
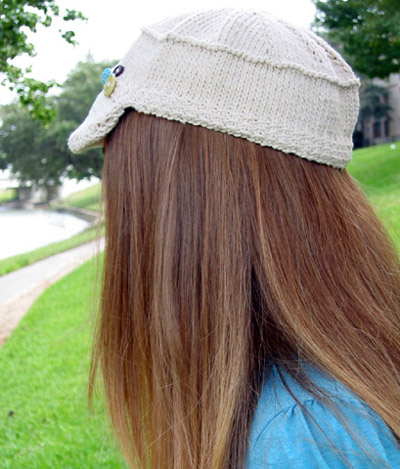
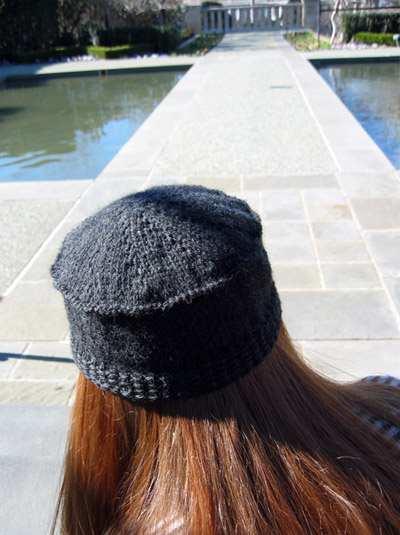
Grandma Knitty Home
Knitty: little purls of wisdom
letter from the editorfeatured articlesKnitty's fabulous pattern selectionarchive of back issuestell us what you think of KnittyKnitty's favorite linkshelp knitty keep on keepin' onknitty's virtual sNbjoin the Knitty notifylistknitty's tiny little shopping malltake home something Knitty


Elann

the Knitty FAQ

submission guidelines for designers and writers

the obligatory legal statement

the rabbit

© Knitty 2002-2006. All rights reserved. Unauthorized reproduction prohibited. This means you.


mesillaanatoliaungranny smitht-twistjameseyjardin anglais
exchequeredtendrilsnagano sakuraconvertibletopireid
double scoop
tiny tether
pedicure sockshederanautie
blossomkatjafelted tea cosy

Inspired by cadet style hats, I knit this up to keep one cozy and the sun out of your eyes.

This hat is worked from the top down all in one piece, including the brim. Since it is worked this way, gauge on this pattern is not crucial. Almost any variety of yarn may be used.

Simply measure the circumference of your head and divide this number by 3.14 to determine the diameter of the top of the hat. Knit until you reach this diameter and then continue with the pattern.

models and photos: Jennifer Tallapaneni/Kishore Tallapaneni

SIZE
S[M, L] (shown in size M)
 
FINISHED MEASUREMENTS

Circumference: 20[22, 24] inches


MATERIALS

Pakucho Organic Cotton [100% Cotton; Approx. 88yd/81m per 50g skein]; color: Vanilla; 2 skeins
OR
Cascade 220 [100% Peruvian highland wool; 220yd/201m per 100g skein]; color: Dark Gray; 1 skein

1 set US #7/4.5mm double-point needles
1 16-inch US #7/4.5mm circular needle
1 16-inch US #5/3.75mm circular needle
Tapestry needle
Stitch marker
1 sheet of plastic mesh canvas
1 crochet hook, sized between US 4/3.75mm and US 7/4.5mm (optional)
Decorative buttons (optional)

GAUGE
20 sts/26 rows = 4 inches in stockinette stitch
PATTERN NOTES

[Knitty's list of standard abbreviations and techniques can be found here]

The brim shaping of this hat is worked like a short row sock heel. Excellent instructions can be found in Knitty's Winter 2002 article here.

Slip Knot Crochet Cast On
This method makes a nearly invisible circular starting point, without a center hole. Make a slip knot with approximately a 0.5 inch diameter, with the adjustable loop coming from the short end of the yarn, rather than from the ball of yarn. Place the loop on the crochet hook. Hold the loop and the working yarn to the left, and the knot and short end of yarn to the right of the hook.

Work 1 single crochet into the loop -- 1 st cast on.

*Work 1 single crochet into loop, but during final step of stitch, draw hook through only first loop on hook.

Repeat from * until there is 1 loop on the hook for each stitch to be cast on -- see photos.

Transfer sts to double-point needles to begin knitting in the round. Tighten slip knot after a few rounds have been worked, to close hole.

This tutorial might be of help as well.

Slipped Stitch Rib (Worked in the round over an even number of stitches):
Round 1: [K1, p1] around.
Round 2: [Sl 1 with yarn in front, p1] around.
Repeat these 2 rounds for Slipped Stitch Rib.

M1: I recommend using the backwards loop increase. Make a loop around your finger, twist the loop and place it on the right needle with the working yarn pointing away from you.

DIRECTIONS

Hat
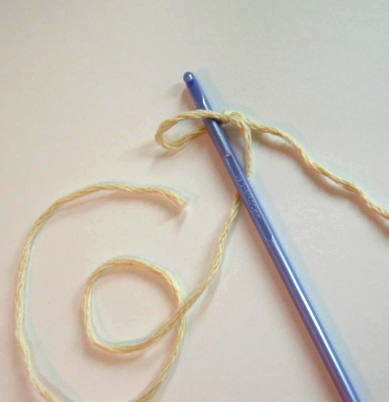
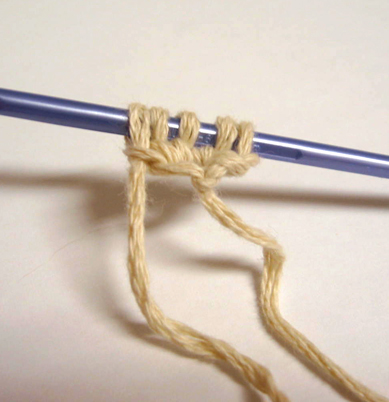
Using double-point needles, CO 5 sts.

[Note: Alternately, use the Slip Knot Crochet Cast On -- see Pattern Notes above.]

Divide sts between needles and join to begin working in the round, being careful not to twist.

K 1 round.

Place a marker to mark beginning of round, or wait until there are a few more sts on the needles first so it is easier to manage. If you find 5 stitches too difficult to work, you can cast on 10 sts and start on Round 3. This will form a small hole that can easily be sewn closed later.

When shaping crown of hat, switch to larger circular needle when necessary.

Round 2: [M1, k1] around. 10 sts.

Round 3: [K1, m1] around. 20 sts.

Even-Numbered Rounds 4 through 20[22, 24]: K all sts.

Round 5: [K2, m1] around. 30 sts.

Round 7: [K3, m1] around. 40 sts.

Round 9: [K4, m1] around. 50 sts.
Round 11:
[K5, m1] around. 60 sts.
Round 13:
[K6, m1] around. 70 sts.
Round 15
: [K7, m1] around. 80 sts.
Round 17:
[K8, m1] around. 90 sts.
Round 19:
[K9, m1] around. 100 sts.

Sizes M, L Only: Round 21: [K10, m1] around. 110 sts.

Size L Only: Round 23: [K11, m1] around. 120 sts.

All Sizes: Round 21[23, 25]: P all sts.

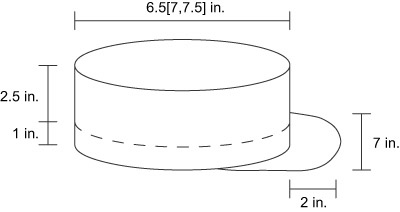
Work in stockinette st until work measures 2.5 inches from p round.

Using smaller circular needle, work 1 inch in Slipped Stitch Rib, ending with Round 2 of patt.

BO 58[68, 78] sts. 42 sts rem.

Top of Brim
Work back and forth in stockinette st until brim measures 1 inch, ending with a WS row.

K to last st, W&T. P to last st, W&T.
K to last 2 sts, W&T. P to last 2 sts, W&T.
K to last 3 sts, W&T. P to last 3 sts, W&T.
K to last 4 sts, W&T. P to last 4 sts, W&T.
K to last 5 sts, W&T. P to last 5 sts, W&T.

Bottom of Brim
[Note: While working this section, when you come to a wrapped st, pick up the wrap(s), and knit it (them) together with the stitch it (they) had wrapped.]

K33, W&T. P34, W&T.
K35, W&T. P36, W&T.
K37, W&T. P38, W&T.
K39, W&T. P40, W&T.
K41, W&T. P 42.

Next Row [RS]: K to last st, pick up edge st from top of brim and k it together with last st on left needle.

Next Row [WS]: P to last st, pick up edge st from top of brim and p it together with last st on left needle.

[Note: Knitting edge sts from top of brim together with sts from bottom of brim joins the edges of the top and bottom of the brim, creating a pocket.]

Repeat these 2 rows until bottom of brim measures 1 inch from end of short rows.

BO all sts.

 
FINISHING

Following template [click to download PDF template], cut out a piece of plastic mesh and insert into brim pocket.

Sew the brim pocket closed.

Weave in all ends, sewing hole at top of crown closed, if necessary.

Sew decorative buttons onto band of ribbing, if desired. Split the plies of the yarn and use 1 ply as the sewing thread.

ABOUT THE DESIGNER

Jennifer is a Multimedia Developer during the day, and squeezes in knitting at night. She lives in Dallas with her husband and their puppy.

Her blogging attempts can be seen at pieknits.com.