|
Ravellings on the knitted
sleeve
Part III - Set-in sleeves by the numbers
The last
time we looked at sleeves, we looked at why
set-in sleeves are shaped the way they are, and how
to make a sleeve cap to fit the armscye using either
a graph-paper method of plotting and tweaking, or
the live seat-of-your-knitted-pants method. Both of
those methods give up some amount of certainty in
the finished product in order to avoid some computational
intensity. However, some designers prefer a more mathematical
approach over repeated graphing and measurement, particularly
when a set-in sleeve cap needs to be graded (multisized)
for a pattern. This article addresses the "trigonometry"
comment in the previous sleeve article, complete with
sample numbers.
This is shaping of a bell-shaped
sleeve cap by calculation and estimation, and may
not be for everyone, although the theory is no more
difficult than the Pythagorean Theorem. (You remember
that, right? If not, there's an appendix with a refresher
course.) All that's necessary to accomplish this method
is a little time and a calculator with a square root
function -- if you're sitting at your computer reading
this article, you've got both.
If you really don't want to follow
along, jump down to Quicker fixes
to completely avoid all the computation, and read
a bit about software, short rows, and top-down construction.

The plan
|
Rules
of thumb
You
may recall some of these rules from the last
column on sleeves:
-
The
tighter fitting the sleeve and armscye,
the deeper the sleeve cap needs to be. Conversely,
the looser fitting the sleeve and armscye,
the shallower the sleeve cap will be.
-
The
armscye has a vertical depth (from the initial
bind-off row to the beginning of the shoulder)
and a horizontal depth or indentation (determined
by the number of stitches bound off or decreased).
The greater the vertical depth with respect
to the horizontal indentation, the shallower
the sleeve cap will be.
-
The
final bind-off row on a knitted set-in sleeve
cap usually ranges from 2 to 6 inches. The
narrower the sleeve cap, the shorter the
final bind-off row will be; it follows,
therefore, that with a looser-fitting garment,
the sleeve cap will be shallower so the
final bind-off row will be wider.
All
of the measurements here are presented in inches,
without centimetre equivalents -- there are
enough numbers in this article without including
conversions.
|
As discussed in the last
sleeve article, there are different strategies
available to plan the shape of a set-in sleeve cap.
You need to begin knowing the maximum width of the
sleeve, and the initial bind-off depth at the start
of the sleeve cap. After that, you can decide on the
sleeve cap height first and create the rest of the
cap to fit, or you can decide on some or all of the
remaining decrease rates and allow the height to be
determined that way. In this procedure, we'll establish
the numbers for all the bind-off rows first, then
the decrease rates, and worry about sleeve cap height
last. The sleeve cap will have a bell curve, and it
will likely (but not necessarily) have multiple bind-off
rows leading up to the final bind-off row.
We'll proceed in this order:
-
Set up the sleeve cap with an
initial width and known bind-off measurements
-
Determine the perimeter of the
body armscye
-
Determine a first approximate
decrease sequence to fit the armscye
-
Refine the decrease sequence
to create typical set-in sleeve cap curvature
-
Check measurements, and revise
step 4 if necessary
-
Determine the sleeve cap height
and design the remaining part of the sleeve
In order to shape the sleeve cap,
we need to know the shape of the armscye first. We'll
work with a hypothetical women's pullover with a 40-inch
finished bust measurement and a shoulder width of
15 inches, worked at a gauge of 4 stitches and 5 rows
per inch and intended to be worn with about 2" of
ease. This hypothetical pullover has identically shaped
front and back armscyes, which is normal in hand-knitted
clothing (it also makes the calculations easier).
In this example, both the front
and back armscyes are shaped with the following instructions
(these instructions leave out the neck shaping):
Bind off 4 sts at beg next 2 rows.
Dec 1 st ea side for next 2 rows.
Dec 1 st ea side every other row 4 times.
Work even until armhole measures 8 inches.
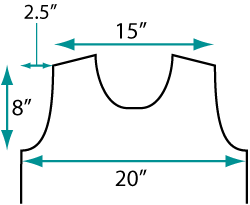 |
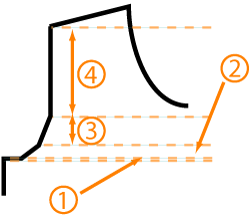
| Dimensions of the
sweater front (and back) to be fit with a set-in
sleeve. |
This decreases the armscye a total
of 10 stitches on each side (that's equal to an indentation
of 2.5 inches), and provides an armhole depth of 8
inches.
Some knitters may take the 8-inch
depth to include the bind-off rows, which means that
a further 28 rows should be worked after the bind-off/decrease
instructions are completed (28 rows even + 12 rows
of decreases and bind-offs = 40 rows, which at a gauge
of 5 rows per inch is 8 inches).
Others may choose not to include
the two bind-off rows, which means that a further
30 rows should be worked. Provided you're not working
at a terribly bulky gauge, two rows won't make much
of a practical difference.
In this example, we won't include
the bind-off rows, or in other words, "work even for
a further 30 rows".
1. Set up the sleeve cap
with an initial width and known bind-off measurements
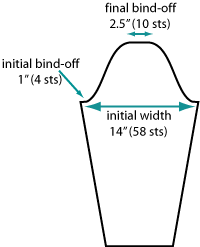 |
| Initial values set
for the sleeve cap. |
Some numbers need to be arbitrarily
fixed. First, the width of the sleeve before
the cap shaping must be set. Some general
rules of thumb set the ease of a sleeve between 50%
and 100% of the ease around the body; in our case,
that would be between 1 and 2 inches around the upper
arm.
We'll say that the wearer would
have a 12-inch upper arm circumference, and set the
width of the sleeve at 14 inches and add a one-stitch
selvedge on either side, which is equal to 58 stitches
at a gauge of 4 stitches to 1 inch. (In this methodology,
the selvedge stitch is not treated any differently
than the rest of the stitches for the purpose of calculation.)
Next, in this method, we need to
fix the final bind-off width. Because
we're also planning to have multiple bind-off rows
at the top of the sleeve cap, the final bind-off width
can be on the narrow side; we'll choose 2.5 inches,
which at our gauge will be 10 stitches. This arbitrary
value is something that you'll come to set according
to your own preferences.
However, if the sleeve is starting
with an even number of stitches right before the sleeve
cap, then the final bind-off row should consume an
even number of stitches in order to be perfectly centred.
Similarly, if the sleeve starts with an odd number
of stitches, the final bind-off should have an odd
number as well.
 |
| The
sleeve cap so far. |
Finally, the initial bind-off
width must be fixed. This will usually be
the same as the initial bind-off shaping on the body
armscye, which in this case is 4 stitches on each
side. In fact, it's almost an unwritten rule for hand
knits -- keeping the initial
bind-off at the same width as the underarm bind-off
makes setting that portion of the sleeve into the
armscye easier.
In the course of shaping the rest
of the sleeve cap, we might tweak the final bind-off
number or the sleeve width by a stitch or two in order
to get all your numbers to fit. However, the initial
bind-off width will never be changed unless we decide
to change the bind-off width on the body.
At this point, we can deduce that,
given these bind-off rows, a further 20 stitches must
be decreased or bound off on either side of the sleeve
cap.
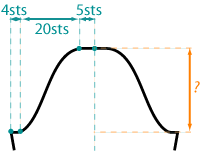
Now it's time to calculate the perimeter
of the armscye, which is where the trigonometry comes
in.
2. Determine the perimeter of the body armscye
The armscye can notionally be divided
into different shaping zones: one for each region
having a different bind-off or decrease frequency.
We need to calculate the approximate length of the
garment edge for each of these zones. In our hypothetical
sweater, each side has four such zones:
| Zone |
Decreased/
bound-off stitches |
Number of rows |
|
| 1 |
4 stitches |
0 rows (these are the bind-off rows, and we'll
ignore their height for the purpose of calculation) |
 |
| 2 |
2 |
2 ("dec 1 st ea side for next two rows") |
| 3 |
4 |
8 ("dec 1 st ea side every other row 4 times") |
| 4 |
0 |
30 ("work even until armhole measures 8 inches") |
| total |
10 |
40 rows |
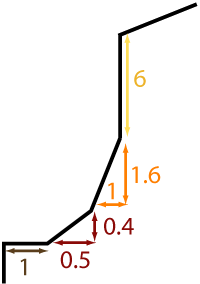
First we convert these stitch and
row numbers to inches, based on a gauge of 4 stitches
and 5 rows per inch:
| Zone |
Decrease/
bind-off length |
Height (depth) |
|
| 1 |
1 inch |
0 inches |
| 2 |
0.5 |
0.4 |
| 3 |
1 |
1.6 |
| 4 |
0 |
6 |
| total |
2.5 inches |
8 inches |
Now, we need to calculate the perimeter
associated with each zone (refer to the appendix on
the Pythagorean Theorem if necessary):
| Zone |
Decrease/bind-off length |
| 1 |
1 inch |
 |
| 2 |
0.64 |
| 3 |
1.89 |
| 4 |
6 |
| total |
9.53 inches |
Thus, half an armscye -- either
the front or the back half -- has a perimeter of 9.53
inches. The total perimeter of the entire armscye,
then, is 19.06 inches. This means that the perimeter
of our sleeve cap, if it is to fit the armscye, must
measure 19.06 inches as well; it may even be longer
than that, say about another inch longer, and it will
still fit into the armscye without noticeable puckering.
Therefore, we'll aim for a sleeve cap with a perimeter
that measures between about 19.06 and 20.06 inches.
Because our armscye and sleeve cap
are symmetric, we can work in terms of a half-armscye
and half-sleeve cap. Therefore, we want to create
a sleeve cap with a half-perimeter measuring between
9.53 and 10.53 inches. We certainly won't be designing
a sleeve cap to this level of precision; an approximate
number like 9.5 or 10.6 inches will be fine.
You might have figured out that
the real lengths of zones 1 and 4 are not exactly
1 inch and 6 inches, but could be more or less depending
on how the side and shoulder seams are joined. The
side seam will not be an issue, because the initial
bind-off in zone 1 will be matched by the sleeve cap
shaping, and the sleeve seam will have the same seam
allowance as the side seam. As for the shoulder seam,
that's not enough to make a significant practical
difference.
3. Determine a first approximate
decrease sequence to fit the armscye
Now, to fill in the big blanks in
the sleeve cap shaping. In this method, we'll follow
some rules:
-
No
more than one decrease per edge in any row.
For example, "dec 1 st ea side for next 4 rows"
is acceptable, but "dec 2 sts ea side for next
2 rows" is not. If your computations suggest that
you need to work more pairs of decreases than
you have available rows, then you will need to
either expand or increase the number of bind off
rows, by adding another pair of bind-off rows
at the bottom or top of the sleeve cap, or by
increasing the number of stitches bound off at
the top of the sleeve cap. The only bind-off row
that is inviolate is the initial pair of bind-off
rows: the ones that match the initial pair of
bind-off rows on the body.
-
It's preferred, but not mandatory,
to keep easy-to-follow
decrease rates on the sleeve cap,
such as every row, every other row or every fourth
row. This keeps as many decreases as possible
on the right side of the fabric, because this
seems to make instructions easier to follow for
some knitters. If it's simply not possible to
follow that rule, then go ahead and decrease on
every third row. ("Every third row" is easier
for a knitter to follow than "every second and
fourth row alternately", although "every second
and fourth row alternately" does keep all decreases
on the right side.)
-
If you find that you need to
do a lot of tweaking to your sleeve cap, and you
really need guidance on where to end one set of
decreases and start decreasing with a different
frequency, try following the general rule of keeping
the point of inflection on the sleeve
cap shape in approximately the right place.
Point of inflection?
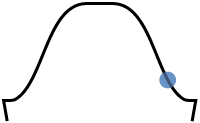
The typical set-in sleeve cap gains
its bell-like shape from a change in the curvature
from positive to negative. This change is an inflection
point. For those of you who love calculus, no
further explanation of an inflection
point is needed. For those of you who don't, it's
the point where the sleeve cap stops being concave
upwards (around the underarm) and starts being concave
downwards (around the shoulder). For those of you
who didn't like the word "concave", the point of inflection
is the big blue dot in the diagram. See?
That point corresponds to the point
on the armscye where the decreasing stops and the
straight vertical part starts. In practice, the curvature
of a hand-knitted sleeve cap doesn't always immediately
switch to an obvious negative curvature at the point
of inflection; it just stops being obviously positive
by that point. Furthermore, the bulkier your gauge,
the less scope there is for refining the curvature
of the sleeve cap, because you simply don't have enough
stitches and rows to follow a precise curve. (Think
of intarsia--if you tried to knit a graphic design
in a fixed area, you get a lot more detail if you
knit at a finer gauge.) So, when drafting the sleeve
cap, if we take the point of inflection into consideration,
we won't aim for absolute mathematical certainty;
we'll just aim to keep the point of inflection in
that neighborhood.
In our hypothetical sweater, the
point of inflection occurs at the junction of zone
3 and zone 4. So, a half sleeve cap to fit this half
armscye will curve around the underarm, but that curvature
will have stopped by the time the perimeter equals
3 inches.
Now, how would these underarm and
shoulder curvatures be represented in knitting? If
you described the underarm curvature in words, you'd
say that it starts out flat, begins a shallow curve,
and gradually climbs so that the angle gets steeper
and steeper. The shoulder curvature starts out steep,
but gradually eases off to be shallow, then becomes
totally flat at the final bind-off. If you described
it in numbers, in our bell-curve-like sleeve cap you'd
say that the tangent of the sleeve cap curve starts
at zero degrees and increases to a maximum angle,
then decreases again to zero. Either way, in the context
of knitting a sleeve cap:
-
A flat line (zero degree tangent)
corresponds to a bind-off.
-
A very shallow curve corresponds
to multiple decreases in each row(preferably,
a bind-off row or two).
-
A shallow curve corresponds
to one decrease in every row.
-
As you reduce the frequency
of decreases to one decrease every other row,
to every three rows, four rows, etc., the curve
becomes progressively less shallow, or progressively
steeper.
Filling in the numbers: first
attempt
First, let's add a little more shaping
to the top of the sleeve cap. We've already fixed
a final and an initial bind-off width. If you were
to picture the sleeve cap in your mind's eye at this
point with a constant decrease rate between the bottom
and top of the sleeve cap, you could imagine that
there'd be a rather sharp corner at the very top --
not very curvy. This is one area where we'd like a
very shallow curve, so we could add some further,
shorter bind-off rows leading up to the final row
to soften the angle.
A good first attempt for this area
is to add 50% of the final bind-off width to either
side of the final bind-off row, and to split this
50% over a couple of bind-off steps -- maybe evenly,
or maybe in a roughly two-thirds/one-third proportion.
In our hypothetical sleeve cap, we had a final bind-off
of 10 stitches (2.5 inches), so we'll add some more
bind-off rows that remove a further 5 stitches (50%)
on either side. And we'll split that up over a couple
of steps, which in this case is 3 stitches + 2 stitches.
If you graphed this sleeve cap, it would look like
this [see below]: (if you were using this method of
calculating sleeve cap shaping, you likely wouldn't
bother plotting it out; these graphs are provided
for illustration)
 |
| Graphed schematic
of the sleeve cap after estimating the final bind-off
rows (this graph is to scale, but the total height
of the sleeve cap at this point is only an estimate). |
The corresponding sleeve cap instructions
would read like this:
[instructions from wrist to sleeve cap shaping]
58 sts on needle.
Bind off 4 sts at beg of next two rows.
[decrease instructions to be filled in]
Bind off 2 sts at beg of next two rows, then 3 sts
at beg of foll two rows.
Bind off remaining 10 sts.
We're now left with 15 stitches
to decrease on either side of the sleeve cap. We need
to figure out how to do that, while keeping the half-perimeter
of the sleeve cap between 9.53 and 10.53 inches.
Each half sleeve cap has
an initial bind-off of 4 stitches (equal to 1 inch
of the perimeter) and a final bind-off of 5 stitches
at the very top (equal to 1.25 inches). We've now
added further bind-offs of 5 stitches over 4 rows.
In terms of inches, that's a length of 1.25 inches
over a height of 0.8 inches. The approximate perimeter
measurement of this segment is about 1.48 inches.
Therefore, in total, the bind-off rows in the above
diagram take up about 3.73 inches of a half-sleeve
cap perimeter (1 + 1.25 + 1.48 inches). This means
that the remaining part of the half-sleeve cap, in
which the 15 stitches must be decreased, must cover
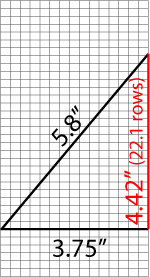
a length of between 5.8 inches (9.53 - 3.73 inches)
and 6.3 inches.
 |
| Calculating the number
of rows available for the remainder of the sleeve
cap shaping. |
For a first estimate, we'll calculate
what average decrease rate will give us the perimeter
we need. 15 stitches to be decreased is equal to 3.75
inches of width. If this was one short leg of a right
triangle, and the 5.8 inches was the hypotenuse, then
the height of that triangle would be approximately
4.42 inches. In our gauge, that's 22.1 rows (we'll
make use of some of the half inch of tolerance we
have in determining the perimeter of the sleeve cap,
and round that up to 23 rows). In other words, then,
if we decreased 15 stitches more or less consistently
over 23 rows, we'd fit our sleeve cap.
To figure out the decrease frequency,
we'll divide 23 rows by 15 stitches to arrive at 1.53
rows per stitch: in other words, if we worked a decrease
approximately every 1.5 rows, we'd fit our target
perimeter measurement. In this case, decreasing one
stitch every 1.5 rows is the same as decreasing 2
stitches every three rows, or something like "decrease
1 st every other row and every row alternately". If
we used this decrease, the instructions would look
like this:
[instructions from wrist to sleeve cap shaping]
58 sts on needle.
Bind off 4 sts at beg of next two rows.
Decrease 1 st ea side every other row and every
row alternately until 20 sts remain.
Bind off 2 sts at beg of next two rows, then 3 sts
at beg of foll two rows.
Bind off remaining 10 sts.
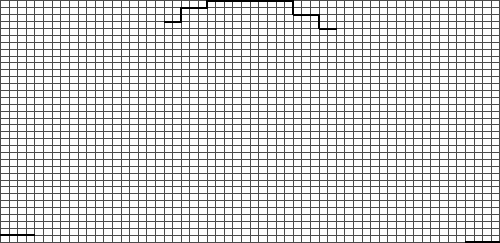
Now, we could stop there, and use
this type of decrease for our sleeve cap. We'd wind
up with a relatively simple trapezoidal shape, and
if plotted on proportional graph paper, it would look
like this:
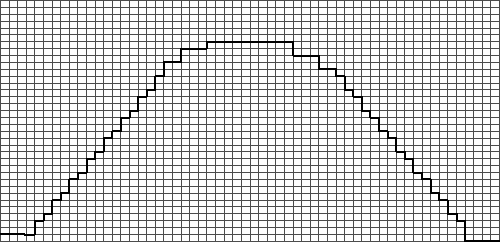 |
| A first estimate
for a sleeve cap. |
That's a roughly 5.4 inch high sleeve
cap. And it doesn't look too bad for a first attempt.
4. Refine the decrease sequence
to create typical set-in sleeve cap curvature
Even though the first attempt at
a sleeve cap looks pretty good, it's not the best.
We could leave the sleeve cap as is and move
on to the next step, but from a pattern-writing perspective,
working decreases "every other row and every row alternately"
is annoying to write and frustrating to follow. Also,
depending on fitting preferences, this sleeve cap
might look too shallow or seem a little too trapezoidal.
If the decrease rate was the only
concern, we could address it by splitting up the every-row
decreases and every-other-row decreases, so that every-row
decreases are worked first, and the decreases every
other row second. Currently, our "decrease 1 st ea
side every other row and every row alternately until
20 sts remain" instructions result in 8 every-other-row
decreases, and 7 every-row decreases. If all the every-row
decreases were worked first, the sleeve cap edge would
look like the outline on the left, below. But we could
also work all the every-other-row decreases first,
as shown in the middle outline. We could even split
up the decreases, and work some every-row decreases,
then the every-other-row decreases, and then the rest
of the every-row decreases, as shown below.
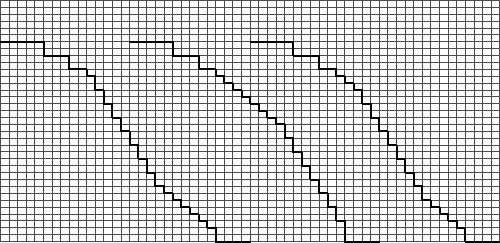 |
| Changing the arrangement
of the decreases: placing the higher-frequency
decreases first (left), second (middle), and before
and after the lower-frequency decreases. |
So how would we divide up these
decreases? If our objective is a shape resembling
a bell curve, we can see by comparing the outlines
above that the rightmost shape is the most desirable;
from the initial bind-off, the sleeve cap begins with
a shallow curve, gets steeper, then tapers off with
another shallow curve before the final bind-off row.
If we used this shape, our instructions would read:
[instructions from wrist to sleeve cap shaping]
58 sts on needle.
Bind off 4 sts at beg of next two rows.
Decrease 1 st ea side every row 4 times, then every
other row 8 times, then every row 3 times.
Bind off 2 sts at beg of next two rows, then 3 sts
at beg of foll two rows.
Bind off remaining 10 sts.
We could take that and move on to
the next step. But if you're more obsessive than this,
and you really wanted to read the words "point
of inflection" again, we could try to place that transition
from every-row to every-other-row decreases at the
approximate point of inflection.
To figure out how to make the decrease
frequency change at the point of inflection, first
we need to figure out what portion of the perimeter
leads from the underarm to the inflection point. As
we figured out earlier, that portion of the perimeter
is 3 inches; the first inch of that consists of a
bind-off edge, both on the sleeve cap and the armscye.
This means that the first set of "decrease 1 st ea
side every row" must be carried out over enough rows
to equal a perimeter of 2 inches. To do this, we'd
figure out the approximate length of a single decrease
over a single row (that's the diagonal of 1 stitch
and 1 row, which at our gauge is equal to about 0.32
inches), and figure out how many of those lengths
go into 2 inches (the answer is approximately 6.25;
let's round that down to 6). This means that 6 of
the every-row decreases would be worked first, then
the set of every-other-row decreases, and then the
last every-row decrease would be worked again:
[instructions from wrist to sleeve cap shaping]
58 sts on needle.
Bind off 4 sts at beg of next two rows.
Decrease 1 st ea side every row 6 times, then every
other row 8 times, then every row once.
Bind off 2 sts at beg of next two rows, then 3 sts
at beg of foll two rows.
Bind off remaining 10 sts.
We've eliminated the annoying decrease
instructions, and we've given the sleeve cap a more
bell-like curve. If there are other things to be tinkered
with, such as the sleeve cap height, this is the time
to do it. Remember that we can add up to about half
an inch to each side of the sleeve cap without seriously
affecting the assembly of the sweater, so an easy
way to sneak in a bit more height is to simply add
a couple of rows. We'll do it in this example, just
for fun. We'll turn two of those every-row decreases
into every-other-row decreases. This will shift the
point of inflection on the sleeve cap downwards. That's
okay -- we didn't move it too far.
And while we're at it, see those
instructions to bind off 2 stitches at the beginning
of two rows? That's just silly, because while it's
equivalent to decreasing 1 stitch at each end for
two rows, it has the disadvantage of adding a stair-step
edge to the sleeve seam. We put those bind-offs in
when we worked on the final sleeve cap shaping; they're
not mandatory. This is a good time to turn them into
decrease instructions.
Now, our instructions read like
this:
[instructions from wrist to sleeve cap shaping]
58 sts on needle.
Bind off 4 sts at beg of next two rows.
Decrease 1 st ea side every row 4 times, then every
other row 10 times, then every row 3 times.
Bind off 3 sts at beg of foll two rows.
Bind off remaining 10 sts.
And our sleeve cap looks like this:
 |
| The final sleeve
cap (we hope). |
5. Check measurements, and
revise step 4 if necessary
It's not necessary to check your
measurements over again if you simply used that first
approximation of the sleeve cap. In this example,
it probably isn't even necessary to double-check that
the sleeve cap perimeter is no more than an inch longer
than the armscye perimeter--all we did was rearrange
some decreases, then stick in a couple of more rows.
However, if you do any further tweaking, and if you
decide to alter the width of bind-off rows, or adjust
the height of the armscye or the width of the sleeve
before the sleeve cap shaping, it's a good idea to
make sure that the sleeve cap will still fit the armscye.
You may find that you need to undo some of your tweaks.
6. Determine the sleeve
cap height and design the remaining part of the sleeve
We're just about done. All that
remains is to figure out how to knit the rest
of the sleeve, which is a lot easier than what we
just did. For this, we need to know the total length
of the sleeve, and the width at the bottom. This is
covered in the first
and second
sleeve articles.
And that's it.
Quicker fixes: software,
short rows, and knitting from the top down
You can avoid the entire process
of calculating armscye and sleeve cap shaping on your
own by using software designed to
generate knitting patterns based on your input measurements.
It's up to you whether the savings in labour is justified
by the expense.
Depending on your design needs,
some knitting software may not give you the degree
of control that you want over the precise fit and
silhouette of a set-in sleeve. You'd need to explore
each program's capabilities to see if you can adjust
the sleeve cap height or final bind-off width, for
example. If possible, try a demo version of the software
first, to see if it will generate the type of set-in
sleeve that you want.
Next, a word on being clever with
short row shaping on a sleeve cap:
you may be familiar with short-rowed
shoulders, which make seaming slanted shoulders
a snap by eliminating the stair-step effect caused
by repeated bind-off rows. It might occur to you to
do the same thing with a sleeve cap worked from the
bottom up, since a smooth edge is easier to work with
than a jagged edge, and in fact, it's a good idea.
However, you need to exercise caution:
working short rows creates an angled line of live
stitches (a hypotenuse, if you will), longer than
the width of the same number of stitches worked straight
in an unangled row. Finishing a series of short rows
normally involves knitting across all stitches,
hiding any wraps, using the same number of
live stitches. This will cause the short-rowed area
to draw in, or cup (such as in short row bust shaping).
If this happens at the top of a sleeve cap, the cap
will curve over the shoulder like a tailored suit
-- but the final sleeve cap perimeter will be too
tight to fit the armscye, unless you increase a few
stitches when knitting the final full row to flatten
the sleeve cap out to its originally intended dimensions.
If you want to deliberately curve
the sleeve cap in this manner, then the sleeve cap
will need to be resized to fit the armscye, and you
should first ensure that the shoulder seam will hit
the shoulder at precisely the right point. Otherwise,
the sleeve cap will cup too low on the arm or too
high on the shoulder, like a misplaced puffed sleeve.
And speaking of short rows, a short-row
method is used by Barbara Walker in her book, Knitting
from the Top, to create top-down set-in
sleeves that are picked up from the armscye
and worked down towards the wrist. In essence, the
stitches required to meet the maximum sleeve width
are picked up around the armscye; the sleeve cap is
shaped by beginning with a fixed proportion of stitches
centered at the shoulder, and working short rows that
consume one additional stitch at the end of each row
until the bottom of the armscye is reached. In bottom-up
terms, that's equivalent to a decrease of one stitch
at each end on every other row between the initial
bind-off rows and a single, final bind-off row. This
creates a simple trapezoidal sleeve cap rather than
a more complex bell shape.
Like the computationally intense
method we worked through above, Walker's method doesn't
bother establishing the height of the sleeve cap before
figuring out the shaping; it sets the width at the
top of the sleeve cap, and the width of the lower
horizontal portions of the sleeve cap outline, then
fills in the rest. However, unlike the method used
in this article, Walker's method is not concerned
with working a sleeve cap that matches the perimeter
measurement of the armscye; rather, the sleeve cap
is "forced" to match the perimeter measurement, because
the sleeve cap stitches are picked up around the armscye
using whatever stitch-to-row proportion is necessary
to distribute the stitches evenly among the rows of
the armscye. The sides of the sleeve cap trapezoid
fit neatly into the curved armscye portions because
the stitch gauge of the sleeve cap is distorted when
the stitches are picked up around the armscye.
The Walker top-down sleeve has a
relatively wide upper edge (the edge that would normally
be the final bind-off edge when knitting from the
bottom). In the proportions used by Walker, the upper
edge of the sleeve cap is one-third of the maximum
sleeve width. Thus, for the sleeve width in our hypothetical
sweater example, Walker's upper edge would measure
about 4.7 inches straight across, whereas we had 2.5
inches (softened with a further pair of bind-off rows).
Strictly following Walker's methodology also yields
a strange result: you'd discover that the narrower
the sleeve, the shorter the sleeve cap will be, and
the wider the sleeve, the longer the sleeve cap will
be. This contradicts the general rule of thumb that
a close-fitting sleeve should have a deeper sleeve
cap. Theoretically, the effect of strictly following
the Walker method in a tight, short sleeve
would be a sleeve hem that does not fall horizontally
across the upper arm; instead, the sleeve fabric would
be stretched by the bulk of the shoulder and upper
arm, and the sleeve hem would appear curved or arched
over the upper arm. (This might produce the impression
that your upper arms are either muscular or fat. But
that depends on your own perspective.) Such fitting
concerns could be addressed by altering the proportions
of the stitches picked up around the armscye, and
changing the lengths of the short rowsto produce a
more rounded cap.
References
Walker, Barbara, Knitting from the
Top [Schoolhouse Press, 1996].
And see the references in the previous
two Thinking Beyond the Pattern columns on sleeves
[1,
2].
|
Appendix:
Pythagoras says...
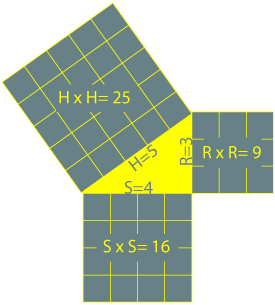
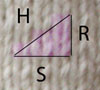
In a
right-angled triangle, the square of the length
of the hypotenuse (H) is equal to the
sum of the squares of the other two sides (S
and R). In the diagram to the right,
you can see that the squares of the two shorter
sides is equal to the square of the longest
side (9 + 16 = 25).
So,
if you've got your trusty calculator, here's
how you'd figure out the following numbers:
1. If
you know S and R, figure out H
like this:
-
calculate
the square of each of S and R
-
add
the square of S to the square of
R
-
take
the square root of that result to get H
Most
calculators will give you the answer if you
press these buttons: [where you see "S"
or "R", type in the number that you have
for those values]

On your
calculator, the square and square root functions
may be on the same button, and one will require
you to press a "shift" or "inv" key first.
2. If
you know H and S, figure out R
like this:
-
calculate
the square of each of H and S
-
subtract
the square of S from the square of
H
-
take
the square root of that result to get R
And
most calculators will give you the answer if
you do this:

3. If
you know H and R, figure out S
by using the same logic. The calculator instructions
would run like this:

The
Pythagorean Theorem applies handily to knitting,
because most knitting creates a grid of stitches,
in which the rows are perpendicular to the columns.
The two shorter sides of a knitted right-angled
triangle can be represented by the number of
stitches and rows; the hypotenuse, which is
the longest side, runs diagonally, and could
roughly follow an increase or decrease edge.
A slight
confounding factor arises in that the height
of a stitch usually isn't the same as the width
of the stitch, but that can be dealt with by
converting all stitches and rows to inch (or
centimeter) measurements.
|
|