|
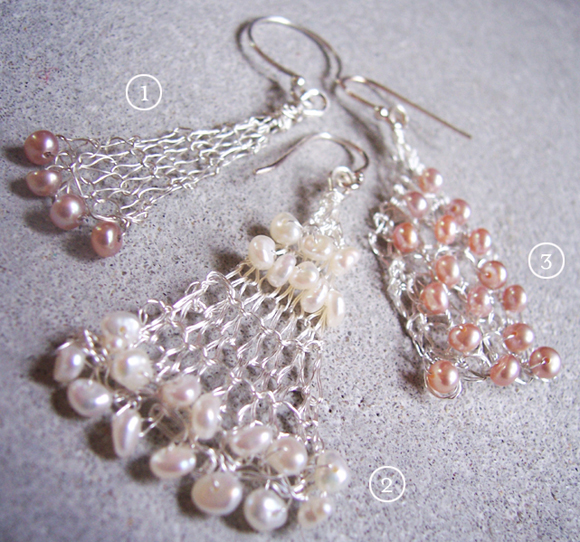
EARRINGS 1 [shown at right] (Make 2)
Prestring 4 beads on wire.
Note: if you are not using
sterling wire, use
two strands of artistic wire held together, and string
beads on one of the strands.
CO 5 sts, beginning with
a lark's head knot and continuing with the backward loop
method.
Row 1: [K1, place bead]
four times, k1. 4 beads
placed.
Rows 2-7: K all sts.
Row 8: Ssk, k1, k2tog.
3 sts.
Rows 9-11: K all sts.
Cut wire, leaving 4-inch
tail.
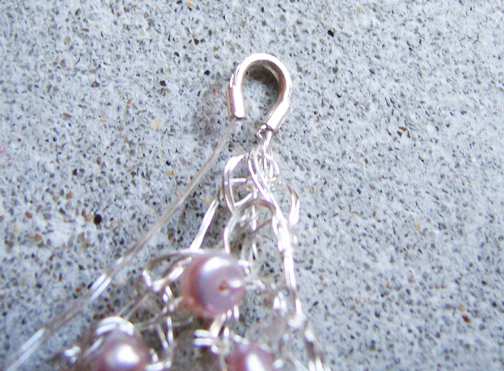
Thread wire through live
stitches and through
cable thimble, then run
through live stitches
and cable thimble again
[see photos below]. Wrap
tail around top of knitted
piece and wrap wire around
itself to secure.
Trim wire.
EARRINGS 2 [shown at right] (Make 2)
Note: Use two strands of wire held
together throughout.
Prestring 22 beads on ONE strand of wire.
With wire doubled, CO
8 sts, beginning with
a lark's head knot and
continuing with the backward
loop method.
Rows 1 and 2: [K1, place
bead] seven times, k1. 7 beads placed in each row.
Note: This is a good
time to finger block the piece so that the beads are arranged
as shown in the photo.
Rows 3-5: K all sts.
Row 6: Ssk, k4, k2tog.
6 sts.
Row 7: K all sts.
Row 8: [K1, place bead] five times, k1. 5 beads placed.
Row 9: K all sts.
Row 10: Ssk, k2, k2tog.
4 sts.
Row 11: [K1, place bead] three times, k1. 3 beads placed.
Cut wire, leaving 4-inch
tail. Thread wire through
live stitches and through
cable thimble, then run
through live stitches and cable thimble again [see photos
below] . Wrap tail around top of knitted piece and wrap wire
around itself to secure.
Trim wire.
EARRINGS 3 (Make 2)
Note: Use two strands of wire held together throughout.
Prestring
16 beads on ONE strand
of wire.
With wire doubled, CO 6 sts, beginning with
a lark's head knot and
continuing with the backward
loop method.
Row 1: K1, place bead,
[k2, place bead] twice,
k1. 3 beads placed.
Even-Numbered Rows 2-12: K all sts.
Row 3: K2, [place bead,
k2] twice. 2 beads placed.
Row 5: Work as for Row
1.
Row 7: Work as for Row
3.
Row 9: Work as for Row
1.
Row 11: Ssk, place bead,
k2, place bead, k2tog.
2 beads placed; 4 sts.
Row 13: Ssk, place bead,
k2tog. 1 bead placed;
2 sts.
Row 14: K2.
Cut wire, leaving 4-inch
tail. Thread wire through
live stitches and through
cable thimble, then run
through live stitches and cable thimble again [see photos
below] . Wrap tail around top of knitted piece and wrap wire
around itself to secure. Trim wire.
|