![Read exactly what FREE PATTERNS really means...respect our designers and authors rights [and thank you]](../images/OFFnavLEGAL.gif)
![Read exactly what FREE PATTERNS really means...respect our designers and authors rights [and thank you]](../images/OFFnavLYS.gif)

 
|
|
 <click for more! <click for more!
|
 |
|
 |
|
This issue of Knitty is printer friendly. To print, simply click the option you wish from the buttons on the right: print all text, images, charts and schematics OR print all text, charts and schematics and just the first pattern image, to save paper and ink. |
|
 |
|
 |
|
|

|
|

|
|
|
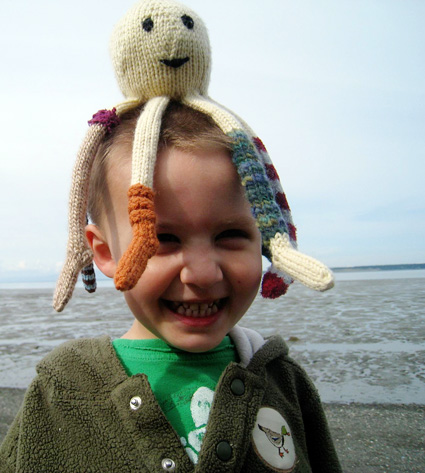
 model: Milo
photos: Laura Edwards
model: Milo
photos: Laura Edwards |
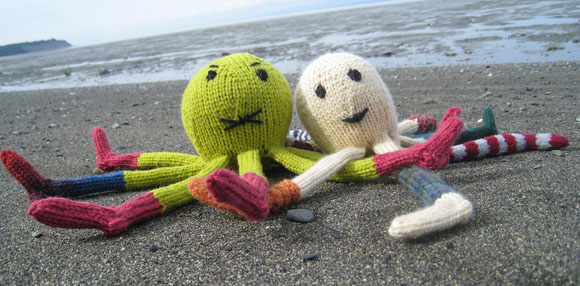
by Laura Edwards

Out of my idea to knit a toy came
Socktopus. I had picked
up a slightly used ball of yarn with “toy” in
my mind. By the time I was decreasing the head, I realized
there wasn’t going to be enough yarn for a whole toy
in one color. Like most knitters, though, I have plenty of
other bits lying around!
Socktopus uses simple increases
and decreases for shaping
and a little short-row heel on each sock. The heel is so
small, even if you have to redo it, it only takes a minute!
Great if you’ve never done
a short-row heel.
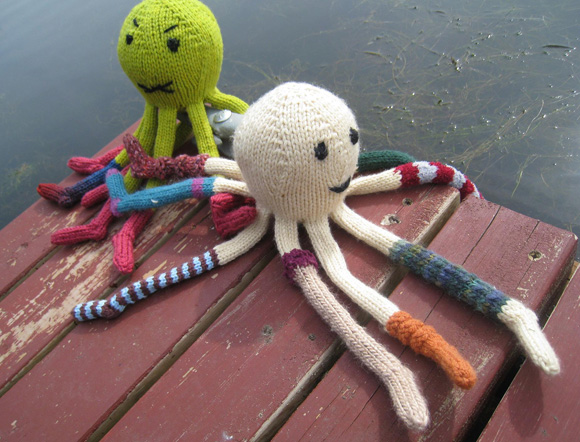
This pattern is a great
way to use up yarn leftovers
to make something fun!
Using yarn from previous projects is a great way to remember
them.
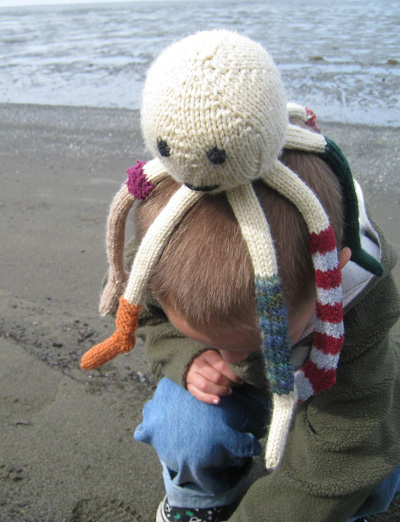
Socktopus makes a quick and cute last minute
gift for anyone, especially kids, as it’s
easy to grab and tote
around. |
|
One |
Height: approx. 10.5 inches, including
legs
Head/Body circumference: approx. 11 inches |
| |
This
toy can be made using yarns with recommended ball band gauge
ranging from 14-19 sts to 4 inches. Yarns will be knit at
a tighter tension than usual, to achieve a tight, firm fabric.
[MC] Green
version: Rowan Cork [90% merino wool, 10% nylon;
120yd/110m per 50g ball]; color: #050 Sour; 1 ball
[MC] Cream
Version: Debbie
Bliss Cashmerino Aran [55% merino wool, 33% microfibre, 12%
cashmere; 98yd/90m per 50g ball]; color: #101; 1 ball
[CC] To work each sock in a different color, you'll need
approx. 5yd/4.5m each of 8 different colors of yarn. CC yarns
shown include Debbie Bliss Soho, Brown Sheep Lamb's Pride
Worsted, Mission Falls 1824 Wool, Plymouth Yarns Oh My, Zitron
Loft and Sirdar Snowflake.
Recommended needle size:
1
set US #7/4.5mm double-point needles (or size needed to obtain
fairly tight fabric)
[always use a needle size that gives you the gauge listed below -- every knitter's gauge is unique]
Safety
pin or split ring marker
Waste yarn
Yarn needle
Small amount of black
yarn or embroidery floss, for embroidering face
Fiberfil or alternate
stuffing
|
|
22 sts/30 rows = 4 inches in stockinette
st
Note: Exact gauge isn't important for this project. Just be sure that your
fabric is firm and tight, so that the stuffing will not leak. |
| |
[Knitty's list of standard abbreviations and techniques can be found here.] |
Directions for the Backward Loop Cast
On can be found
here.
Directions are not given for the color patterns used for
each leg. Instead, change yarns and colors when you wish,
to achieve the look you want. Here are some ideas:
- Socks: Change to contrast
color when leg is desired
length, and continue with
contrast color until leg is complete.
- Stripes: Use two colors, alternating
every 1-4 rows, carrying yarn not in use
loosely along WS of work
(inside leg).
- Scrunchy Sock: Alternate knit
and purl rounds to give some texture.
- Athletic Sock: Use a second
color for a stripe at the top of the sock, and
for the heel and toe.
- Stocking: Use a novelty yarn
for a cuff and something with a little shimmer for
the stocking.
- Leg Warmer: Break contrast
yarn a round or two before
heel shaping, use MC to finish the foot. |
| |
HEAD/BODY
Using MC, CO 3 sts onto
one double-point needle.
[Kfb] in each st. 6 sts.
Divide sts between needle and join to begin working in the
round, being careful not to twist. After the first few rounds
have been worked, place safety pin or split ring marker in
work to indicate beginning of round.
Round 1: [Kfb] in each st. 12 sts.
Even-Numbered Rounds
2-28: K all sts.
Round 3: [K1, kfb] 6
times. 18 sts.
Round 5: [K2, kfb] 6
times. 24 sts.
Round 7: [K3, kfb] 6
times. 30 sts.
Round 9: [K4, kfb] 6
times. 36 sts.
Round 11: [K5, kfb] 6
times. 42 sts.
Round 13: [K6, kfb] 6
times. 48 sts.
Round 15: [K7, kfb] 6
times. 54 sts.
Round 17: [K8, kfb] 6
times. 60 sts.
Rounds 19 & 21: K all sts.
Round 23: [K8, k2tog]
6 times. 54 sts.
Round 25: [K7, k2tog]
6 times. 48 sts.
Round 27: [K6, k2tog]
6 times. 42 sts.
Round 29: [K19, k2tog]
twice. 40 sts.
K 5 rounds.
LEGS
K5; place remaining 35 sts on hold on waste yarn. Divide
the 5 sts on the needle
between 2 needles. Continuing from these sts, CO 3 sts using
backward loop method, and place these 3 sts on a third needle.
8 sts. Join to begin working in the round. Beginning of round
is located at end of newly cast-on sts; if desired, place
pin or marker in work to indicate beginning of round.
Changing colors as desired
(see Pattern Notes), work in stockinette st until leg measures
6 inches.
Heel and Foot:
Wrap first st of next row and turn work (W&T).
Row 1 [WS]: P4, W&T.
Row 2 [RS]: K3, W&T.
Row 3 [WS]: P2, W&T.
In following rows, when working a st which had been wrapped
on a previous short row, pick up the wrap and work it together
with the wrapped st.
Row 4 [RS]: K3, turn
work.
Row 5 [WS]: Sl 1, p3,
turn work.
Row 6 [RS]: Sl 1; resume
working in the round.
Work in stockinette st
until foot measures 1.25
inches from last row of heel.
Next Round: [K2tog] 4 times. Break yarn and draw through
remaining 4 sts, pull tight. Thread yarn tail once more through
these 4 sts and draw yarn tail to inside of leg.
Make 7 more legs in the same way. For each, transfer next
5 held sts of body to needles, rejoin yarn and and work as
for first leg.
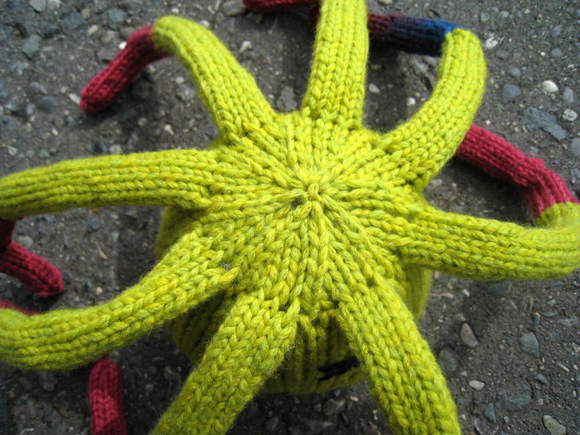
LOWER BODY
Using MC, pick up and k 3 sts (1 st in each CO
st) at base of each leg, and 1 st in each space between legs.
32 sts. Join to work in the round, placing pin or marker
in work to indicate beginning of round. Stuff toy as you
knit the lower body. Do not stuff legs.
Rounds 1-2: K all sts.
Round 3: K2, [k2tog k6]
3 times, k2tog, k4. 28 sts.
Round 4: [K5, k2tog]
4 times. 24 sts.
Round 5: K1, [k2tog,
k4] 3 times, k2tog, k3. 20 sts.
Round 6: [K3, k2tog]
4 times. 16 sts.
Finish stuffing toy to
desired firmness.
Round 7: [K2tog] 8 times.
Break yarn, draw through
remaining 8 sts and pull tight. Thread yarn tail once more
through these 8 sts and sew in end securely. |
| |
Weave in ends. Using desired
color, embroider face on head/body. |
| |
|
Laura lives, works and knits in Alaska.
She is lucky enough
to have a husband, son,
friends and many other
relatives who appreciate
knitted gifts. She blogs
here.
|
| Pattern & images © 2008
Laura Edwards. Contact Laura |
|
|
|
|
|