Note:
chart links will take you to a PDF file. You'll
need the free Acrobat reader to view the charts.
Get it here.
Body
[knitted in the round in one piece]
With smaller circular needle and MC,
CO 198[210, 218] stitches.
Join, being careful not to twist stitches.
Place a marker at the beg of the rnd and after
st 99[105, 109].
Work St st [K every row] for 1 inch to create
a facing.
P 1 rnd for the fold line.
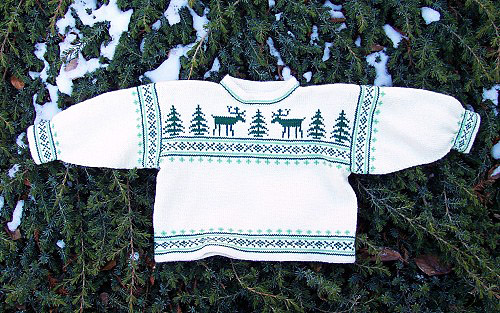
Work Chart
A, beginning the pattern as indicated
on the graph for your size.
When you reach the end of the chart, you will
be at the side marker.
Start the pattern over again from the beginning
of the chart, work to the end of the rnd.
When
you have completed Chart
A, change to the larger circular needle.
Work St st with MC until the body measures
6[6.75, 7.75] inches from the fold line.
Begin
Chart
B, beginning the pattern as indicated
on the graph for your size, work to the end
of the chart for your size [at the side marker],
repeat the chart for the back.
When
you have completed Chart
B, work Chart
C in the same manner.
When
you have completed Chart
C, work until the body measures 10.25[11.25,
12.25] inches from the fold line.
Front
neck shaping
Work
the first 42[44, 46] sts, cast off the next
15[17, 17] sts, then work to the end of the
rnd. 183[193, 201] sts remain.
Break off yarn and move the left front shoulder
sts from the left needle to right needle.
Reattach yarn and begin working back and forth.
BO 3[4, 4] stitches at the beg of the next
2 rows, then 2 sts at the beg of the next
4 rows, then 1 st at the beg of the next 6
rows.
At the same time, when the body measures 11.5[12.5,
13.5] inches, shape the back neck.
Back
neck shaping
BO the center 29[31, 33] sts of the
back for the neck opening and work to the
end of the row.
Working each side of the body separately,
BO 2 stitches at the neck edge on every other
row twice.
Work until the body measures 11.75[13, 14]
inches and BO all sts.
Complete the other side to match.
 Sleeves
With smaller dpns and MC, CO 45[49,
49] sts.
Join, place marker, and work in the round
in St st for 1 inch, then P 1 rnd for the
fold line.
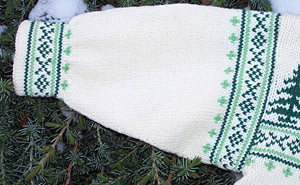
Work Chart A, placing the center stitch of
the graph at the center of the sleeve.
K 1 rnd with MC, inc 14[14, 16] sts evenly
over the sleeve for a total of 59[63, 65]
sts.
Change to larger dpns and continue to work
in St st with MC.
Inc 1 st at the beg and end of every 3rd rnd
14[17, 20] times, leaving 2 sts between increase
stitches until you have a total of 87[97,
105] sts.
At the same time, when the sleeve measures
6.25[7.5, 8.5] inches from the fold line,
work Chart B, placing the center stitch of
the graph at the center stitch of the sleeve,
working any increases into the pattern.
When Chart B is complete, work 2 rnds in MC.
P 6 rnds in MC for facing and BO all.
Make
the second sleeve the same as the first.