Crochet Cast On Crochet Cast On
Using waste yarn,
work a crochet chain several
sts longer than the number
of sts to be cast on. Starting
1 or 2 sts in from end of chain
and using working yarn, pick
up and k 1 st in the back loop
of each ch until the required
number of sts have been picked
up. Later, the chain will be
unraveled and the resulting
live sts picked up.
C2L:
On RS: Sl next st to cable
needle and hold to front of work; k1 from left needle,
k1 from cable needle.
On WS: Sl next st to cable
needle and hold to front of work; p1 from left needle, p1
from cable needle.
C2R: Sl next st to cable needle and hold to back of work;
k1 from left needle, k1 from cable needle.
C2LP: Sl next st to cable needle and hold to front of work;
p1 from left needle, k1 from cable needle.
C2RP: Sl next st to cable needle and hold to back of work;
k1 from left needle, p1 from cable needle.
 C3L: Sl next 2 sts to cable needle and hold to front of
work; k1 from left needle, k2 from cable needle. C3L: Sl next 2 sts to cable needle and hold to front of
work; k1 from left needle, k2 from cable needle.
C3R: Sl next st to cable needle and hold to back of work;
k2 from left needle, k1 from cable needle.
C3LP: Sl next 2 sts to cable needle and hold to front of
work; p1 from left needle, k2 from cable needle.
C3RP: Sl next st to cable needle and hold to back of work;
k2 from left needle, p1 from cable needle.
T3L: Sl next st to cable needle and hold to front of work;
k2 from left needle, k1 from cable needle.
T3R: Sl next 2 sts to cable needle and hold to back of
work; k1 from left needle, k2 from cable needle.
T3LP: Sl next 2 sts to cable needle and hold to front of
work; k1 from left needle, slip second st on cable needle
to left needle, p this st; k1 from cable needle.
C4L: Sl next 2 sts to cable needle and hold to front of
work; k2 from left needle, k2 from cable needle.
C4R: Sl next 2 sts to cable needle and hold to back of
work; k2 from left needle, k2 from cable needle.
M2K: [K into back loop, p into front loop, k again into
back loop] of next st. 1 st increased to 3 sts.
 M2P: [K into front loop, then back loop, then front loop
again] of next st. 1 st increased to 3 sts. M2P: [K into front loop, then back loop, then front loop
again] of next st. 1 st increased to 3 sts.
3-st dec: From right to left, next 3 sts on left needle
are designated sts A, B and C. Sl sts A and B to right needle,
pass st A over st B. Sl st B back to left needle, pass st
C over; k remaining st (st B). 3 sts have been decreased
to 1 st.
5-st dec: From right to left, next 5 sts on left needle
are designated sts A, B, C, D and E. Sl sts A, B and C to
right needle, pass st B over st C. Sl st C back to left
needle, pass st D over. Sl st C to right needle, pass st
A over. Sl st C back to left needle, pass st E over; k remaining
st (st C). 5 sts have been decreased to 1 st.
RLI (Right Lifted Increase): Use the right needle to pick
up the stitch below the next stitch on the left needle.
Place it on the left needle, then knit into it. 1 stitch
has been increased.
LLI (Left Lifted Increase): Use the left needle to pick
up the stitch 2 rows below the last stitch on the right
needle. Knit into this stitch. 1 stitch has been increased.
Wrap and turn. If yarn is at front
of work, bring it between needles to back of work; if it
at back of work, bring it between needles to front of work.
Slip next st, and bring yarn between needles, returning
it to its previous position. Turn work, to begin working
next row.
On a subsequent row, when working a st that has been wrapped, slip the
st to the right needle, use the left needle to pick up the wrap, slip the
st back to the left needle and work the wrap and st together as one st.
 |
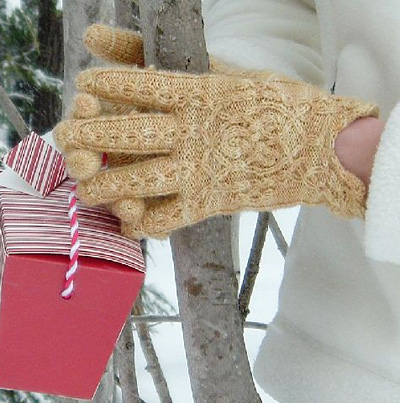
CUFF
Note: Cuff is worked back and forth on two needles.
If preferred, straight or circular needles can be used
instead of double-point needles.
Using crochet cast on or other provisional cast on method,
CO 24 sts.
Set-up Row [WS]: Sl 1, k9, p1, k4, p4, k5.
Note: While working the
cuff, first st of each row will be slipped.
Row 1 [RS]: Sl 1, work Row 1 of Chart A over next 12
sts, k1, p10.
Row 2 [WS]: Sl 1, k9, p1,
work Row 2 of Chart A over next 12 sts, k1.
These 2 rows set pattern
for cuff. Continue in pattern, working through Chart
A as set, as indicated for your size:
Sizes XS and S: Work Rows 3-16 of Chart A.
Sizes M and L: Work Rows
3-16 of Chart A, then Rows 1-6 once more.
Size XL: Work Rows 3-16
of Chart A, then Rows 1-16 once more.
Before continuing to Chart B, review notes in Pattern
Notes re. turning short
rows (Wrap and Turn).
The
short rows in Chart B will cause the cable to turn 90
degrees to the right.
Work Rows 1-11 of Chart B.
Next Row (Row 12 of Chart
B) [WS]: BO 10 sts knitwise, work Row 12 of Chart B.
Work Rows 13-22 of Chart
B, purling last st of RS rows and slipping first st of
WS rows.
Break yarn, leaving a tail
approx. 4 inches long. Place all sts on st holder.
Carefully remove waste yarn from CO edge, placing 23
resulting live sts on needle. Attach yarn with WS facing.
Important Note: Pattern
will not match up perfectly with first half of cuff;
it will be offset by half a stitch.
Row 1 [WS]: Sl 1, kfb, k2, p4, k4, p1, k10.
As for first half of cuff,
first st of each row is slipped. First half of each
row (when looking at work with RS facing) is worked
in reverse stockinette st, center st is worked in stockinette
st, and cable panel is worked over last half of row.
Continue in pattern, working through Chart A as indicated
for your size:
Sizes XS and S: Work Rows 15-16 of Chart A, then Rows
1-16.
Sizes M and L: Work Rows
5-16 of Chart A, then Rows 1-6.
Size XL: Work Rows 5-16
of Chart A.
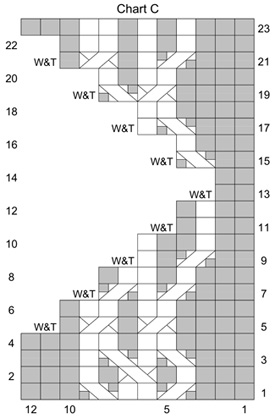
Chart C mirrors Chart B, turning the cable 90 degrees
to the left.
Work Rows 1-12 of Chart
C.
Next Row (Row 13 of Chart
C) [RS]: BO 10 sts purlwise, work Row 13 of Chart C.
Work Rows 14-23 of Chart
C, slipping first st of RS rows and knitting last st
of WS rows. Do not break yarn. If you have been using
straight or circular needles to knit the cuff, transfer
sts to double-point needle.
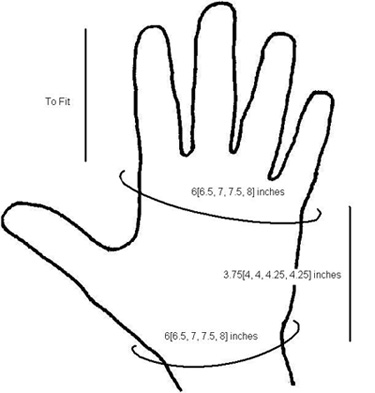
HAND
Join Cuff:
Using a new double-point
needle and continuing from sts just worked, pick up
and k 1 st in each slipped st along edge of cuff: approx.
20[20, 24, 24, 26] sts. Divide these sts evenly between
2 needles.
Place 14 held sts of first half of cuff on needle. Continuing
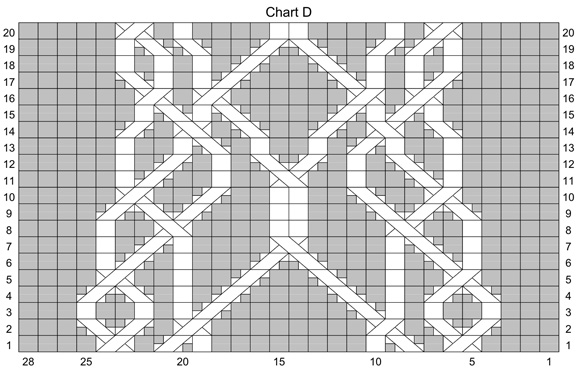
from picked-up sts, work first half of Row 1 Chart D
over these 14 sts; join to work in the round, being careful
not to twist; using same needle, work second half of
Row 1 of Chart D over 14 sts from second half of cuff.
This needle will now be designated Needle 1.
K all sts on remaining 2 needles (Needles 2 and 3),
evenly increasing 0[2, 2, 6, 8] sts. This point (end
of Needle 3) will now be beginning of round.
48[50, 54, 58, 62] sts:
28 sts on Needle 1, 10[11, 13, 15, 17] sts each on Needles
2 and 3.
The next round is worked differently for right and left
hands. For sizes XS and S, you will be directed to place
a stitch marker at a point between needles; instead,
the division between needles will act in place of a stitch
marker. If desired, place a removable marker in the work
at this point.
Right Hand: Work Round 2 of Chart D over sts on Needle
1; k0[0, 2, 2, 4], place marker, k4, place marker, k16[18,
20, 24, 26].
Left Hand: Work Round 2
of Chart D over sts on Needle 1; k16[18, 20, 24, 26],
place marker, k4, place marker, k0[0, 2, 2, 4].
Pattern is set for hand: over sts on Needle 1, work
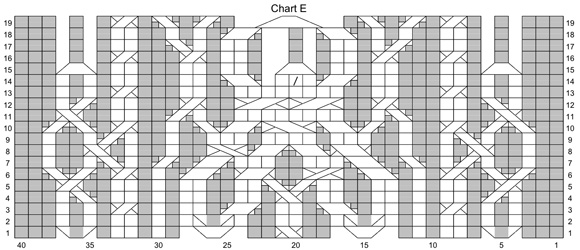
through all rounds of Chart D, then Chart E; over sts
on Needles 2 and 3, work in stockinette st, shaping thumb
gusset as directed below.
Work 2[3, 4, 5, 6] rounds in pattern before proceeding
to thumb gusset.
Thumb Gusset:
Note for Sizes XS and S Only: For right hand, division
between Needle 1 and Needle 2 takes place of first marker.
For left hand, division between Needle 3 and Needle 1
takes place of second marker.
Gusset Increase Round: Work in pattern to first marker,
slip marker, RLI, k to second marker, LLI, slip marker,
k to end.
K 2 rounds.
Repeat these 3 rounds 2[4,
4, 6, 6] times more, then work Gusset Increase Round
once more. 56[62, 66, 74, 78] sts: 12[16, 16, 20, 20]
sts between markers.
Work 4[4, 4, 4, 6] more
rounds in pattern without further shaping.
Next Round: K to first marker, remove marker, place
next 12[16, 16, 20, 20] sts on hold on waste yarn, CO
4 sts, remove second marker, join to continue working
in the round, k to end of round. 10[11, 13, 15, 17] sts
each on Needles 2 and 3.
Continue in pattern until all rounds of Chart E have
been completed. 49[51, 55, 59, 63] sts.
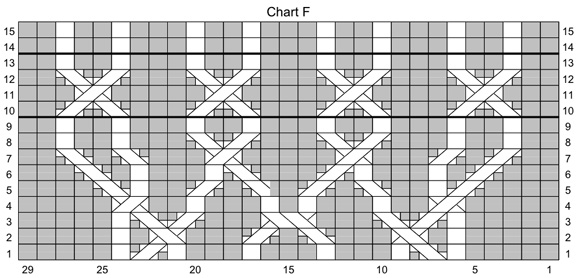
Size XS Only: Work Rounds 1-9 of Chart F.
Sizes S and M Only: Work
Rounds 1-13 of Chart F.
Sizes L and XL Only: Work
Rounds 1-15 of Chart F.
FINGERS
Slip all sts from Needles 2 and 3 to st holder or
spare needle.
Work Each Finger as Follows:
Set up as described below
in section for each hand, working fingers in given
order.
Work sts from Needle 1
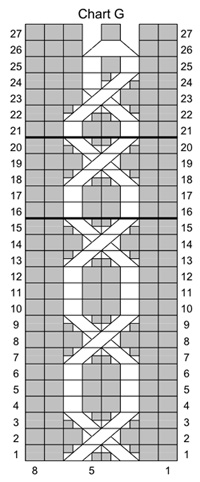
(sts in cable pattern)
following Chart G, working Rounds 1-15 once, then Rounds
16-20 as needed until work measures 1.25-1.75 inches
less than desired length, then Rounds 21-27. (If necessary
for shorter fingers, Rounds 16-20 may be omitted.) Work
all other sts in stockinette st.
On last round of Chart
G, finish 1 st before end of round; last st of round
will now be first st of next round.
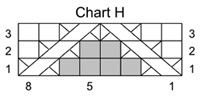
Chart H begins 1
st to the right of the
sts which had been worked following Chart G, and ends
1 st to the left of these sts.
Work Rounds 1-3 of Chart
H.
Continue in stockinette
st until finger is desired
length.
Next Round: [K2tog] to
end. Break yarn, draw through
all sts and pull tight. Thread yarn through sts again
to secure.
Setting Up Fingers:
When working first round
of each finger as described below, work first round
of Chart G over sts from Needle 1.
RIGHT HAND
For first 2 fingers of
this hand, the 8 sts of Chart G will be worked over
the 7 sts worked from Needle 1, and the first CO st
following these sts.
Little Finger: Slip last 5[5, 6, 7, 8] sts from holder
to new double-point needle. This will be third needle
of round. Work 7 sts from Needle 1 onto first needle
of round, CO 2[2, 3, 3, 3] sts onto second needle of
round, work 5[5, 6, 7, 8] sts from third needle of round.
Redistribute sts and join to work in the round. 14[14,
16, 17, 18] sts.
Ring Finger: Slip last 3[4, 4, 5, 6] sts from holder
onto new needle. Attach yarn and k these sts, then CO
3[4, 4, 4, 5] sts onto this needle. This will be third
needle of round. Work 7 sts from Needle 1 onto first
needle of round, CO 3[4, 4, 4, 5] sts onto second needle
of round, work 6[8, 8, 9, 11] sts from third needle of
round. Redistribute sts and join to work in the round.
16[19, 19, 20, 23] sts.
Middle Finger: Slip last 6[6, 8, 9, 10] sts from holder
onto new needle. Attach yarn and k these sts, then CO
3 sts onto this needle. This will be third needle of
round. Work 8 sts from Needle 1 onto first needle of
round, following Chart G; CO 3 sts onto second needle
of round, work 9[9, 11, 12, 13] sts from third needle
of round. Redistribute sts and join to work in the round.
20[20, 22, 23, 24] sts.
Index Finger: Slip remaining 6[7, 8, 9, 10] sts from
holder onto two new needles. These will be second and
third needles of round. Attach yarn and k these sts,
then CO 4 sts onto third needle. Slip last CO st to new
first needle of round; this st will be first st of Chart
G. Onto same needle, work remaining 7 sts from Needle
1 following Chart G. Work 9[10, 11, 12, 13] sts from
second and third needles of round. Redistribute sts and
join to work in the round. 17[18, 19, 20, 21] sts.
LEFT HAND
Index Finger: Slip last
6[7, 8, 9, 10] sts from
holder to new double-point
needle. This will be third
needle of round. Work 7
sts from Needle 1 onto first needle of round, following
Chart G; CO 4 sts onto second needle of round. Work first
CO st as last st of Chart G. Work 6[7, 8, 9, 10] sts from
third needle of round. Redistribute sts and join to work
in the round. 17[18, 19, 20, 21] sts.
Middle Finger: Slip last 6[6, 8, 9, 10] sts from holder
onto new needle. Attach yarn and k these sts, then CO
3 sts onto this needle. This will be third needle of
round. Work 8 sts from Needle 1 onto first needle of
round, following Chart G; CO 3 sts onto second needle
of round, work 9[9, 11, 12, 13] sts from third needle
of round. Redistribute sts and join to work in the round.
20[20, 22, 23, 24] sts.
Ring Finger: Slip last 3[4, 4, 5, 6] sts from holder
onto new needle. Attach yarn and k these sts, then CO
3[4, 4, 4, 5] sts onto this needle. This will be third
needle of round. Slip last CO st to new first needle
of round; this st will be first st of Chart G. Onto same
needle, work 7 sts from Needle 1 following Chart G. CO
3[4, 4, 4, 5] sts onto second needle of round, work 6[8,
8, 9, 11] sts from third needle of round. Redistribute
sts and join to work in the round. 16[19, 19, 20, 23]
sts.
Little Finger: Slip remaining 5[5, 6, 7, 8] sts from
holder onto two new needles. These will be second and
third needles of round. Attach yarn and k these sts,
then CO 2[2, 3, 3, 3] sts onto third needle. Slip last
CO st to new first needle of round; this st will be first
st of Chart G. Onto same needle, work remaining 7 sts
from Needle 1 following Chart G. Work 6[6, 8, 9, 10]
sts from second and third needles of round. Redistribute
sts and join to work in the round. 14[14, 16, 17, 18]
sts.
THUMB
Place 12[16, 16, 20, 20]
held sts from thumb gusset onto two needles. Join yarn
and using a third needle, pick up and k 6 sts in CO
edge at point where gusset joins hand: 1 st at each
side of CO sts, and 1 st in each CO st. 18[22, 22,
26, 26] sts.
First Round: Using needle
which holds picked-up sts, k first 3[5, 5, 6, 6] held
sts; this will be Needle 1. Using another needle, k next
6[6, 6, 8, 8] held sts; this will be Needle 2. Using
another needle, k last 3[5, 5, 6, 6] held sts, then first
3 sts from Needle 1; this will be Needle 3. Beginning
of round is located at center of picked-up sts.
Work all sts in stockinette
st until thumb measures 0.5 inches.
Decrease Round: K2tog, k to last 2 sts of round, ssk.
K 2 rounds.
Repeat these 3 rounds once
more. 14[18, 18, 22, 22]
sts.
Continue in stockinette st until thumb is desired length.
Next Round: [K2tog] to end.
Break yarn, draw through all sts and pull tight. Thread
yarn through sts again to secure. |