![Read exactly what FREE PATTERNS really means...respect our designers and authors rights [and thank you]](../images/OFFnavLEGAL.gif)
![Read exactly what FREE PATTERNS really means...respect our designers and authors rights [and thank you]](../images/OFFnavLYS.gif)

 
|
|
 <click for more! <click for more!
|
 |
|
 |
|
This issue of Knitty is printer friendly. To print, simply click the option you wish from the buttons on the right: print all text, images, charts and schematics OR print all text, charts and schematics and just the first pattern image, to save paper and ink. |
|
 |
|
 |
|
|

|
|

|
 |
|
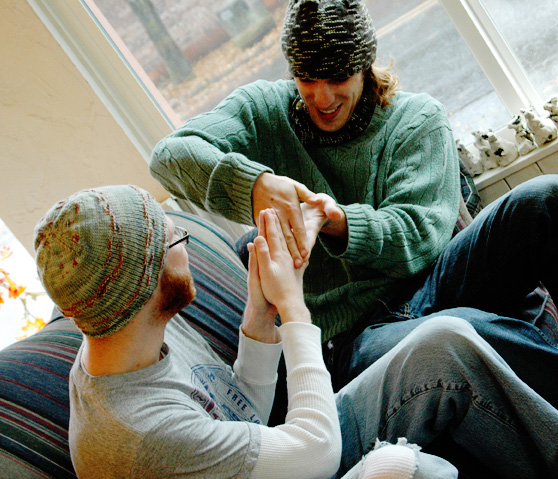
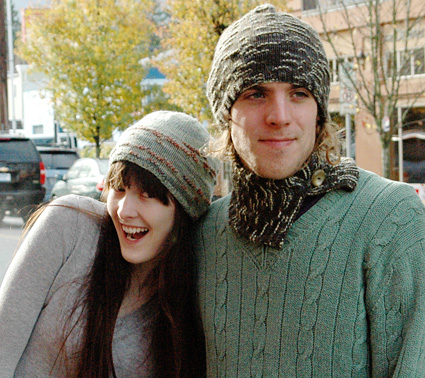
 models:Alexandra Tinsley,
Travis Schuster,
Aaron Smith
models:Alexandra Tinsley,
Travis Schuster,
Aaron Smith
photos: Travis Schuster,
Aaron Smith
Thanks to Abundant Yarn and Dyeworks in Portland, OR,
for letting
us take photos
in their store. |
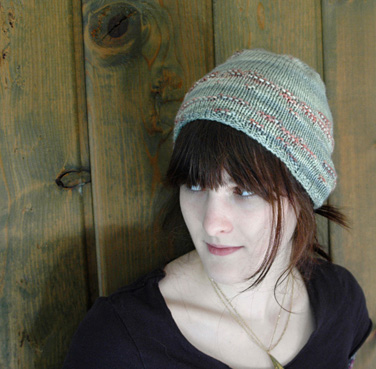
by Alexandra Tinsley

The colors of this yarn reminded me of
a set of beautiful topographical maps that used to hang
in my house. I set out to recreate the feel of those maps
by covering this hat with a random, color-dictated relief.
The beauty of this technique is that, besides being ridiculously
easy, it works with any two-colored yarn in virtually any
sort of project to add simple, interesting texture. The
yarn itself and the way it was dyed dictate what your finished
project will look like:
whether or not the pattern will be regular or very random,
stripe-y or blotchy, sparsely textured or lumpy all over.
It's exciting to give up control and let the yarn lead the
way...and for once you can welcome pooling!
The hat itself
features box-like decreases to avoid interrupting the pattern
too much, and is just a touch slouchy (which is perfect
for me, but you can make it longer or shorter to accentuate
or eliminate that look.) Tailor your colors to your audience
and you've got a great unisex hat that works at any age. |
|
Hat: S[L]
Will comfortably stretch to fit head circumference of 22[24] inches
Neckwarmer: One size |
Hat Circumference (unstretched): 17[19]
inches
Hat Height: 8[9] inches
Neckwarmer Width: 5 inches
Neckwarmer Length (unstretched):
17 inches |
| |
Green
Version (Size S): Colinette
Cadenza [100% Merino Wool; 128yd/117m per 50g skein]; color:
#75 Moss; 1 skein for hat, 2 skeins for neckwarmer
Charcoal
Version (Size L): Malabrigo Silky Merino [51% Silk, 49%
Merino Wool; 150yd/137m per 50 g skein]; color: #470 Bosques;
1 skein each for hat and neckwarmer
Note: To make a scarf instead of a neckwarmer,
buy 1-2 additional skeins.
Recommended needle size:
1
set US #7/4.5mm double-point needles
1 16-inch US #7/4.5mm
circular needle
[always use a needle size that gives you the gauge listed below -- every knitter's gauge is unique]
4
stitch markers; be sure one is different from the others
Yarn needle
Large button (for neckwarmer) |
| |
22 sts/30 rows = 4 inches in stockinette
st |
| |
[Knitty's list of standard abbreviations and techniques can be found here.] |
You can easily substitute any
two-color worsted weight
yarn (handpainted is ideal),
and simply designate one
color as the Main Color
and the other as the Contrasting
Color. The CC should be
the less prevalent color,
and be aware that different
color spacing and proportions
may leave you with a very
different looking hat.
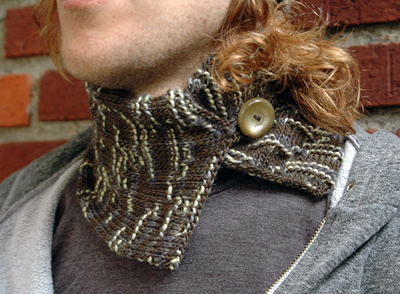
The yarn in the smaller hat is almost entirely green, with
just tiny spatters of reddish brown. The
larger hat was worked in
a yarn that is mostly blackish-gray,
with small white patches.
The white patches in the
charcoal yarn are bigger
than the brown ones in
the green yarn, and you
can see how the texture
of the end product differs.
Topographie Pattern:
Work in stockinette st,
except: When the next st on the left needle is a CC st,
purl it instead of knitting it. (Be careful at color changes
- sometimes a stitch looks like it will be one color,
but ends up looking like the other color once it's worked.
Be prepared to undo a stitch occasionally and rework it.)
ssp: Slip next 2 sts knitwise, one at a time, to right
needle. Slip them both, purlwise, back to left needle. Purl
them together through their back loops.
2x2 Rib (Worked in the round over a multiple of 4 sts):
All Rounds: [K2, p2] to
end.
I-Cord
Using a double-point needle,
pick up and k required number of sts.
Next Row: Instead of turning
work around to work back on the WS, slide all sts to other
end of needle, switch needle back to your left hand, bring
yarn around back of work, and start knitting the sts again.
I-Cord is worked with the RS facing at all times.
Repeat this row to form
I-cord. After a few rows, work will begin to form a tube.
|
|
|
| |
HAT
Using circular needle, CO 96[108] sts.
Place unique marker to
indicate beginning of round and join to begin working in the
round, being careful not to twist.
Work 2[6] rounds in 2x2
Rib.
Work in Topographie Pattern until piece measures 6[6.5]
inches.
Next Round: [K24(27), place marker] 3 times, k24[27].
Continuing in pattern, shape crown as follows. When working
decreases, if the sts to be decreased are CC sts, work p2tog
instead of k2tog, or ssp instead ssk. If the two sts are
not the same color, experiment with decreases to see which
one yields the desired result. Switch to double-point needles
when necessary.
Decrease Round: [Work 1 st in pattern, k2tog, work
in pattern to 3 sts before marker, ssk, work 1 st in pattern]
four times. 8 sts decreased.
Work 1 round in pattern.
Repeat these 2 rounds
5[6] times more. 48[52] sts.
Work Decrease Round 4 times more. 16[20] sts.
Next Round: [K2tog] 8[10] times.
Break yarn, draw through remaining 8[10] sts and pull tight.
NECKWARMER
Using double-point needles, CO 60 sts. Divide
sts between needles and join to work in the round, being
careful not to twist.
Work in Topographie Pattern until piece measures 17 inches,
or desired length.
BO all sts.
|
| |
|
HAT
Weave in ends and block lightly,
taking care not to flatten pattern.
NECKWARMER
Sew tube closed at both CO and BO ends, forming a flat piece.
Ends of neckwarmer shown were sewn using a small running stitch.
Button Loop:
Approx. one third of the
way across one short
end of the piece, pick up and k 4 sts. Work I-Cord
until loop is long enough t fit tightly around button.
BO all sts, and sew BO end of cord to edge of neckwarmer,
close to picked-up sts.
Weave in ends. Try on neckwarmer to determine desired
location of button, and sew in place.
|
|
  Alex is a 20-something, college-hopping psych/art student
with not-so-secret yarn related ambitions that make her dear
mother nervous. She enjoys knitting, spinning, and picture-taking,
all three of which can be seen at presentsknits.blogspot.com. |
| Pattern & images © 2008
Alexandra Tinsley. Contact Alex |
|
|
|
|
|