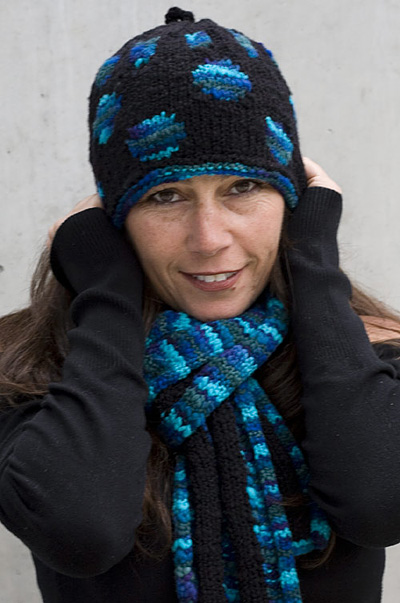
Grandma Knitty Home
Knitty®: little purls of wisdom
what's the editor up to lately?feature articlesKnitty's generous selection of patternsKnittyspin³archive of previous issuesMeet other Knitty readers and chat in our coffeeshop!sign up for the free Knitty newsletterLooking for an ad fromone of our advertisers? Click here!Our tiny, perfect online shopping mallGet yourself a little Knitty treat!read the behind-the-scenes news at Knitty


Find exactly what you're looking for

The answer to your question about Knitty is probably here!

Take home something Knitty today

Advertise with Knitty

Get your cool stuff reviewed in Knitty

Full information about how  to get published in Knitty

Read exactly what FREE PATTERNS really means...respect our designers and authors rights [and thank you]

Knitty is produced in a pro-rabbit environment

© Knitty 2002-2007. All rights reserved. Unauthorized reproduction prohibited. This means you.


<click for more!
 
Schaefer Yarn Company

This hat was inspired by such diverse elements as:

- an article tempting me to try intarsia

- the dazzling colors and cozy feel of Schaefer Yarn

- a beautiful ceramic piece in a store window with colored circles on a dark background

- a general adoration of circles. 

The hat inspired the scarf; stripes follow spots!  I was thrilled when the scarf took on its 3-dimensional aspects.


model: Suzanne Loesch photos:Sheryl Sinkow

SIZE
One
 
FINISHED MEASUREMENTS

Hat circumference: 22.75 inches
Scarf width: approx. 9 inches
Scarf length: approx. 60 inches

 
MATERIALS

Schaefer Yarn Elaine [100% Merino Wool; 300yd/274m per 227 g skein]; 1 skein each color
[MC] Black
[CC] Eleanor Roosevelt

1 16-inch US #10/6mm circular needle (for Hat)
1 set(s) US #10/6mm double-point needles (for Hat)
1 set(s) US #11/8mm straight needles  (for Scarf)
Stitch marker
Tapestry Needle


GAUGE

14 sts/24 rows = 4 inches in stockinette st on US #10/6mm needles (hat)
13 sts/20 rows = 4 inches in stockinette st on US #11/8mm needles (scarf)

 
PATTERN NOTES

[Knitty's list of standard abbreviations and techniques can be found here]

Intarsia
This pattern involves the Intarsia method of color work. When working in this way, different sections of each row are worked with different colors. Use a separate length of yarn for each area of color.
When beginning with a new color, tie the strand of the new color in a slip knot around the strand of the old color. Slide the knot up close to the needle, then proceed with the new color.
When switching from one color to the next within each row, drop the color you have been knitting with, and bring the yarn for the next color up under the yarn of the previous color before you continue knitting. This will twist the 2 yarns around each other. It is very important to do this; if you do not wrap the yarns in this way, the areas of color will not be joined, and you will have holes in your work.

To prepare to work the intarsia pattern, look at the chart and pattern to determine how many separate blocks of color there are in the upcoming rows. For each one, cut a length of yarn several meters long, and either wind it into a small ball or butterfly, or use a bobbin, either purchased or made from cardboard for this purpose.

When working an intarsia project in the round, you will actually be working back and forth in rows, but the rows will be joined at the ends so that the piece remains tubular. This is done as follows:

  1. Knit the first intarsia “round” with the RS facing. When you get to the end of the round, turn the work so that WS is facing. (You may prefer to turn the piece inside out to work WS rows.)
  2. Place the st marker on the right needle, and work a yarnover around the right needle, bringing the yarn up over the needle from front to back, then between the needles to the front of the work. Work the next row as a WS row. When you reach the end of this row, p the last st of the row together with the yo at the beginning of the row. Turn the work so the RS is facing.
  3. Place the st marker on the right needle, and work a yarnover around the right needle, bringing the yarn up over the needle from back to front, then between the needles to the back of the work. Work the next row as a RS row. When you reach the end of the row, [ssk] the last st of the row together with the yo at the beginning of the row. Turn the work so the WS is facing.

Repeat Steps 2 and 3 to work intarsia in the round.

I-Cord
Next Row: Instead of turning work around to work back on the WS, slide all sts to other end of needle, switch needle back to your left hand, bring yarn around back of work, and start knitting the sts again. I-Cord is worked with the RS facing at all times.
Repeat this row to form I-cord. After a few rows, work will begin to form a tube.

DIRECTIONS

HAT
Using US #10/6mm circular needle and CC, CO 80 sts. Place marker and join to begin working in the round, being careful not to twist.
Work 2 rounds in garter st, beginning with a k round.
Join MC. Using MC, work 2 more rounds in garter st.

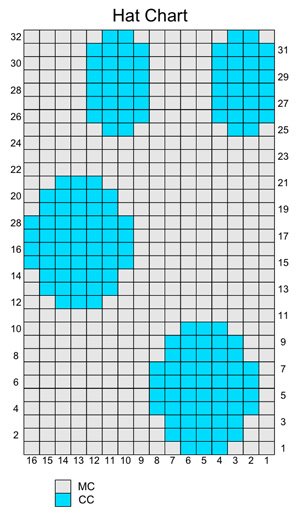
Work through all rounds of Hat Chart; see notes above re. working intarsia in the round. Chart will be repeated 5 times in each round. Note that it is not necessary to break the lengths of MC between the first set of circle motifs and the second set; yarn may be carried loosely across the back of the work.

When all rows of Hat Chart are complete, resume working in the round, using MC only.
K 1 round.

Switching to double-point needles when necessary, shape crown as follows:
Round 1: [K6, k2tog] to end. 70 sts.
Even-Numbered Rounds 2-10: K all sts.
Round 3: [K5, k2tog] to end. 60 sts.
Round 5: [K4, k2tog] to end. 50 sts.
Round 7: [K3, k2tog] to end. 40 sts.
Round 9: [K2, k2tog] to end. 30 sts.
Round 11: [K1, k2tog] to end. 20 sts.
Round 12: [K2tog] to end. 10 sts.
Round 13: [K2tog] to end. 5 sts.
Round 14: Working all sts onto one needle, k2tog, k2tog, k1.
Work remaining 3 sts in I-Cord until cord measures 1 inch. Break yarn and draw through all sts, pull tight. Form cord into a loop, and use yarn tail to sew in place.
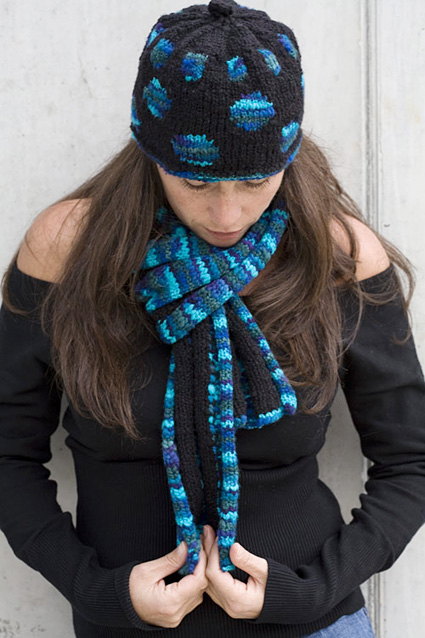
SCARF

Before beginning, wind yarn into large bobbins or butterflies; 2 of MC and 3 of CC. Don't worry about having enough yarn in each to work the entire scarf; make them a comfortable size to work with, and wind new ones as needed.

Using CC and US #11/8mm needles, CO 29 sts.

Row 1 [RS]: [K7, p4] twice, k7.
Row 2 [WS]: [P7 using CC, k4 using MC] twice, p7 using CC.
Row 3 [RS]: [K7 using CC, p4 using MC] twice, k7 using CC.

Repeat Rows 2 and 3 until scarf measures 60 inches or desired length, ending with Row 3.

Break MC, and all CC strands except the one attached to the last st.

Last Row [WS]: Using CC, [p7, k4] twice, p7.
BO all sts in pattern.


FINISHING

Weave in ends.

ABOUT THE DESIGNER

Debbie is a teacher, designer, maker and lover of all things textile (weaving, dyeing, printing, you name it). Knitting is a relatively new obsession in full swing.

She is blogless.