|


![Read exactly what FREE PATTERNS really means...respect our designers and authors rights [and thank you]](../images/OFFnavLEGAL.gif)

 
|
|
 <click
for more! <click
for more!
 
|

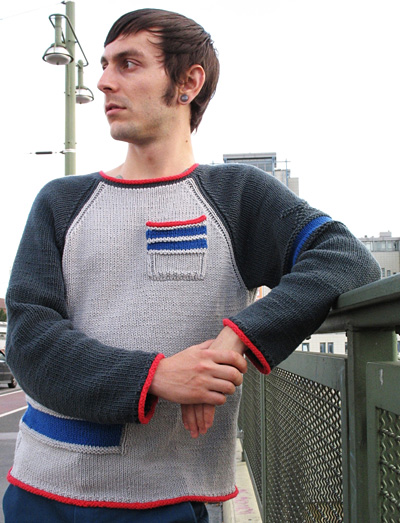
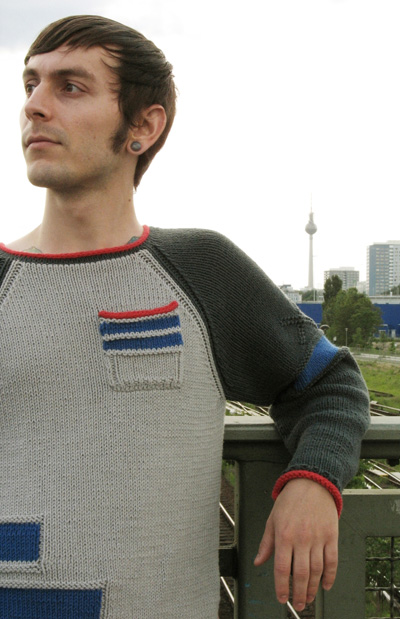
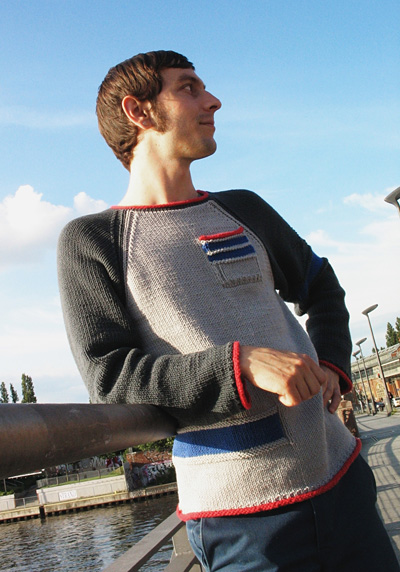
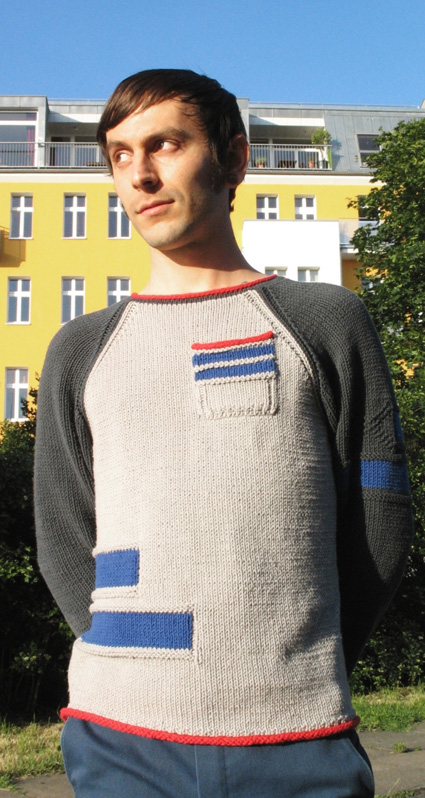 by Nathan Plante by Nathan Plante

As
a young male knitter I'm always looking for great patterns to knit for
myself. As most patterns are for women, I find this to be quite a difficult
task! Sweaters seem to be either overly decorative, which is not my style,
or overly simplified, which is boring to knit. I wanted to create a pattern
that fit my simple taste but with enough flair to make it interesting
to knit and to wear.
The partial striping breaks up the plain Stockinette
stitch adding color and dimension while the brightly colored rolled edges
and I-Cord Bind Off add a decorative finish without being too frilly.
And who doesnt love a pocket?!? The ambiguous X on the left arm was taken
from Vogue Knitting's King Charles Brocade (p. 123).
The end result is a light, relaxed-fit sweater, perfect
for a cool fall evening. I used a basic Cotton/Acrylic blend from Germany. If you live somewhere where this particular brand is not available, try your favorite cotton blend that fits the indicated gauge. Rowan All Seasons Cotton and Phildar Aviso would be good substitutes. Use similar colors or choose your own! |  model: Nathan Plante photos: Nico Hotz model: Nathan Plante photos: Nico Hotz
| | | |
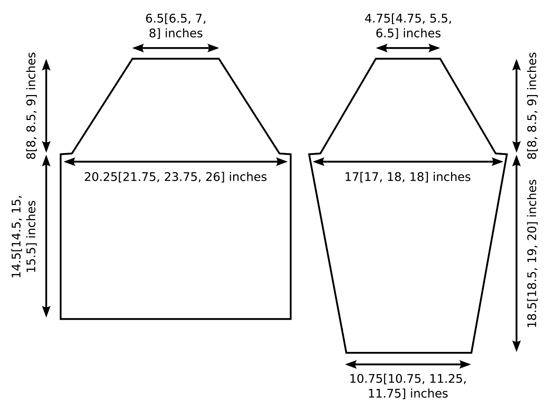
S [M, L, XL] (shown in size S)
To fit chest circumference of 36-38[40-42, 44-46, 48-50] inches | |
|
Chest: 40.5[43.5, 47.5, 52] inches
Length: 24.5[24.5, 26, 27.5] inches | |
|
SAMOA
Garn Grohandel Hamburg [50% cotton, 50% acrylic; 104yd/95m per 50g
skein]
[MC1] Grey: 6[6, 7, 8] skeins
[MC2] Dark Grey: 5[6, 7, 8] skeins
[CC1] Red: 1 skein
[CC2] Blue: 1[2, 2, 2] skeins
1 set US #6/4mm straight needles
1 16-inch US #4/3.5mm circular needle or set of double-point needles
2 stitch markers
Tapestry needle | |
|
| 17 sts/25 rows = 4 inches in stockinette st, using larger (straight) needles | |
|
[Knitty's list of standard abbreviations and techniques can be found here] | 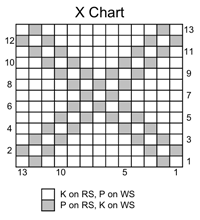 The lower edges of the sleeves and body are intended to roll. When measuring the lengths of these pieces, be sure to measure with the edge rolled. The lower edges of the sleeves and body are intended to roll. When measuring the lengths of these pieces, be sure to measure with the edge rolled.
Attaching the Patch Pocket can be tricky if it's your first time. I
suggest making your swatch large enough to practice on before attempting
to sew the patch onto the front panel.
Instructions for the I-Cord Bind Off can be found here.
|
|
|
 FRONT FRONT
Using CC1, CO 88[94, 102, 112] sts.
Rows
1-3: Work in stockinette st, ending with a RS row. Break CC1.
Row
4 [WS]: Using MC1, p all sts.
Row
5 [RS]: K2, [k1, p1] to last 2 sts, k2.
Row
6 [WS]: P2, [k1, p1] to last 2 sts, p2.
Main Pattern:
Row 1 [RS]: K2, p1, k to last 3 sts, p1, k2.
Row
2 [WS]: P2, k1, p to last 3 sts, k1, p2.
Repeat these 2 rows until work measures 4[4, 5, 5] inches.
Make a note
of how many rows you have worked.
First Stripe:
Row 1 [RS]: K2, p1, k41[44, 48, 53], place marker, p to end.
Row
2 [WS]: K to marker, p to last 3 sts, k1, p2.
Row
3 [RS]: K2, p1, k to marker, p1, k to end. Break MC1.
Row 4 [WS]: Using CC2, p to 1 st before marker; using MC1, k1, p to last 3 sts, k1, p2.
Row 5 [RS]: Using MC1, k2, p1, k to marker, p1; using CC2, k to end.
Rows 6-14: Work as for Rows 4 and 5. Break CC2.
Row 15 [RS]: Work as for Row 3.
Row 16 [WS]: Work as for Row 2.
Row 17 [RS]: K2, p1, k to marker, remove marker, p to end.
Work 3 rows in Main Pattern.
Second Stripe:
Row 1 [RS]: K2, p1, k53[56, 60, 65], place marker, p to end.
Work Rows 2-17 as for First Stripe.
Continue in Main Pattern until work measures 14.5[14.5, 15, 15.5] inches or desired length to underarm, ending with a WS row.
Shape Raglan Armholes:
BO 4[6, 7, 8] sts at beginning of next 2 rows. 80[82, 88, 96] sts.
Decrease Row 1 [RS]: K2, p1, [k2tog] twice, k to last 7 sts, [ssk] twice, p1, k2.
Work 1 row in Main Pattern.
Repeat these 2 rows 0[1, 1, 2] time(s) more. 76[74, 80, 84] sts.
Decrease Row 2 [RS]: K2, p1, k2tog, k to last 5 sts, ssk, p1, k2.
Work 1 row in Main Pattern.
Repeat these 2 rows 23[22, 24, 24] times more.
BO remaining 28[28, 30, 34] sts.
 BACK BACK
Note: The Back is worked in the same way as the Front, except that the stripes are worked on the opposite side of the piece.
Work as for Front to beginning of First Stripe. Be sure to work the same number of rows before beginning Stripe as you worked for the Front.
First Stripe:
Row
1 [RS]: P44[47, 51, 56], place marker, k to last 3 sts, p1, k2.
Row
2 [WS]: P2, k1, p to marker, k to end.
Row
3 [RS]: K to last st before marker, p1, k to last 3 sts, p1, k2.
Row
4 [WS]: Using MC1, p2, k1, p to marker, k1; using CC2, p to end.
Row
5 [RS]: Using CC2, k to last st before marker; using MC1, p1, k to last 3 sts, p1, k2.
Rows
6-14: Work as for Rows 4 and
5. Break CC2 and MC1.
Row
15 [RS]: Rejoin MC1 and work as for Row 3.
Row
16 [WS]: Work as for Row 2.
Row
17 [RS]: P to marker, remove marker, k to last 3 sts, p1, k2.
Work 3 rows in Main Pattern.
Second Stripe:
Row
1 [RS]: P32[35, 39, 44], place marker, k to last 3 sts, p1, k2.
Work Rows
2-17 as for First Stripe.
Continue as for Front.
 RIGHT SLEEVE RIGHT SLEEVE
Using CC1, CO 46[46, 48, 50] sts.
Rows
1-3: Work in stockinette st, ending with a RS row. Break CC1.
Row
4 [WS]: Using MC2, p all sts.
Row
5 [RS]: K2, [k1, p1] to last 2 sts, k2.
Row
6 [WS]: P2, [k1, p1] to last 2 sts, p2.
Work 2[2, 2, 6] rows in Main Pattern.
Note: The sleeve increases are worked by alternating two different increase rows. In the first increase row, the increase is worked near the beginning of the row, and in the second increase row, the increase is worked near the end. This gives a smooth, gradual slope to the shaped inside edges of the sleeves.
Increase Row 1 [RS]: K2, p1, m1, k to last 3 sts, p1, k2.
Work 3 rows in Main Pattern.
Increase
Row 2 [WS]: K2, p1, k to last 3 sts, m1, p1, k2.
Work 3 rows in Main Pattern.
Repeat these 8 rows 12[12, 13, 12] times more. 72[72, 76, 76] sts.
Continue in Main Pattern until work measures 18.5, 18.5, 19, 20] inches or desired length to underarm, ending with a WS row.
Shape Raglan Sleeve Cap:
BO 4[6, 7, 8] sts at beginning of next 2 rows. 64[60, 62, 60] sts.
Decrease Row [RS]: K2, p1, k2tog, k to last 5 sts, ssk, p1, k2.
Work 3 rows in Main Pattern.
Repeat these 4 rows 2[4, 7, 11] times more. 58[50, 46, 36] sts.
Work Decrease Row.
Work 1 row in Main Pattern.
Repeat these 2 rows 18[14, 10, 3] times more.
BO remaining 20[20, 24, 28] sts.
 LEFT SLEEVE LEFT SLEEVE
Note: The Left Sleeve is worked in the same way as the Right Sleeve, with the addition of stripes and a charted relief pattern. Remember to continue the sleeve shaping while working this patterning! If needed, use a row counter or pen and paper to help you keep track.
Work as for Right Sleeve until 19[19, 18, 18] Increase
Rows have been completed, plus 1[1, 3, 3] rows of Main Pattern. Maintaining increase pattern as set, begin working Stripes as follows. Note that for sizes L and XL, an increase will be worked in the first row.
Stripes:
Row
1 [RS]: P all sts.
Row
2 [WS]: K all sts.
Row
3 [RS]: K all sts. Break MC2.
Row
4-11: Using CC2, work all sts in stockinette st. Break CC2.
Row
12 [WS]: Using MC2, p all sts.
Row
13 [RS]: P all sts.
Row
14 [WS]: K all sts.
Row
15 [RS]: K to last 3 sts, p1, k2.
Row
16 [WS]: P2, k1, p to end.
Row
17 [RS]: P32[32, 34, 34], place marker, work first row of X Chart, place marker, k to last 3 sts, p1, k2. From this point, work sts between markers following X Chart.
Row
18 [WS]: Work in pattern to second marker, k to end.
Row
19 [RS]: K to 1 st before marker, p1, work in pattern to end.
Row
20 [WS]: Work in pattern to second marker, k1; using CC2, p to end.
Row
21 [RS]: Using CC2, k to last st before marker; using MC2, p1, work inpattern to end.
Rows
22-26: Work as for Rows 20 and 21. Break CC2 and MC2.
Row
27 [RS]: Rejoin MC2, k to last st before first marker, p1, work in pattern to end.
Row
28 [WS]: Work in pattern to second marker, p to end.
Row
29 [RS]: P to marker, remove marker, work last row of X Chart, remove marker, k to last 3 sts, p1, k2.
Continue as for Right Sleeve.
PATCH POCKET
Using MC1, CO 19 sts.
Row
1 [RS]: Sl 1, [k1, p1] to last 2 sts, p2.
Row
2 [WS]: Sl 1, [p1, k1] to last 2 sts, p2.
Row
3 [RS]: Sl 1, k1, p1, k to last 3 sts, p1, k2.
Row
4 [WS]: Sl 1, p1, k1, p to last 3 sts, k1, p2.
Rows
5-11: Work as for Rows 3 and 4.
Row
12 and 13: Sl 1, k to end.
Rows
14-17: Using CC2, work in stockinette st, slipping first st of each row. Break CC2.
Rows
18-20: Using MC1, sl 1, p to end.
Rows
21-24: Using CC2, work in stockinette st, slipping first st of each row. Break CC2.
Rows
25-27: Using MC1, sl 1, k to end. Break MC1.
Row
28 [WS]: Using CC1, p all sts.
BO all sts using I-Cord Bind Off. |
|
|
|
Weave in ends and block all
pieces to measurements shown in schematic. Be sure to leave lower
edges rolled when blocking.
Sew Front and Back to Sleeves at raglan edges. Sew sleeve seams
and side seams.
Try on sweater to determine best position for pocket, then sew
pocket in place.
Neckband:
Using circular needle and MC2, beginning at right back raglan seam,
pick up and k 1 st in each bound-off st around neckline edge.
Join to work in the round.
K 3 rounds. Break MC2.
Using CC1, k 1 round.
BO all sts using I-Cord Bind Off.
Weave in remaining ends.
| |
Nathan
has been obsessed with knitting for more than two years now. A native
Californian, he works as a freelance trumpet player with several
ensembles throughout Germany.
Currently Nathan is living in Berlin where hand-knit sweaters often
come in handy. A book of patterns for men is in the works. You can
check out his progress as KilgoreTrout over at menwhoknit.com! |
| Pattern & images © 2007 by
Nathan Plante. Contact Nathan |
|
|
|
|
|