Grandma Knitty Home
Knitty®: little purls of wisdom
what's the editor up to lately?feature articlesKnitty's generous selection of patternsKnittyspin³archive of previous issuesMeet other Knitty readers and chat in our coffeeshop!sign up for the free Knitty newsletterLooking for an ad fromone of our advertisers? Click here!Our tiny, perfect online shopping mallGet yourself a little Knitty treat!read the behind-the-scenes news at Knitty


Find exactly what you're looking for

The answer to your question about Knitty is probably here!

Take home something Knitty today

Advertise with Knitty

Get your cool stuff reviewed in Knitty

Full information about how  to get published in Knitty

Read exactly what FREE PATTERNS really means...respect our designers and authors rights [and thank you]

Knitty is produced in a pro-rabbit environment

© Knitty 2002-2007. All rights reserved. Unauthorized reproduction prohibited. This means you.


<click for more!
 
Knitting Matters


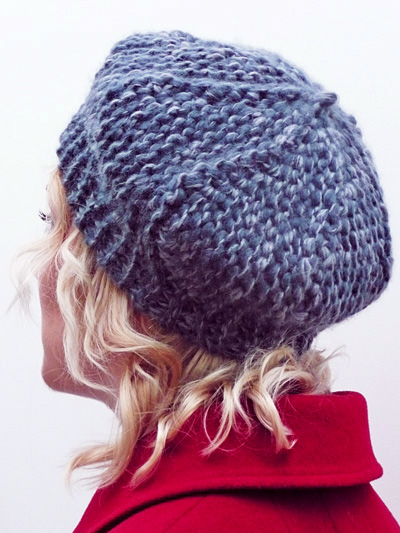
When I first found this beautiful thick and thin yarn in my local yarn store, I knew I wanted to make it into a beret. Nothing I tried worked, however; my beret kept turning out puckered and misshapen.

The solution was surprisingly simple, I turned my work on its side and suddenly the yarn worked with rather than against the pattern.

I named it Urchin because the texture reminds me of a sea urchin’s shell, while the shape is reminiscent of the caps street urchins always seem to be wearing in old photographs.

I originally designed this pattern to make use of the dusky pink thick and thin yarn and it is now my go-to pattern for yarns that are pretty in the skein but rather awkward to use. It would be the perfect way to showcase a special skein of handspun yarn. The design is very versatile though, and also works well with simpler yarns like the grey blue I’ve shown it in.

The beret is knit sideways in garter stitch and composed of eight wedges shaped with short rows. Because it’s in garter stitch there is no need to bother with picking up the wraps and the only part of this pattern that really pushes it into the tangy category is grafting the two short ends together to transform the unrecognizable curl of knitting into a hat. If you aren’t comfortable with that much grafting, it would be even easier -- but not quite so invisible -- to join the ends with a three needle bind off. Best of all it knits up quickly in bulky yarn, so as the cool winds start to blow, you can be warm and cozy.

model: Ysolda Teague photos: Shawn Teague

SIZE
Womens S[M, L] Shown in size medium
To fit approximate head circumference of 18-20[20-22, 22-24] inches.
 
MATERIALS

Pale Pink Hat
Knit Global Shetland Flame [96% wool, 4% nylon; 109yd/100m per 100g skein]; color: pink sherbet; 1 skein

Gray Hat
Lana Grossa Airwool [60% merino, 40% acrylic; 44yd/40m per 50g skein]; color: 005; 2 [2, 3] skeins

1 set 7mm needles
Waste yarn
Crochet hook
Yarn needle

 
GAUGE
10 sts/20 rows = 4 inches in garter stitch, unstretched
10 sts/12 rows = 4 inches in stockinette stitch
(Stockinette stitch gauge given for purposes of yarn substitution only.)
 
PATTERN NOTES

[Knitty's list of standard abbreviations and techniques can be found here]

Use a safety pin or other marker to keep track of the RS and WS of your work.

Crochet Cast-On
Using waste yarn, work a crochet chain several sts longer than the number of sts to be cast on.

Starting 1 or 2 sts in from end of chain and using working yarn, pick up and k 1 st in the back loop of each ch until the required number of sts have been picked up.

Later, the chain will be unraveled and the resulting live sts picked up.

Grafting Garter Stitch:
Directions for grafting garter stitch are included in this pattern.

If you would like a visual reference, a good one can be found here (PDF link).

PATTERN
Using Crochet Cast-On or other provisional cast-on method, CO 20[22, 24] sts.

K 1 row.

Wedge:
Row 1 [RS]: K to last 2 sts, W&T.

Row 2 [WS]: K to end.

Row 3 [RS]: K to last st before wrapped st of previous row, W&T.

Repeat these 2 rows 1[2, 3] times more. 3[4, 5] sts have been wrapped.

Row 4 [WS]: K to last 4 sts, W&T.

Row 5: K to last st before wrapped st of previous row, W&T.

Repeat this row 8 times more.

There are 5 wrapped sts on the wider side of the wedge; this edge will form part of the hat brim. There are 8[9, 10] wrapped sts on the narrower side of the wedge.

Row 6 [WS]: K to end.

Row 7 [RS]: K all sts.

Row 8 [WS]: Sl 1, k to end.

Repeat Wedge 7 times more, omitting Rows 7 and 8 of last Wedge.
FINISHING

Break yarn, leaving a 1-yard tail. Thread tail on yarn needle.

Remove waste yarn from CO edge and place resulting live sts on needle, beginning from center of hat (so that tip of needle is at outer edge).

Hold needles parallel, with needle with working yarn attached held to the front, with needle tips pointing to the right.

Graft seam as follows:

Step 1: Insert needle into first stitch on front needle from back to front, as if to purl.
Step 2: Insert needle into first stitch on back needle from front to back, as if to knit. Drop first stitch from back needle.
Step 3: Insert needle into first stitch on back needle from back to front, as if to purl.
Step 4: Insert needle into first stitch on front needle from front to back, as if to knit. Drop first stitch from front needle.
Repeat Steps 1-4 until all sts have been grafted.

Weave yarn through stitches at center of hat and pull tight to close up hole.
Weave in ends.

Optional: Make a stalk by pulling a short loop of yarn through to the right side at the centre of crown, and rub sides of loop together with damp fingertips to felt.

ABOUT THE DESIGNER

Ysolda is a young Scottish designer who is always either making something or blogging about making things, or more frequently attempting to do both at once.

She sells her designs on her website.