“To save time, take time to check gauge.”
“Check your gauge before starting.”
“IF YOU DON’T CHECK GAUGE, HAIR WILL GROW OUT OF YOUR EARS AND YOUR KNITTING WILL SPONTANEOUSLY COMBUST!!”
You’ve all seen the warnings … but is gauge really as important as they say it is? The short answer is yes. The longer answer is most of the time. This issue we’ll take a closer look at gauge – why it’s important and how to check it properly.
How important is gauge, really?
If the thing which you are knitting needs to be a certain size, gauge is incredibly important – fully as important as those dire warnings lead you to believe. We’ll talk a little bit about how important soon. The good news is that there are lots of things that you can knit where gauge is less crucial. Blankets, scarves, bags, some things that are to be felted and – to some extent – baby things can usually be knit in a variety of sizes. After all, babies grow and that sweater that came out way too big for a newborn will surely fit an 8 month old.
When you want to knit something where size matters - a sweater for your teenager daughter, mittens for yourself, socks for your best friend – a slight difference in gauge makes a large difference in finished size. If the pattern for a sweater gives a gauge of 28 stitches per 4 inches to make a size small and your gauge is 26 stitches per 4 inches, your finished sweater is not going to be the 32 inches in circumference that you thought but a full 2.5 inches larger. And that’s with only a difference of one half of a stitch per inch! And with a larger sweater in chunkier yarn the difference is even more dramatic. Gauges of 3.5 versus 4 stitches per inch on a sweater made with 200 stitches around the chest could make a difference of more than 7 inches. That’s a LOT.
Row gauge – though ignored by many a knitter – is also important, especially for shaping. Most patterns DO give a length to knit to – “continue until work measures 19 inches from cast on edge”. But if you’re knitting something such as a sweater with set in sleeves and your row gauge does not matches the row gauge in the pattern, the sleeve cap might not fit well in the arm hole.
Gauge, defined.
Gauge is defined by as “the fineness of a knitted fabric expressed by the number of loops per unit width”. Most knitting patterns give gauge as a number of stitches and rows per one, two or 4 inches (or cm). For example a common stitch gauge for a worsted weight yarn is 5 stitches per inch, which is the same as 10 stitches = 2 inches and 20 sts = 4”. Gauge information usually tells what kind of stitch pattern gauge is to be taken over – often this is stockingette stitch. (If I needed to check stitch gauge over reverse stockingette stitch, I would rather turn the work over and take the gauge over stockingette stitch since I find it somewhat easier to count knit stitches.) Each knit stitch makes one V on the right hand side of the fabric. One half of a knit stitch looks like either a slash (/) or a back slash (\).
Row gauge, however, is sometimes easier to read over reverse stockingette stitch by just counting the lines of purl bumps. Each line = one row.
Making a swatch.
Your swatch should be at least four inches wide and four inches long in order to take measurements properly. Taking gauge too near a cast on or bind off edge is not recommended because these edges tend to draw in and be tighter than the knitting itself. Yarns or patterns that tend to change shape with blocking – cotton yarns with lots of drape, yarns that bloom with washing and lace for example – should be blocked in the same way the pattern recommends for the finished object before you measure gauge.
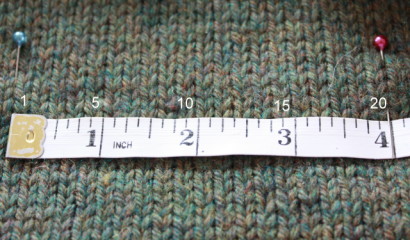
Place a marker – a needle or contrasting length of yarn, anything something that won’t push the stitches apart - to one side of a whole stitch.
Then place a second marker exactly 4 inches from the first one and count the stitches (and half stitches!) between the two markers. If you are using thick yarn, count also quarter stitches. Don’t forget to check your row gauge!
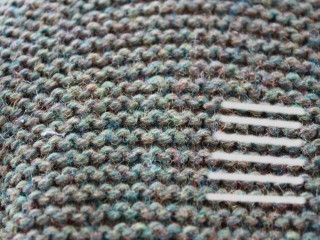
Measuring gauge on garter stitch
To measure stitch gauge in garter stitch, place the marker…
then stretch the knitting apart enough vertically to see the stitches and count.
Counting row gauge on garter stitch couldn’t be easier – each garter stitch ridge is two rows.
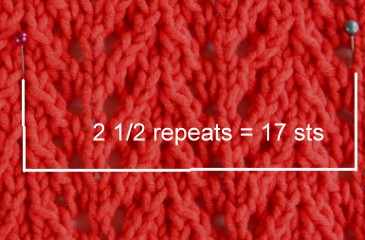
Measuring gauge on lace
Making a swatch for lace isn’t always necessary – gauge isn’t critical for scarves, stoles and most shawls. And sometimes the designer has been kind enough to provide us gauge over stockingette stitch!
If not use what you’ve learned from knitting the lace pattern for the swatch to help decide how many stitches is between the markers. Another method of measuring gauge over lace is to knit the swatch to one or two repeats and measure the size of the repeats.
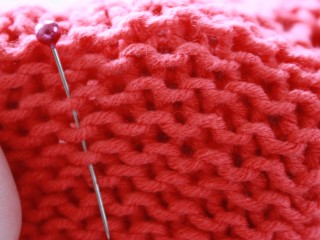
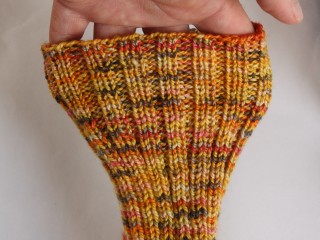
Measuring gauge on ribbing
Hopefully the pattern will tell you whether gauge is to be measured over ribbing that is unstretched, stretched slightly, or blocked. If the ribbing is to be measured stretched slightly then pull the ribbing apart enough so that the purl stitches that usually recede between the knit stitches before measuring become visible.
If the ribbing is to be blocked out - so that it looses most of its stretchiness - do this before measuring gauge.
I should admit that making a gauge swatch is not my favorite thing to do. There’s nothing quite as fun as starting something new and most times it feels that swatch is just standing between me and a good time. But making something that fits – and fits well – is really … kind of worth it.
|