You’ve mastered the basics of sock knitting. You’ve worked a variety of sock patterns, both plain and fancy … and now it’s time to expand your skills a little.
As a teacher of sock knitting, these are the topics I am asked about most often.
Using Non-Sock Yarns
More than anything else you’ll ever knit, socks will be subject to wear. Yarns designed specifically for sock knitting will be designed to endure. Sock yarns typically have multiple strands, rather than being a single ply, and are spun very tightly. They’re also often a blended yarn – wool features most often, and a bit of nylon is common. If you’re a natural-fiber enthusiast, don’t be put off by the nylon. Think of it as a helper thread, there to ensure your socks last longer. Even “non-wool” sock yarns – cotton (Fortissima Cotton, for example) or soy-based (SWTC’s Tofutsies), for example – usually have some wool in them. This means, of course, that the wool-sensitive have to look carefully when choosing a yarn for socks.
It is possible to use yarns that are not specifically designed or designated for sock knitting, but there a few things to keep in mind for best results. Look for a yarn that shares the same characteristics as sock yarn: it should be multiply stranded and tightly spun. (One of the most beautiful pairs of socks I’ve ever seen was worked in baby alpaca; unfortunately, due to the lofty, lightly spun nature of the yarn, they could only ever be worn on days spent sitting around at home.)
If you do want to use a non-sock yarn, unless you’re wool sensitive, look for a yarn that’s wool-based. Wool not only wears well but has a good deal of natural elasticity. Socks inevitably stretch out as they are worn, but wool bounces back very nicely when washed. Silk is good for this, too. Cotton on its own has little bounce-back. Once stretched, it’s there for good. Same for linen. This is why cotton sock yarns are almost always a multi-fibre blend. If you don’t want the wool, look for a blend with Lycra or something similar. See Amy Singer’s No Sheep for You for more information on yarn choices for the wool-sensitive.
And you want a yarn that’s smooth. A nubbly or bumpy yarn is going to feel pretty terrible underfoot. Smoothness is far more important than softness. I encounter a fair number of knitters who shy away from the more traditional wool/nylon blend sock yarns because they’re not particularly soft. Softness actually works against you in sock knitting – the softer the yarn, the more likely it is to pill and wear, and the less elastic it’s likely to be. Unless you’re a diabetic, your feet just aren’t as delicate as your hands. Don’t let yourself fall into the trap of choosing a yarn because it feels good on your hands. That’s not where it’s going to be worn.
Of course, it is a good idea to choose something that’s machine-washable.
If you really have your heart set on an inappropriate yarn for your sock, just use it for the leg, and work the foot in something more sensible.
Adding Pattern Stitches to a Plain Sock Pattern
You know the answer to this one already… you just don’t want to admit it to yourself… swatch, dammit, swatch.
You’ve probably got a favourite basic sock pattern, tweaked for a perfect fit – top down, or toe up, whichever you prefer.
But sometimes, you want something fancier. Whether lace or cables or colourwork, you can easily add pattern stitches to your favourite sock pattern.
First things first: measure your tension for the pattern stitch and compare it to tension for plain old stocking stitch. Calculate the number of stitches you would use for the plain sock and the patterned sock – you’ll need both numbers. (And yes, check your tension for colourwork, too. Most knitters have a different gauge when working with more than one colour.)
Consider the tightness of the pattern stitch. A sock always needs some kind of ribbing at the top to keep it up. (Unless you want slouchy socks, of course.) So even if you’re working a pattern stitch on the leg, keep your ribbing – and keep the number of stitches you’d use for the ribbing for a plain sock. Adjust the number of stitches to the number required for the pattern stitch once the ribbing is complete. The exception is that if you’re working a cabled sock, the cables themselves are basically ribbing anyway, so you can launch directly into the patterning.
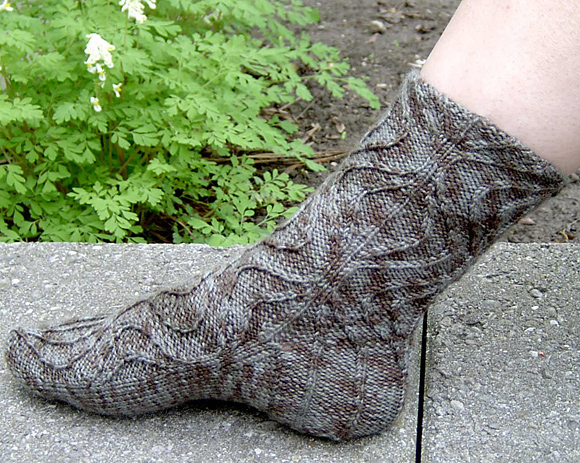
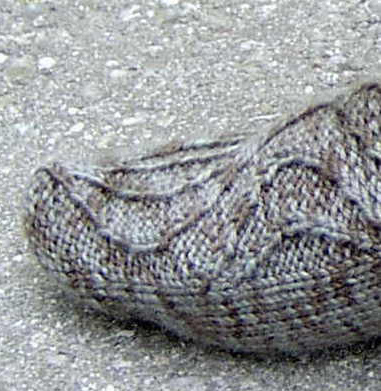
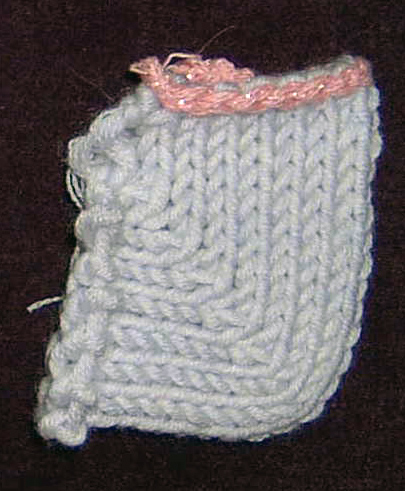
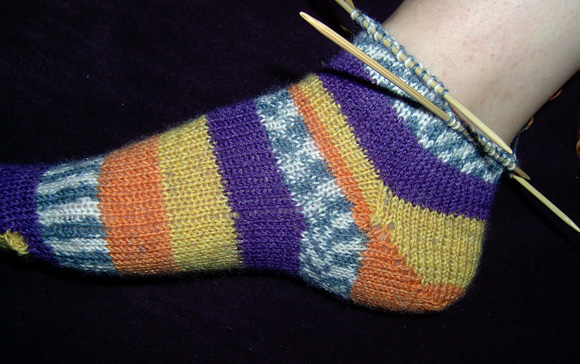
Pattern the top of the foot as you want, but in the words of Elizabeth Zimmermann, “the under part of the foot should be in stocking stitch – what else?” You want a smooth surface to stand on, after all. What you do with the heel is up to you:
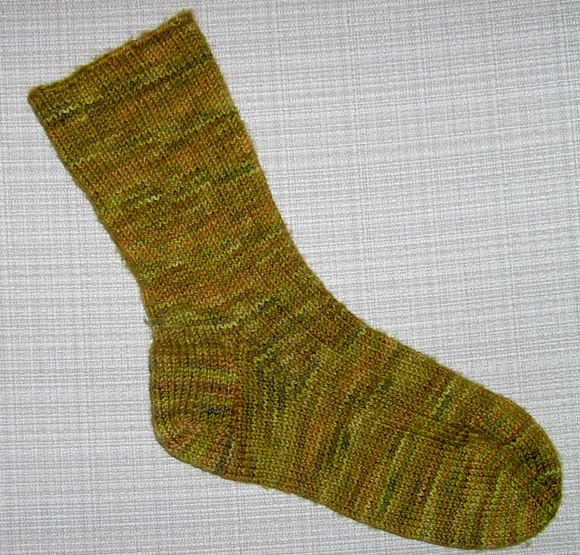
pattern away [see pic above], use heel stitch [instructions can be found later in this article] or leave it plain [see below].
If your pattern stitch gauge is different than your plain stitch gauge, you’ll need to adjust the number of stitches for the bottom of the foot. Do this when working your gusset decreases.
The toes are most often worked plain, in stocking stitch, although lately I’ve been experimenting with keeping the pattern flowing down into the toe.
The Flapped Heel
These types of heels are worked in two steps – a flap worked flat, and then the actual turn. The flap extends down from the leg and covers the back of the heel.
In my basic sock template, the heel flap is worked on half the stitches of the leg. For an adult sock, it’s usually about 5cm/2 ins - 6.5cm/2.5 ins long – or a number of rows equal to 2/3 to 3/4 of the number of heel stitches. That is, for a 32 stitch heel, work 24 rows.
As above, it can be worked plain or in a pattern stitch. Note that if you work it in a pattern stitch, it will make the heel bulkier, and therefore might not fit as easily in a shoe. The benefit is that it also reinforces the heel.
If you’re not using a nylon blend sock yarn, or if the socks are going to be used in particularly wearing environments (e.g. with winter boots, for hiking), it’s a good idea to reinforce the heel flap. The most common method is to work the flap with reinforcing stitch pattern. Heel Stitch and the Eye of Partridge variation are the most common.
Heel Stitch:
Row 1 (RS): *Sl 1 purlwise, k1; repeat from * to end.
Row 2: Sl 1 purlwise, p to end.
Eye of Partridge:
Row 1 (RS): Sl1, *k1, sl1; repeat from * to end.
Row 2: Sl 1 purlwise, p to end.
Row 3: Sl 1 purlwise, k1, *k1, sl1; repeat from * to last 2 sts, k2.
Row 4: As per row 2
Once the heel flap is done, you turn the heel. There are many different heel turns – Nancy Bush’s classic Folk Socks book (Interweave Press, ISBN 0-934926-97-1) details many of them.
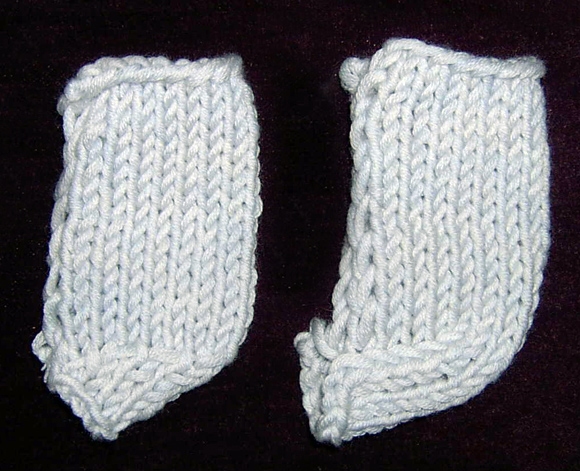
The two most common flapped heels are the Dutch (German, or Band) Heel (on the right in the picture) and the Half-Handkerchief Heel (on the left in the picture).
Dutch or German or Band Heel Turn
This is my favourite heel turn. It creates a nice-fitting heel that works for pretty much any foot. It has a shaped “band” under the foot, and allows for a gusset – that is, a section of increased circumference – for a better fit around the heel and arch. The size of the gusset is a direct function of the length of the flap. If you’re working for a foot with a very high arch, a longer flap is required.
Work a heel flap on the required number of stitches, ending with a WS row. When flap is completed, divide the heel stitches as evenly as possible into thirds. For example, a 30 stitch heel is 10/10/10, a 28 stitch heel is 9/10/9.
Foundation row: Knit the first 2/3s of the Heel Stitches, ssk, turn.
Row 1: Sl 1, p the centre 1/3 of the Heel Stitches, p2tog, turn.
Row 2: Sl 1, k the centre 1/3 of the Heel Stitches, ssk, turn.
Repeat rows 1 and 2 until all the stitches are worked. You’ll end after a WS row (Row 1), and you’ll have a heel band of x+2 sts, where x is the centre 1/3 stitches.
Using the Dutch heel provides flexibility to accommodate a pattern stitch. It allows you to vary the number of stitches in the heel flap without a significant change in fit.
The most common case is if you’re working a pattern stitch, and want the pattern to flow nicely down the instep. I recently worked a cabled sock on 60 sts. The heel would normally have been on 30 stitches, but to get the cables to flow unbroken along the foot, I worked the heel on 24 stitches. I compensated by changing the proportions of the heel turn. Normally, on a 60 stitch sock, you’d work a 30 stitch heel, which would mean that the resulting heel band would be 12 stitches (the centre third of 30, 10, plus 2). With 24 stitches for the heel, the Dutch heel turn proportions if worked as prescribed would result in a band of 10 stitches (8 is the centre third of 24, plus 2).
On this sock, I divided the heel for the turn as 6/10/6 rather than 8/8/8 to maintain a heel band of 12 stitches. What results is that the sides of the heel are narrower than they would normally be, meaning that the foot part of the sock starts further back than it would if you’d used the usual proportions. To compensate for this, I worked the gusset decreases more slowly than usual to cover the extra distance. That is, I worked the gusset decrease every third round rather than every other.
Half Handkerchief Turn
This is the other common heel turn. Again, it’s a good fit for pretty much anyone. It creates a flat triangle under the foot, and allows for a gusset to size the sock around the heel and arch.
It needs to be worked on an even number of stitches. It’s less accommodating for variations in the number of heel stitches, but it’s easier to memorize than the Dutch heel, and at least one reliable source (Elizabeth Zimmerman) claims that it wears slightly better.
Work a heel flap on the required number of stitches (usually half, as noted above; in this case it needs to be an even number), ending with a WS row. When flap is completed, work as follows:
Row 1 (RS): Knit half the heel stitches, ssk, k1, turn.
Row 2: Sl 1 purlwise, p1 p2tog, p1, turn.
Row 3: Sl 1 purlwise, k to 1 st before gap, ssk, k1, turn.
Row 4: Sl 1 purlwise, p to 1 st before gap, p2tog, p1, turn.
Repeat Rows 3 and 4 until all stitches are worked. You’ll end after a WS row.
The Flapless Heel – The Short-Row Heel
The short row heel is popular because it’s easy to work, and easy to memorize. There seems to be a common perception that a traditional heel turn is brain-bendingly difficult, and the short row heel is easier. It’s easy to work, no question, but I find it’s not always a great fit.
A short-row heel is most commonly worked on an even number of stitches, but this isn’t a hard-and-fast rule. It does not require a flap – you just start turning the heel when you’re ready. It fits quite differently than the two previous heels, as it doesn’t allow for a gusset in its standard form.
Again, it’s typically worked on half the total number of sock stitches.
Work the first half:
Row 1 (RS): Knit to 1 stitch before end of heel stitches, wrap and turn.
Row 2 (WS): Purl to 1 stitch before end of heel stitches, wrap and turn.
Row 3: Knit to st before last wrapped st, w&t.
Row 4: Purl to st before last wrapped st, w&t.
Continue as established, working always to one stitch before the last wrapped stitch. Work until about a third of the stitches remain unwrapped in the centre, ending with a WS row.
Now work back out again:
Row 1: Knit to first wrapped stitch, knit it (working the wrap with the stitch), w&t.
Row 2: Purl to first wrapped stitch, purl wrapped stitch, w&t.
Row 3: Knit to first double-wrapped st, knit it (working both wraps with the stitch), w&t.
Row 4: Purl to first double-wrapped stitch, purl it, w&t.
Continue as established, always working the wraps of the wrapped stitches with the stitch itself, until all the stitches of the heel have been worked and you’re back at the number you started with.
This can be used equally well for a toe-up or top-down sock.
See this tutorial on working short rows for details on the wrapping and how to work the wraps.
Adding Gussets to a Short Row Heel for Better Fit
This actually works for any sock that uses a short-row heel, whether toe-up or top down.
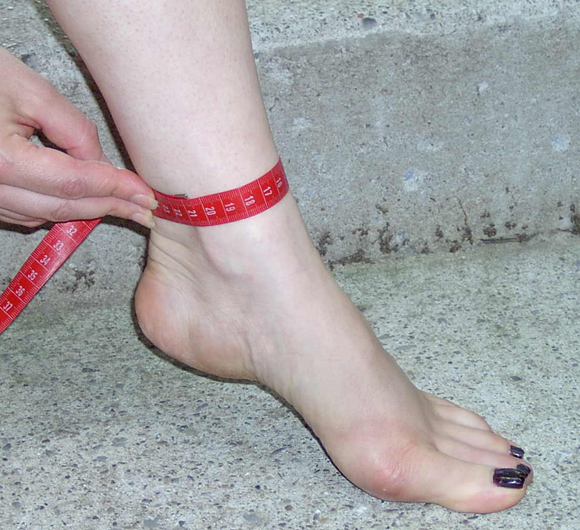
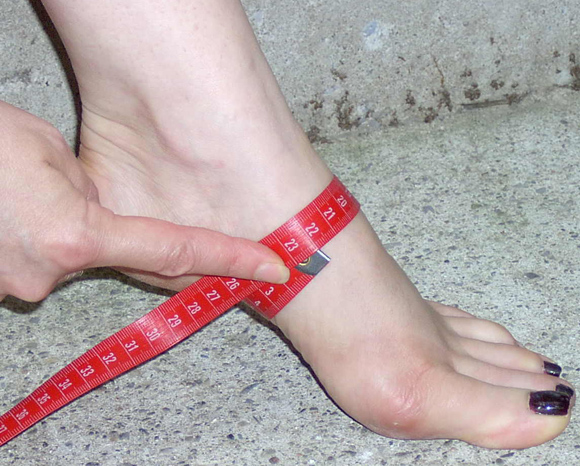
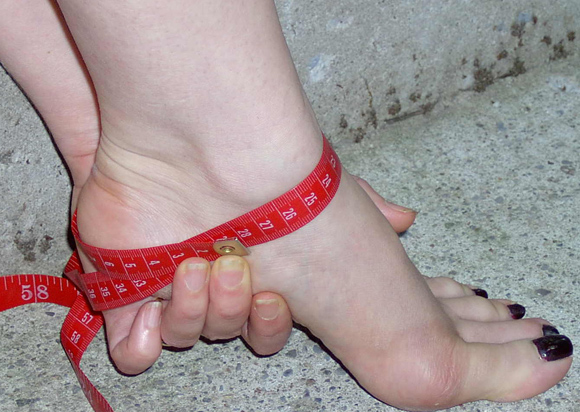
The key design feature of the short-row heel is that the number of stitches remains constant throughout the sock. The challenge with this is that it assumes the circumference of your heel and arch is roughly the same as that of your foot and ankle. This is definitely not true for me.
My ankle circumference is 21cm.
My foot circumference is 22cm.
But the circumference of my heel is 28cm.
I find that if the short-row heeled sock fits me well around the ankle and foot, it’s far too tight around the heel and arch; if it fits around the heel, it’s too loose everywhere else.
The way to solve this problem is to increase the number of stitches for the sock around the heel by adding a gusset. The heel itself doesn’t change; you’re actually changing the top half of the foot.
Begin by working out how many stitches to increase. A typical gusset is about 10% of the total number of stitches on each side. On a 55-60 stitch sock that’s 6 additional stitches each side – 12 in total.
The increases should be worked in the “upper” or “front” half of the stitches – that is, the stitches which will be on the instep of the foot. Start the increases as you’re approaching the heel, work the heel as normal, and then decrease them back down after the heel is done.
If you’re working toe-up, increase every other round until you have the required number of stitches, and then work the corresponding decreases on the leg every round. I usually work the increases at either end of the instep stitches. If you’re working top down, increase every round on the leg and then work the corresponding decreases every other round on the foot. The foot is typically “slantier” than the leg, hence the difference in the rate of increase/decrease. When to start? This is where your row/round gauge applies… figure out how many rounds you’re working the increase over, and then start that many rounds before the heel turn.
For example, if you’re working a 60 stitch sock toe-up, you need to increase 12 stitches in total. You work 2 increases per round – making 6 increase rounds; and you increase every other round, so that’s 12 rounds in total. If your row/round gauge is 10 rounds per 2.5cm/inch, then you need to start your increases slightly more than an inch, or about 3cm, before the heel is to start.
If you’re working a 60 stitch sock from the top down, you need to increase 12 stitches in total. At 2 stitches per round, increasing every round, you need 6 increase rounds, which means you need to start increasing about half an inch/1.5 cm or so before the heel.
The sock is otherwise worked as normal.
Toe Shaping
Three things control how the toe looks: the number of stitches left before closure, the rate of the decrease, and the position of the decrease. How the closure is worked is less important in the fit.
When to Start
For an adult sock worked on fingering weight yarn, you start the toe about 5 cm/2 inches short of the desired sock length.
I typically work my socks a little shorter than my foot, so that they stretch to fit. I find that a sock worked to precisely my foot length stretches with wearing and becomes too loose through the day. My foolproof way for figuring out how far to knit before starting the toe is to try the sock on, letting it stretch a little. As soon as I’ve hit the toes, I start the decrease.
If you’re working a pattern stitch and switching back to stocking stitch for the toe, you’ll need to reset the number of stitches back to the number that would be required for the plain sock. Decrease or increase appropriately in a plain round, and then begin the toe shaping.
To be more precise about when to start – and if you’re using a different gauge yarn – you should use the row/round gauge to calculate the distance over which the toe shaping takes place.
For example: you’re working a 56 stitch sock on yarn with a gauge of 32 stitches and 40 rounds. You want to decrease down to 8 stitches, using my favourite 3/2/1/0 decrease pattern. 56-8=48 stitches in total to decrease, and at 4 stitches decreased per round, that’s 12 decrease rounds. And with the 3/2/1/0 pattern, you work 26 rounds in total for the toe: you work 1 decrease & 3 even, 1 decrease & 2 even twice, 1 decrease & 1 even three times for a total of 16 rounds containing 6 decrease rounds, and then 10 more rounds of decreasing every round to get to 8 stitches. And at my gauge, that’s about 2.5 inches or 6 cm or so. But here’s where the precision gets less precise: because you’re decreasing, you’re actually creating a slope, and the vertical distance of the toe will be shorter than this – by about a fifth. Hence 2.5 inches worth of rounds become 2 inches vertically. And magically, 2 inches is usually the recommended toe length.
When to Stop
The number of stitches you decrease to depends on the shaping of the toes.
If you’re working a sock for a foot with a fairly broad top – that is, when the toes don’t differ much in length – stop the decreases sooner. If you’re working for a foot with pointy toes – as in my case, where my big toe is much longer than my baby toe – work the decreases longer, so that you end with fewer stitches. Very broadly speaking, women’s feet tend to be narrower and pointier than men’s, so for a woman I’ll work down to 8 or 10 stitches, for a man’s 10 to 14. See notes below on the closure.
Rate of Decrease
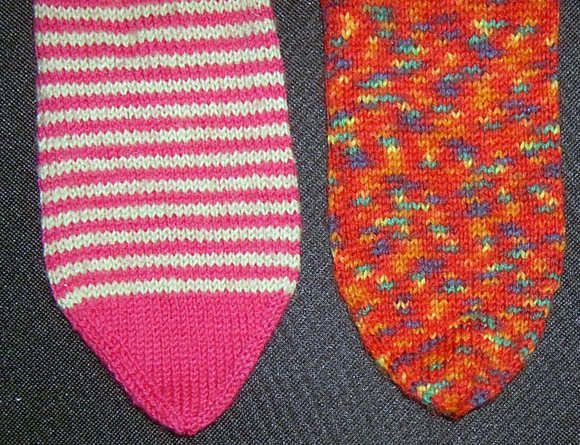
Decreasing every other row produces a very pointy toe, in the green and pink one on the left the picture below.
A rounder toe – as in the red sock on the right in the picture above– is produced by working the decreases less often at first, and then increasing the frequency later on.
Pattern 1: My Favourite
1 decrease round, 3 even.
1 decrease round, 2 even – twice.
1 decrease round, 1 even – three times.
Decrease every round to desired number of sts.
Pattern 2: Easier to remember.
Alternate decrease and even round until you’ve worked half the total number of decreases. Then decrease every round until the full number of decreases has been worked.
Position of the Decrease
The first three are very minor variations of the same idea, and are all quite common.
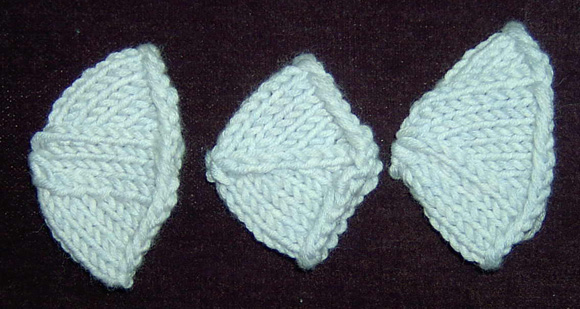
The Wedge Toe
The leftmost toe in the picture. This is a very common toe, and it fits nicely.
With the centre of the heel (the sole) as the start of the round, divide the stitches into four quarters.
Decrease round: Work to 3 sts before the first quarter, k2tog, k2, ssk, work to 3 sts before the last quarter, ssk, k2, k2tog, work to end of round.
The Double-Decrease Toe
The centre toe in the picture. This is a minor variation on the wedge, which creates a flatter toe.
With the centre of the heel (the sole) as the start of the round, divide the stitches into 4.
Decrease round: Work to 2 sts before the first quarter, work a double decrease, work to 2 sts before the third quarter, work a double decrease, work to end of round.
My favourite double decrease is s2kpsso – slip 2 sts knitwise together, knit 1, pass slipped sts over knit st.
The Star Toe
The rightmost toe in the picture. The fit here is just as good, but it doesn’t look as flat. It is easier to work in that it only uses a k2tog.
With the centre of the heel (the sole) as the start of the round, divide the sts into 4.
Decrease round: Work to 1 st before first quarter, k2tog, work to 1 st before half, k2tog, work to 1 st before third quarter, k2tog, work to 1 st before end of round, k2tog. (Rearranging the sts on the needles slightly can make this easier to work.)
The Round Toe
Work fewer decrease rounds, decreasing more stitches per round, and distribute the stitches evenly through the round. Follow your favourite hat top shaping. This is particularly useful when working socks for a broad foot with a flat top, as you work fewer decrease rounds.
On The Closure – Two Solitudes
There is great debate about the proper closure of the toe of a sock. I feel very strongly here that there’s no one right answer – it’s all about what you like and what looks good for your particular sock and foot.
As noted above, I work my socks down to 8 or 10 stitches, and simply cinch the top closed – I thread the yarn through the final stitches and pull tight to close. It’s quick and easy, no question, but it doesn’t work very well if you’re working a broad toe.
Others swear by grafting or Kitchener stitch. It’s fiddly, and I personally don’t like the “ears” that result, but it’s great for finishing a broader toe. For detailed instructions, see Theresa’s article.
Everyone has their preference – I encourage you to try both. It’s like voting: ultimately, it’s more important that you do it than how you do it. |