Knit smarter, not
faster
A manifesto of
sorts by Jenna Wilson
I had been knitting for
several years before I realized that the measure
of one's skill as a knitter is not merely
a tally of technical milestones or finished
projects. Rather, it is a product of
technical proficiency and the ability to supply
context to a knitting project where little
context, or no context, is provided.
What do I mean? Well,
there are knitters who routinely knit sweaters
from written patterns as gifts for their extended
family every year, but cannot improvise a
garment on their own. Yet there are
also "novice" knitters who have
no hesitation in knitting an allegedly difficult
project, or combining disparate design elements
into one garment. There are knitters who seem
to be incapable of deviating from a written
pattern, and others who must always apply
their own improvements. And there are knitters
who are disappointed when they finally try
on a finished garment and discover the fit
isn't right, while other knitters are able
to spot potential fit issues before committing
the resources and time to a project, and either
work around or avoid the problems altogether.
What's the difference? Is
it a question of having the confidence to
make mistakes and rip back if necessary? Not
entirely, because ripping back is a fact of
knitting life. If the experience of
knitting from patterns can teach you anything,
it's that many patterns contain errors that
the technical editors miss, and that anyone
can misread even straightforward instructions. Is
it tunnel vision from knitting too many intarsia
reindeer? That's really a taste issue, and
beyond the scope of this article [not to mention
beyond hope].
This difference is best
described as the degree of context the knitter
is able to bring to his or her work.
Call it knitter's instinct, or plain common
sense; context is the ability to knit "smarter"
-- the ability to supply details to a pattern
with deficient instructions, or to identify
the source of errors and the means of correcting
them. It's having a starting point for creating
an original design, insight into shortcuts
for making knitting, fitting or finishing
easier, and being able to visualize the big
picture.
Context is also difficult
to teach. Ideally, it's gained by experience,
but that's not the case for everybody. And
while it's possible to teach the individual
morsels of knowledge that form part of knitting
context, it is not as easy to impart the insight
that combines all those elements into successful
garment design. Part of that insight
is an understanding of garment structure,
and how that structure can be achieved.
Most instructional knitting
books concentrate on only the technical aspects
of knitting: they are catalogs of cast-on
techniques, decreases, increases, and buttonholes.
But all such techniques are merely the building
blocks of a knitted garment.
What instructional books
are often missing is an appreciation of garment
design and structure. Without the ability
to shape knitted pieces into a properly fitted
garment, knitting merely produces a substrate
for texture or colour. That's fine if you're
planning to knit and wear pillowcases; but
if you wish to be able to knit garments that
fit your body, rather than merely sit in storage,
you need to knit smarter: you need to understanding
the shaping you wish to achieve, as well as
the techniques that allow you to achieve it.
Developing this knowledge
has additional benefits, even if you don't
have design aspirations. Being able to supply
your own context to patterns will make pattern
reading easier, and allow you to work around
errors, because you will understand the logic
behind the written instructions. It will also
help you think ahead in your knitting, and
plan changes to improve fit and make finishing
easier.
What I hope to do with this
column is to help you develop your own context
and knit smarter by focusing on structure
and form. So, here's the plan. The rest of
this article is preparatory work. We'll
review one element of knitting smarter: reading
your knitting pattern properly, and learning
how to extract information from whatever written
instructions you have -- a necessary step
on the way to effecting alterations and improvements. And
in the following two issues of Knitty, we
will concentrate on one aspect of the theory
behind garment design and structure, but with
a practical application: we'll learn to add
sleeves to a sleeveless garment, starting
first with the simple drop shoulder and modified
drop shoulder, then moving on to the set-in
sleeve with shaped cap.
Reading comprehension
One important method of
avoiding grief in knitting is mind-bogglingly
simple, but often ignored. If you read through
a pattern before you pick up the needles,
the actual process of knitting the pattern
will be easier. And if you're planning to
make improvements or changes to the design,
particularly fitting alterations, it's an
excellent idea to milk the written pattern
for as much information as possible.
Preparation
Start by taking a look at
what you've got. Hopefully, you have
complete -- if cryptic -- knitting instructions,
any necessary charts and symbol keys, separate
instructions for special stitch patterns,
and a schematic. At the very least, you should
have some instructions. Not every pattern
includes schematics, particularly those that
are short on space [if you collect "vintage"
knitting patterns and magazines, you will
have noticed that schematics were frequently
omitted].
Before committing to knit
this pattern, you also will have hopefully
determined that the garment style is actually
flattering to you [or the intended recipient].
First, read
the pattern from beginning to end. You're
not reading for correctness, just glaring
errors and clarity.
-
Is there sufficient
information to enable you to choose a
suitable yarn -- at the very least, the
intended gauge?
-
Based on the photos
and description, count the number of parts
you need to knit to yield a whole garment
[for example, for a cardigan there might
be a back, two sleeves, two fronts, a
front band and a neck band]. Are there
instructions for each of these parts,
or is something missing?
-
Wherever the pattern
uses some unfamiliar abbreviation, or
references a stitch pattern [for example,
"herringbone st" or "fancy
stitch patt"], check to make sure
a definition is provided.
-
If the pattern references
one or more charts, make sure they're
present, and check the symbol key to make
sure you understand each symbol. If
your pattern requires that you follow
more than one chart at a given time [for
example, if you are knitting an Aran sweater],
make working copies of these charts, and
tape them to a separate piece of paper
so they are side by side, if that will
help you. If you run through multiple
repeats of one chart while you're still
working the first repeat of another, consider
making multiple copies of the shorter
chart, and tape them in place, too.
-
If the pattern makes
use of recursive or otherwise cryptic
instructions, now is the time to decipher
them. Write them out in detail, while
your head is clear, for reference later.
-
If you notice any "at
same time" or similar instructions
that expect you to execute more than one
shaping step at a time [a tip on identifying
those problem areas is given below], highlight
them in the text. Otherwise, you
may miss them when knitting the pattern,
resulting in some inconvenient ripping
back.
Next, if your pattern has
a schematic and you have the means, make
an enlargement of the schematic
so that you can write numbers, measurements,
and brief notes on it comfortably -- aim to
fill most of a letter-sized piece of paper
with the schematic of a single piece. If
you don't have the means to make an enlargement,
sketch out your own supersize schematic on
a piece of graph paper, and write in any measurements
provided on the schematic. If your pattern
does not include a schematic, sketch out your
own, making your best guess from the photographs
and descriptions provided.
Make
a note of the pattern's gauge
per inch
at the top of your schematic. Gauge is typically
given as a number of stitches and rows over
a span of 4 inches [10 cm] or 2 inches [5
cm]. It's an easy calculation to break this
down as numbers of stitches and rows per inch
[2.5 cm], and it's handy to have these numbers
at your fingertips.
Visualization
 |
For now, we'll stick
with a typical sweater pattern, which
is knit in pieces from bottom to top.
This particular hypothetical pattern
has a deep V-neck and set-in sleeves.
Take a look at your schematic, and apply
some geometric logic.
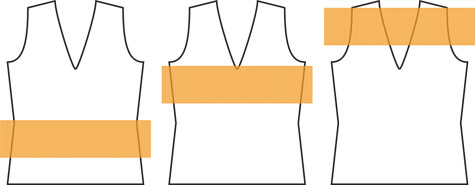
Looking at our hypothetical
design, we notice that there is some
ribbing at the hem, decreases and increases
defining the waist, as well as the expected
armhole decreases and neck shaping.
|
The hypothetical front
of a hypothetical sweater
|
 |
In fact, we can draw
horizontal lines across the schematic
to denote the various shaping zones,
as shown on the left.
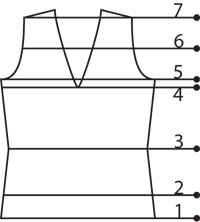
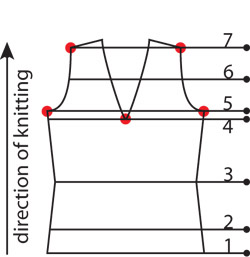
In this schematic,
the front starts with ribbing at line
1. The ribbing ends at line 2, at which
point there are decreases that taper
the body to line 3. After line 3, the
width increases up to line 5; however,
you'll note that first, at line 4, the
V-neck begins. Between lines 5
and 6, the armhole is decreased, and
then worked even up to line 7, which
is where the shoulder shaping begins.
|
Dividing
your schematic
into shaping zones. |
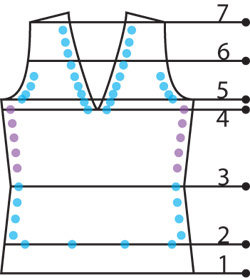
Now, imagine that you were
to hold a ruler or other straight edge across
the schematic, and slide the straight edge
upwards, in the direction of knitting.
Examine the orientation and number of lines
in the schematic that intersect the straight
edge at various positions.
|
| Sliding a
straight edge along the schematic. |
Because we're knitting upwards
from the bottom [the same would apply to knitting
downwards from the top], straight or "even"
knitting with no increases, decreases, or
other shaping is represented by schematic
lines that meet the straight edge at a right
angle [90Å]. An angle other than a right
angle suggests that there is some shaping
to be worked in that zone.
In the left-hand diagram,
two lines of the schematic do not meet the
ruler at a right angle; instead, they slant
towards the center of the schematic.
You can infer quite easily that there must
be some decreases worked in this area, and
you should be able to confirm this by checking
the written instructions. Furthermore, the
lines of the schematic are symmetric around
the imaginary center line of the garment;
they slant at the same rate towards the center,
and again, you can easily infer that the decrease
instructions for either side of the garment
must match.
In the center diagram, the
upper edge of the ruler now intersects four
lines, all of them at non-right angle intersections.
The fact that there are four lines obviously
means that there are two parts to the garment
to knit at that stage -- the left side and
the right side of the neck.
 |
But there's something
else to note: on each side, the angle,
or slope, of the lines intersecting
the ruler are different. The slope
of the neckline is different from the
slope of the side edge at this point.
The fact that the slopes are different
suggests that you have different shaping
instructions for each edge that must
be followed [the notorious "at
same time" instructions].
Similarly, in the
right-hand diagram above, there are
two pieces [left and right shoulder]
to be knit, and the design lines have
different slopes: while you are shaping
the shoulders, you should be alert to
the fact that you may have some neck
shaping to work at the same time. You
may have already flagged these potential
problems during your first read through
the pattern; if not, you can go back
and highlight them now, and even highlight
the trouble zones on your schematic
[see diagram at left]. |
Highlighting
trouble ["at same time"] spots.
|
Calculation
When preparing to knit a
pattern, it's also useful to write
in your own checkpoints --
stitch and row counts at the end of each shaping
zone in your pattern.
Many patterns provide stitch
counts at certain points: for example, after
all the decreases from the hip to the waist
of a pullover have been completed, or after
all the increases in a sleeve have been completed. However,
patterns do not always provide stitch counts
after the completion of each shaping zone
in a pattern, and fewer provide row counts. For
example, instructions often read "knit
until piece measures 14 inches from cast on
edge, ending with WS row," rather than
providing the exact number of rows to be knit. Since
a measurement of length in knitting before
blocking can be grossly inaccurate, it's wiser
to knit to a set number of rows rather than
holding a measuring tape to your knitting.
 |
Based on the written
instructions in the pattern, make some
simple calculations now based on your
gauge, and write the stitch and row
count you expect to have at the end
of each zone on your schematic, as well
as the corresponding measurements in
inches or centimetres. At the same time,
count the number of decreases and increases
you expect to make in each zone, and
mark them on your schematic as well. |
| Marking increases
and decreases on the schematic. |
Immediately before
committing to the project
Swatch
with your chosen yarn.
Really.
There are knitters who proudly
claim that they have never swatched before
knitting a sweater in their lives. Have you
actually seen them wear those sweaters? And
do you want to look like them?
There are two circumstances
where it is reasonably safe to forego swatching:
when an exact finished size for a single knitted
piece is not crucial, and when you have used
that particular yarn with that particular
size of needles so frequently that you can
accurately predict the characteristics of
the knitted fabric they will produce. A
scarf or shawl is still functional even if
your knitting gauge is a little off, and you
probably can compensate for any extra or lost
width or length by working fewer or more repeats
of the pattern -- assuming you have sufficient
yarn. But when a knitted piece is meant
to be seamed to another or to conform to a
particular body shape and size, if you want
to be reasonably assured of the final result,
you will knit a six-inch [15 cm] square
swatch before you embark on the actual
project. And you will like it.
During knitting
As you knit, refer to your
schematic as well as the written pattern,
and check off
decreases and increases as
you knit them. By tracking the increases and
decreases, and by marking the points at which
there are "at same time" instructions
to be followed, you have a warning system
in place that will hopefully alert you to
follow the written instructions more carefully,
thus avoiding mistakes.
Some patterns will explicitly
tell you to work all your shaping stitches
one or two stitches in from the edge, so that
you are left with a clean selvedge for seaming. Other
patterns may miss that detail, and simply
instruct you to "dec 1 at each side." In
that case, make
a note of how you've decided to work increases
and decreases along garment edges. It
will save guesswork later when you come to
work matching pieces, such as the second sleeve.
Once you reach the dreaded
"at same time" or "work as
for other side, reversing shaping" shoulder
and neck shaping of a garment, if the instructions
are not explicitly provided, take the time
to record in
detail exactly how you are knitting the first
side -- on what rows you have
chosen to work decreases to shape the neckline,
for example. That way, you will be able to
work the mirror image on the other side of
the neck with more confidence.
But do I have to?
Carrying out each and every
one of these steps in preparation for a knitting
project does sound laborious. Of course, it
isn't necessary to do everything listed above.
However, if you anticipate difficulties in
interpreting the instructions on the fly,
or you are concerned that a pattern is beyond
your current skill level, it's a good idea
to read the pattern through before you start
so that you're not caught by surprise. And
if you are planning any modifications to the
pattern, whether to customize the fit or alter
the style, it's extremely useful to sketch
a large schematic and have all the relevant
numbers at your fingertips. In the upcoming
articles on sleeves, we will assume that this
type of preparation for the original sleeveless
pattern has already been done.
Resources
Gibson-Roberts, Priscilla,
and Deborah Robson, Knitting in the Old
Way: Designs and Techniques from Ethnic Sources
[Nomad Press, 2004]. This book was recently
republished. It's a wonderful reference, covering
the construction techniques, stitch patterns,
and shaping in many folk sweaters from around
the globe; and in fact a passage from this
book was the inspiration behind this series
of articles.
Newton, Deborah, Designing
Knitwear [Taunton, 1998]. This book is
an excellent reference for anyone who wants
to embark on handknitted garment design at
any level. In addition to covering the
basics of garment shaping, Newton encourages
exploration [via swatching] of knitted fabric,
texture, and colour, and demonstrates her
sources of inspiration for knitwear designs.
Walker, Barbara, Knitting
from the Top [Schoolhouse Press, 1996]. Nothing
focuses your mind on the shaping of a garment
like knitting it in a different direction.
Even if you do not choose to knit from the
top down, reading through this book with its
verbose directions will help you appreciate
garment construction and what knitted fabric
can do for you.
None of the above references
provide you with hard pattern instructions,
or if they do, those instructions are provided
as an afterthought. The directions in these
books are phrased as general directions, and
you are expected to work with your own numbers
[measurements, gauge, finished dimensions]
to arrive at a finished product.
"The Method of Three,"
INKnitters. This
is a three-part article on adjusting pre-written
patterns to fit; however, there's probably
enough data contained in the article to allow
you to calculate the instructions for a sweater
from scratch. So far, the first two
parts of this article have been published
in the winter 2003 [Issue #11] and spring
2004 [Issue #12] issues; the third should
be published in summer 2004 [Issue #13].
While you may not need the information in
these articles right away, I recommend that
you pick up copies of these issues while they're
still available.