Knitty is dedicated to...
Knitty: little purls of wisdom
letter from the editorfeatured articlesKnitty's fabulous pattern selectionarchive of back issuestell us what you think of KnittyKnitty's favorite linkshelp knitty keep on keepin' onknitty's virtual sNbjoin the Knitty notifylistknitty's tiny little shopping malltake home something Knitty


purlsoho.com

the Knitty FAQ

submission guidelines for designers and writers

the obligatory legal statement

the rabbit

© Knitty 2002-2006. All rights reserved. Unauthorized reproduction prohibited. This means you.


anoukjewelledbad penny graceT3lite brite rosebudhoneymoonotis
boogieglamouflagefrill devanparty aproncut your teethsueetbonbon

I love little handbags because they symbolize freedom from my usual cargo of diapers and crayons.  This bag is small enough to be cute for a date but big enough to hold the adult essentials comfortably. 

The design was inspired by two simultaneous events: a glimpse of interesting tied straps on a handbag carried by a passing fashionista, and a love-at-first-sight reaction to the suede-esque GGH Velour yarn spotted while playing hooky on a left-coast biz trip at-where else-a very cool [Knitty-aware] yarn shop! 

I 've deliberately kept the knitting simple.  If you have basic sewing skills, I encourage you to make the lining, as it will help the bag keep its shape better and last longer.

model: Sarah Fairman photo: Natalie Wilson

SIZE
One
 
FINISHED MEASUREMENTS

Width: 9 inches
Height: 8 inches
Depth: 2 inches

MATERIALS

GGH Velour [100% nylon; 58 m per 25 g skein]; color: 07; 4 skeins 
Note:  If you can 't find GGH Velour, Berroco Suede [100% nylon; 120 yds per 50 g skein] is a perfect substitute; you will need 2 skeins

1 set(s) US #7/4.5 mm double-point needles
1 set(s) US #7/4.5 mm straight needles
1 set US #6/4 mm straight needles
Approx. 10 yds smooth cotton waste yarn in contrast color, DK weight or lighter
Stitch holders (4)
Yarn needle
Marking chalk
Snap (1) for bag closure (consider a magnetic snap if you intend to line the bag)

Optional [for lining, recommended to enhance durability]

Piece of cardboard, 2 inches x 7 inches
Piece of fabric measuring at least 10 inches x 21 inches (a "fat quarter" from a quilt shop is perfect)
Sewing machine
Sewing thread and needle


GAUGE

20 sts/32 rows = 4" in stockinette stitch with larger needles

 
DIRECTIONS

Bag

With larger needles and waste yarn, CO 96 sts.
P 1 row.
K 1 row.
P 1 row.
Change to MC, leaving a 36 inch tail for joining bottom of bag later (Hint:  wrap it up into a butterfly to prevent it from bothering you as you work).
Beg with a RS row, work even in St st until piece measures 8.5 inches from beg of MC, ending with RS facing.
Work 10 rows even in garter st.
Next row:  BO 11, k 5 and place on holder A, BO 17, k 5 and place on holder B, BO 20, k 5 and place on holder C, BO 17, k 5 and place on holder D, BO rem 11 sts.
Break yarn, leaving 15 inch tail for sewing.

Long Straps

With smaller needles and WS facing, rejoin yarn to 5 sts on holder A.  Work even in garter st for 69 rows.
Next row (RS): K1, sl 1, k2tog, psso, k1 (3 sts).

Work even for 10 rows.
Next row
: K1, m1, k1, m1, k1 (5 sts).
Work even for 6 rows.
Next row
:  K1, m1, k3, m1, k1 (7 sts).
Work even for 8 rows.
Next row
:  K1, k2tog, k1, k2tog, k1 (5 sts).
K 1 row.
Next row: K1, sl 1, k2tog, psso, k1 (3 sts).
K 1 row.
Next row: K1, sl1, k2tog, psso.
Break yarn and draw tail through rem sts.
Rep from beg with sts on holder C.

Short Straps

With smaller needles and WS facing, rejoin yarn to 5 sts on holder B.  Work even in garter st for 5 rows.

Next row (RS): K1, sl 1, k2tog, psso, k1 (3 sts).
Work even for 10 rows.
Next row: K1, m1, k1, m1, k1 (5 sts).
Work even for 6 rows.
Next row: K1, m1, k3, m1, k1 (7 sts).
Work even for 8 rows.
Next row
: K1, k2tog, k1, k2tog, k1 (5 sts).
K 1 row.
Next row
: K1, sl 1, k2tog, psso, k1 (3 sts).
K 1 row.
Next row: K1, sl1, k2tog, psso.
Break yarn and draw tail through rem sts.
Rep from beg with sts on holder D.
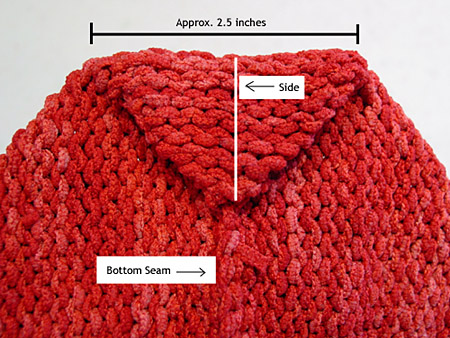
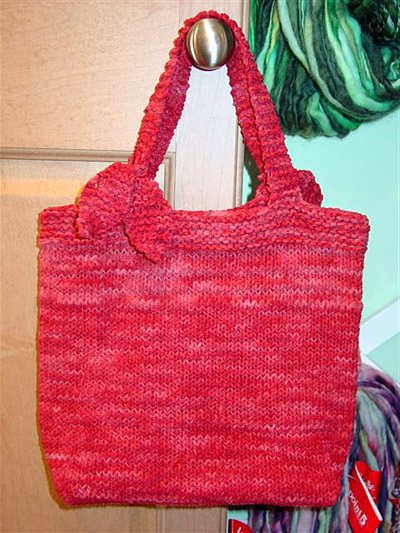
Tie long straps A and C to short straps B and D, respectively, as shown in photograph.


FINISHING
With RS facing, working from right to left, place 48 sts from first row of MC on one dpn by inserting needle through first (right) leg of each st.  Rep for next 48 sts using a second dpn.  Carefully remove waste yarn.  Holding RSs tog, use a third dpn and the long tail of MC to work a 3-needle BO to join bag bottom.
Use tail from BO row to sew bag side seam.
Weave in ends. 

Form gusset (see photos for assistance):  Turn bag inside out and lay flat with side seam at left.  With chalk, mark RH side edge of bag opposite side seam for 2 inches above bottom seam. 


Fold bag so side seam and bottom seam are along the same line.  Turn work so the resulting point where the side seam meets the bottom seam is away from you.  At a point 1 inch down from the point, mark a line perpendicular to the seams; this line should be about 2.5 inches long.  Sew through all layers along this marked line.  Fold the point to the bottom seam edge and tack down the point to the bottom seam. 

Repeat for the other side of the bag, beg by matching marked side edge to bottom seam.  Turn bag right side out.  If not lining bag, mark snap position on inside, centered between handles and 0.5 inch from top of bag.  Sew snap securely, being careful so that stitching does not show on RS of bag. 

Optional lining
Cut a piece of cardboard to 2 inches x 7 inches.
Trim corners.
If desired, cut a piece of fabric 4 inches x 10 inches and cover the cardboard as though you were wrapping a present.
Secure with glue or tape. 
Cut another piece of fabric 10 inches x 19 inches. 
Note:  experienced sewers may wish to make a pocket and sew it to the lining at this point.
Fold the fabric in half with RS together so it measures 10 inches x 9.5 inches.
With sewing machine, sew side and bottom seams.
Create a 1-inch hem at top edge.
Create gusset as for bag.
Install magnetic snap (or sew regular snap) at top edge at the midpoint between the side edges.  Turn lining WS out.
Place covered cardboard in bag with finished side down.  Place lining in bag and using sewing thread and needle, sew it invisibly to bag approx. 0.5 inch from top of bag. 


ABOUT THE DESIGNER

Natalie is a knitwear designer and knitting teacher and generalized yarn freak in the Detroit area. Her knitting patterns are now sold in yarn shops in two countries and four time zones.

Learn all about it at iknitiative.com.


[The shawl shown above is Natalie's Sunrise/Sunset Poncho, in three colors of Noro Silk Garden, worn sideways like the Sidewinder Poncho. See both at http://www.iknitiative.com/patterns.htm]