The possibilities
are endless: your favorite band's logo,
your niece's favorite cartoon character,
even the face of the latest teenage heartthrob
(for those with a million colors of yarn
and a million hours of free time). This
tutorial assumes you are familiar with the
basics of Photoshop, but the technique can
also be used with Paint Shop Pro.
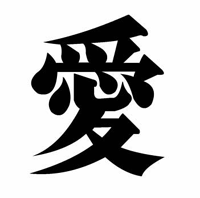
1) Find and open the
image you want to knit. You can use google
or other search engines. Pictures with few
colors (usually gif files) work best. You
also probably want an image that is not
very detailed. In this example, I used the
Chinese word for love.
2) Crop the image
so that there is very little border.
3) Resize the image
(Image>>Image size) so that its width
in pixels is 10 times the width in number
of stitches. I wanted the final product
to be 30 stitches wide so I made the image
300 pixels wide. Make sure you remember
to constrain proportions.
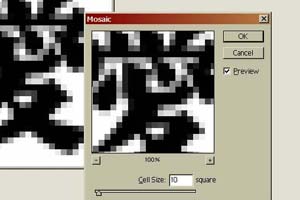
4) Then, apply the
mosaic filter ( Filter>>pixelate>>mosaic).
You want a cell size of 10.
5) Reduce the number
of colors by adjusting the contrast (Image>>Adjustments>>Brightness/Contrast).
I only wanted to use two colors so I set
the contrast to +100. If you want to control
the number of colors in the image, you can
save the image as a gif file and choose
the number of colors.


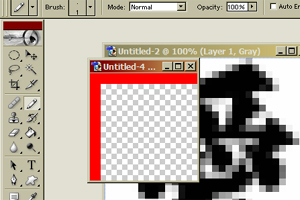
6) Next, make a grid
to separate the stitches. First open a new
image that measures 10 pixels by 10 pixels.
Draw two lines with the pencil tool as shown
(zoom in as needed). Choose a color that
can be seen well.
7) Select All (Ctrl
+ A) of the new 10 by 10 image. Define your
pattern using a name you will remember (Edit>>Define
pattern).
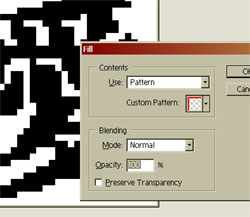
8) Return to the image
you are making into a chart. Make a new
layer and fill that layer with the pattern
(Edit>>Fill).
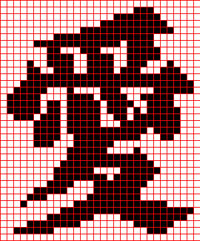
9) You're done! Save
the final image as a gif file and print
it out or work directly off your computer.
Happy knitting.